Wednesday, December 24, 2014

Origin Story: Kid's Bedroom Remodel

So here it is Christmas Eve.  Kids awake at 6 am (not bad in our opinion), excited to start the Christmas festivities.  This is our first year at home during the holidays so we have a week-long extravaganza of Christmas awesomeness scheduled as we host relatives excited to spend the holidays with us.  We like to keep Christmas pretty low key and simple around here so today we are opening gifts that were mailed to us and keeping track of what time it is by spreading various, scrumptious appetizer foods throughout the day such as breakfast flatbread, roast beef sliders and spicy-rubbed chicken wings.  YUM.

So what do two, renovation crazy people decide to do right at Christmas, preparing for lots of visitors and expecting baby #3 in 4 weeks or so?  This.

Considering just a week ago we were still in a project-break around here a lot has changed.  We jump into new projects for a variety of reasons:  necessity, boredom, extensive planning, etc.  Ripping out E's walls and putting in new insulation and drywall have been on our necessary list from day one of buying the house when the room looked like this.

We we first moved in, I was 9 months pregnant with F and we were already overwhelmed with the work we wanted to do before moving trucks appeared- mainly painting all the white walls in the house (which is SO much easier to do before you are moving furniture) and replacing the flooring in the two kid's rooms.  Ripping out walls at this time was not a high priority so we decided to put it off a bit.  We spruced up the room with new flooring (really inexpensive linoleum tiles), painted walls and trim and a new ceiling light/fan.


Over the next two years, we could tell that the walls had minimal insulation as proven by the extreme temperature changes felt in there.  Or the insulation is fine and a ghost is inhabiting the room...  We also were concerned by sounds of mice running through the walls in what must have been a dream play land for them.  Other projects came up such as the bathroom remodel that took precedence so the room kept getting put off.  Despite that, I collected ideas from magazines for the room.

This was my first plan- an idea from This Old House but it is hard to pull the trigger of the expense of built in beds that then stay with the house.

I found this in Country Living last month and was obsessed with the metal beds.
Flash forward to about a week ago when I discovered a twin bed that I couldn't walk away from at my favorite shop Adourn, located in Chatfield, MN.  I had been keeping my eye out for twin metal bed frames to put in the room so E and F could share the room and baby #3 could move into the nursery room.  Finding a wood bed was not in my plan but after driving away, a quick phone call to Andy convinced me to turn around like a crazy person and buy the damn bed.  Love at first sight.

Adourn purchase- you can see the footboard behind the headboard at the bottom of the picture.
Bed in car, the project was finally in full swing but we had to decide if we would go ahead and deal with the walls at this point or just leave them as they were, put in two beds and fix the walls later.

Andy was charged with creating a budget so we could decide what direction to go.  Andy hates that I have him do this but I really have no clue how much things will cost- even with all the renovations we have done.  For example, I was expecting something around $350 for insulation and drywall so when he came back at $750 I almost shit a brick.  Next step of the bid process is going over every line item and me nickel and diming or questioning every choice.  Marriages are broken up over stuff like this but luckily we got through it.  Scaling down his original lighting plan and deciding to reuse the current trim, we worked the budget down closer to $550.  Still painful right at Christmas time especially considering would would need to buy one more twin bed as well as mattresses.  After creating a pro and con list of the project, we decided to go ahead with it.  What put us over was the fact that he would have 2 weeks off of work as well as family visiting that could lend a hand so hopefully we can get it finished quickly.  Haha... famous last words probably.

Project a go, I took a day to visit some antique stores and Habitat ReStores in Winona and Lacrosse.  I couldn't believe it when I stumbled on a head and foot board at the first store I walked into (minus the pre shopping stop at a donut shop)- the Winona Habitat Restore.  It was the right size and a similar style to the bed from Adourn plus it was $10!


The bed did not have a frame with it but I was pretty confident Andy could make something work and at $10 I was willing to give it a try.  A few more stops in Lacrosse netted me some chalk paint (Esther picked out a pretty light pink) and stripper for $25 so I could refinish it.  $35 total at this point-  a huge steal and a big help to the final budget!
Side by side beds- bed on the right needs to be painted still
So we are a "Go For Launch" and now that Andy has starting ripping out the walls, too far to turn back now.  As you are visiting with family, opening gifts, feasting on meats, sides and pie or resting after Christmas check back to follow our progress as we work on "Project Kid's Room 2014!".  Our goal is to put up quick updates daily (we may even try our hands at Vlogging).  Happy Holidays!

Friday, August 16, 2013

ReStore-ing the Master Bath

Anyone who has tackled any sort of restoration project in their home knows budgets can get out of control really fast.  We save a lot of money by doing all the work ourselves and borrowing tools when we can but costs always seem to pile up fast.  One of our money saving tricks without compromising quality is purchasing items from a ReStore.  I learned about the Habitat Humanity ReStore a few years ago and am now obsessed!  Basically, ReStores are nonprofit home improvement and donation stores for building materials, furniture, appliances and odds and ends.  I have seen anything from lighting to tiles, french doors, toilets, trim, stoves, cabinetry, dressers and dining sets.  Most items are "gently" used but sometimes a retailer will donate new items that they have an overstock of.  All the proceeds of the ReStore go back to Habitat for Humanity who help build homes in the community.

Most people know that I HATE bargain bin shopping- even more now that I have kids- but I don't mind the ReStore too much because they are usually organized pretty well and I usually find something to take home for a great price.  Even so, I have to gear up before I go into one with the kids because 2 normal children turn into 2 octopuses with 8 arms each grabbing everything within reach.  F gets strapped to me in the Ergo carrier and E goes in the stroller.  Still, we usually manage to knock over a display of doors or rearrange the knob bins while we are there.

Now with any kind of resale shop, you never know what they have at any given time until you get there.  I always keep a list of things we are looking for at any given time with measurements.  Right now, my list includes several light fixtures, shutters, exterior doors and storm doors.  Whenever I am in a town with a ReStore, I try to pop in and see if I find anything on my list.  In the past year, we have found several great items that have found their way into our remodeling projects.  Top of my list for the past year has been a white vanity sink for the master bath.  Currently, the sink has this 70s-beige disco thing going:

Actually, disco is even too nice.  It has a 70's-beige old person feel to it.  We knew from day one the bathroom needed a quick, inexpensive update so I have been looking for a new sink to replace the beige. On a trip to the ReStore in La Crosse a few months ago, we found this gem:
I loved the square shape of it and simple lines of the sink.  We ended up getting it for free because there is a crack down the left side of it.  Since it was free, we decided to take it and see if we could repair the crack- it is long but not deep.  I think the crack could have been fixed but the sink was not as large as the current one so Andy would have had to build a new vanity for it to sit on.  Doable but more time we don't have, so back to the drawing board.  (You may see this sink later though in another project because I still love it).

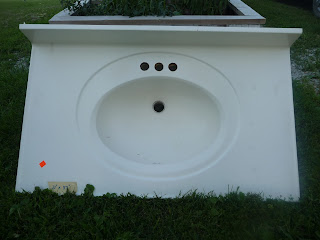
Last week, I was visiting family in Chicago so I stopped by the ReStore in Aurora, Illinois.  I love this ReStore because it is HUGE and has a ton of stock.  I hit pay-gold, finding 2 white sinks both the right size!!  (Imagine nerdy mommy dance in the middle of the aisle with F hanging on in the Ergo and E getting hangry in the stroller **hangry is our term for irrational anger due to hunger).  One was a shiny white; the other matte white.  After a quick call to Andy at work, we choose the matte finish.  Best part- the sink was $25 (and the money then goes to Habitat)!
After squeezing my new sink in the back of my Subaru, I was re-invigorated and determined to find a faucet.  I took a quick peek at the big-box home improvement websites and saw their basic faucets started at $30 and were really generic looking.  So, adding a faucet to my ReStore list, I decided to move on.  Luckily, since we have so many projects going, we are not in any huge rush to get started on the bathroom update- we figure when we find the pieces we need, we will get started.  After an unsuccessful stop at the Addison, Illinois ReStore, I headed back home.  A week later, we found ourselves back in La Crosse for some hiking and came across this gem:
I LOVE the double white handles and square faucet shape.  Can you see the price tag?  $15!! Money much better spent than the generic $30 new ones.  A good scrub with CLR and....
...so shiny you can see my camera in it!
So, now that we have all our pieces, I have Andy pulling the old sink off so he can put the new one on (I am hearing grumblings of glue...).  Also, we are setting aside our old sink and faucet to donate next time we are at a ReStore to help Habitat for Humanity continue to build homes for those in need.  The only thing I haven't found for the bathroom yet is a vanity light so if anyone sees a good one, send it my way!