Wednesday, December 31, 2014
Kid's Attic Renovation Update: Sealing up the gaps and putting up the walls
Monday, December 29, 2014
Kid's Room Demo Electrical Update Vlog
Almost a week into the kid's room project and demolition is done. Andy has scraped all the walls down, removing newspaper from 1901 and is starting electrical work.
Vlog post number 2 for us and after days and DAYS of wrestling with our Mac, Blogger and YouTube I think I finally have figured out how to get these uploaded straight to our blog site. Now the real trick will be is I can replicate all the steps again...
Vlog post number 2 for us and after days and DAYS of wrestling with our Mac, Blogger and YouTube I think I finally have figured out how to get these uploaded straight to our blog site. Now the real trick will be is I can replicate all the steps again...
Wednesday, December 24, 2014
Origin Story: Kid's Bedroom Remodel
So here it is Christmas Eve. Kids awake at 6 am (not bad in our opinion), excited to start the Christmas festivities. This is our first year at home during the holidays so we have a week-long extravaganza of Christmas awesomeness scheduled as we host relatives excited to spend the holidays with us. We like to keep Christmas pretty low key and simple around here so today we are opening gifts that were mailed to us and keeping track of what time it is by spreading various, scrumptious appetizer foods throughout the day such as breakfast flatbread, roast beef sliders and spicy-rubbed chicken wings. YUM.
So what do two, renovation crazy people decide to do right at Christmas, preparing for lots of visitors and expecting baby #3 in 4 weeks or so? This.

Considering just a week ago we were still in a project-break around here a lot has changed. We jump into new projects for a variety of reasons: necessity, boredom, extensive planning, etc. Ripping out E's walls and putting in new insulation and drywall have been on our necessary list from day one of buying the house when the room looked like this.

We we first moved in, I was 9 months pregnant with F and we were already overwhelmed with the work we wanted to do before moving trucks appeared- mainly painting all the white walls in the house (which is SO much easier to do before you are moving furniture) and replacing the flooring in the two kid's rooms. Ripping out walls at this time was not a high priority so we decided to put it off a bit. We spruced up the room with new flooring (really inexpensive linoleum tiles), painted walls and trim and a new ceiling light/fan.


Over the next two years, we could tell that the walls had minimal insulation as proven by the extreme temperature changes felt in there. Or the insulation is fine and a ghost is inhabiting the room... We also were concerned by sounds of mice running through the walls in what must have been a dream play land for them. Other projects came up such as the bathroom remodel that took precedence so the room kept getting put off. Despite that, I collected ideas from magazines for the room.
Flash forward to about a week ago when I discovered a twin bed that I couldn't walk away from at my favorite shop Adourn, located in Chatfield, MN. I had been keeping my eye out for twin metal bed frames to put in the room so E and F could share the room and baby #3 could move into the nursery room. Finding a wood bed was not in my plan but after driving away, a quick phone call to Andy convinced me to turn around like a crazy person and buy the damn bed. Love at first sight.
Bed in car, the project was finally in full swing but we had to decide if we would go ahead and deal with the walls at this point or just leave them as they were, put in two beds and fix the walls later.
Andy was charged with creating a budget so we could decide what direction to go. Andy hates that I have him do this but I really have no clue how much things will cost- even with all the renovations we have done. For example, I was expecting something around $350 for insulation and drywall so when he came back at $750 I almost shit a brick. Next step of the bid process is going over every line item and me nickel and diming or questioning every choice. Marriages are broken up over stuff like this but luckily we got through it. Scaling down his original lighting plan and deciding to reuse the current trim, we worked the budget down closer to $550. Still painful right at Christmas time especially considering would would need to buy one more twin bed as well as mattresses. After creating a pro and con list of the project, we decided to go ahead with it. What put us over was the fact that he would have 2 weeks off of work as well as family visiting that could lend a hand so hopefully we can get it finished quickly. Haha... famous last words probably.
Project a go, I took a day to visit some antique stores and Habitat ReStores in Winona and Lacrosse. I couldn't believe it when I stumbled on a head and foot board at the first store I walked into (minus the pre shopping stop at a donut shop)- the Winona Habitat Restore. It was the right size and a similar style to the bed from Adourn plus it was $10!


The bed did not have a frame with it but I was pretty confident Andy could make something work and at $10 I was willing to give it a try. A few more stops in Lacrosse netted me some chalk paint (Esther picked out a pretty light pink) and stripper for $25 so I could refinish it. $35 total at this point- a huge steal and a big help to the final budget!
So we are a "Go For Launch" and now that Andy has starting ripping out the walls, too far to turn back now. As you are visiting with family, opening gifts, feasting on meats, sides and pie or resting after Christmas check back to follow our progress as we work on "Project Kid's Room 2014!". Our goal is to put up quick updates daily (we may even try our hands at Vlogging). Happy Holidays!
So what do two, renovation crazy people decide to do right at Christmas, preparing for lots of visitors and expecting baby #3 in 4 weeks or so? This.
Considering just a week ago we were still in a project-break around here a lot has changed. We jump into new projects for a variety of reasons: necessity, boredom, extensive planning, etc. Ripping out E's walls and putting in new insulation and drywall have been on our necessary list from day one of buying the house when the room looked like this.
We we first moved in, I was 9 months pregnant with F and we were already overwhelmed with the work we wanted to do before moving trucks appeared- mainly painting all the white walls in the house (which is SO much easier to do before you are moving furniture) and replacing the flooring in the two kid's rooms. Ripping out walls at this time was not a high priority so we decided to put it off a bit. We spruced up the room with new flooring (really inexpensive linoleum tiles), painted walls and trim and a new ceiling light/fan.
Over the next two years, we could tell that the walls had minimal insulation as proven by the extreme temperature changes felt in there. Or the insulation is fine and a ghost is inhabiting the room... We also were concerned by sounds of mice running through the walls in what must have been a dream play land for them. Other projects came up such as the bathroom remodel that took precedence so the room kept getting put off. Despite that, I collected ideas from magazines for the room.
 |
| This was my first plan- an idea from This Old House but it is hard to pull the trigger of the expense of built in beds that then stay with the house. |
 |
| I found this in Country Living last month and was obsessed with the metal beds. |
 |
| Adourn purchase- you can see the footboard behind the headboard at the bottom of the picture. |
Andy was charged with creating a budget so we could decide what direction to go. Andy hates that I have him do this but I really have no clue how much things will cost- even with all the renovations we have done. For example, I was expecting something around $350 for insulation and drywall so when he came back at $750 I almost shit a brick. Next step of the bid process is going over every line item and me nickel and diming or questioning every choice. Marriages are broken up over stuff like this but luckily we got through it. Scaling down his original lighting plan and deciding to reuse the current trim, we worked the budget down closer to $550. Still painful right at Christmas time especially considering would would need to buy one more twin bed as well as mattresses. After creating a pro and con list of the project, we decided to go ahead with it. What put us over was the fact that he would have 2 weeks off of work as well as family visiting that could lend a hand so hopefully we can get it finished quickly. Haha... famous last words probably.
Project a go, I took a day to visit some antique stores and Habitat ReStores in Winona and Lacrosse. I couldn't believe it when I stumbled on a head and foot board at the first store I walked into (minus the pre shopping stop at a donut shop)- the Winona Habitat Restore. It was the right size and a similar style to the bed from Adourn plus it was $10!
The bed did not have a frame with it but I was pretty confident Andy could make something work and at $10 I was willing to give it a try. A few more stops in Lacrosse netted me some chalk paint (Esther picked out a pretty light pink) and stripper for $25 so I could refinish it. $35 total at this point- a huge steal and a big help to the final budget!
 |
| Side by side beds- bed on the right needs to be painted still |
Monday, December 8, 2014
The L Word
Since moving from the Chicago suburbs to our little farm in rural Iowa, we have encountered many problems that are new location specific such as learning when the power is out, the water is out as well (that means no toilet flushing too)! Andy and I have enjoyed sharing our unique adventures as we navigate our new environment but today's post is not rural specific but something every mom will be able to relate to: Lice. Yes, I said it. I admitted it. We had it. A month ago, I got the dreaded call from another parent- clearly hiding in a closet and whispering with embarrassment- that her daughter had lice and we were possible exposed, like a case of anthrax. I laughed and said it was no big deal and went about my business. Four days later, on a typical morning preparing E for preschool I noticed she was scratching her head. I sat her down to do a check and quickly found a few live bugs. Ew, but I knew it is an inevitability of life with children (especially with a little girl who insists on growing her hair out to have an Elsa braid) so I quickly called preschool to inform them that E would be staying home, left a message with the doctor's office to find out what I should treat with and called my mom to laugh over the way my morning was turning. Growing up with three sisters during the sudden fad of costume shop parties, we had experienced our fair share of lice outbreaks in our house. I remember having it once; my younger sister was not as fortunate and claims she had it six times. I have a vivid memory of my mom crying in the dining room while she cut off my sister's waist-length hair in an attempt to contain the outbreak. I knew my mom was very experienced, so I dutifully wrote down the instructions she gave on how to clean the house- basically put everything that is fabric or soft in a garbage bag and then wash everything. Again, at this point I was kind of laughing the whole thing off and not getting too worked up about it. My mom, on the other hand was experiencing some PTSD-style flashbacks about the whole thing.
As I was busy bagging up all of our belongings, the nurse on call from the doctor called me. She clearly had been through the whole ordeal in her house and gave me further instructions- wash everything in HOT water with bleach, quarantine everything that can't be washed in garbage bags for two weeks, vacuum obsessively and wash the hair of the bug-infested child plus everyone else in the household with Nix. Treat with Nix on day 1, don't wash on day 2, shampoo for the next 7 days then repeat. Don't use conditioner. Didn't sound too complicated to me, though I was a little tentative about using pesticides on my children as well as myself, being 7 months pregnant. I was also not thrilled with the thought of having to shampoo my hair for 14 days. I have curly hair and only use shampoo once a week and condition every day. After confirming that the Nix would be ok for all, I ran to the store and dropped nearly $100 on the treatment, bleach, new pillows, more laundry detergent and other cleaning essentials.
Once we got home, I dutifully followed the package instructions and treated the kids' hair while they chilled in the tub. Andy and I each did our hair that night and had a good laugh thinking about a line in "Whip It" when Kristin Wigg is describing using the "special shampoo" on a micro critter issue in a another region and not feeling so special. I felt much better knowing we had CONQUERED this inconvenience. Oh, silly Megan. I sat E down and used the useless comb that came with the Nix to try to pull out nibs- the lice eggs. An hour and half later, I had found a couple live bugs. Panicked, I checked the Nix instructions and read that it can take up to 12 hours for all the bugs to die so I wasn't too worried. Again, final last words.
Flash forward 24 hour later, 4 1/2 combined hours of meticulous combing and I was still finding a couple live bugs in E's hair! I called the doctor's office to find out what I should do next and was given no help- Nurse on duty: "Humm... I don't know. Call the Walmart pharmacy". A call into Walmart netted me with a helpful employee who read me the instructions on the box. She recommend doing another treatment. I was less than thrilled to be pouring yet another round of chemicals on my 4 year old's hair but I wanted to bugs gone more.
Flash forward 2 days. E had now missed her whole three day week of preschool, our washer and dryer had been running non stop for 4 days and I was starting to get twitchy when I would watch a show and see two cast members hugging wondering if they were passing lice. It was a low point. I had spent around 4 hours daily combing E's hair in the morning, afternoon and evening pulling nibs and looking for live bugs. After two treatments of Nix, I still found two bugs every time I did her hair! At this point, I have done so many internet searches on lice treatments and house cleaning techniques that I am officially a crazy person. About half the websites say there is really no reason to clean obsessively, just throw bedding in a hot dryer; the other half of the websites say to move house and leave all your belongings (including lice-infested child). Poor E was really good about the whole thing- sitting still for hour and half chunks as I combed her hair (with the little blue lice comb that I had come to hate) and tolerating the shower cap I made her wear in an attempt to not spread live bugs.
So how did I finally get rid of it? The Nuvo method. On one of my internet searches on Nix alternatives, I stumbled across the Nuvo method which was created by a Californian doctor and published in a research study in 2004. Go to his website here for step by step instructions. Basically, the method is to suffocate the beasts using Cetaphil Gentle Skin Cleanser. You coat the hair with Cetaphil, blow dry the hair and then leave on for 8 hours. After washing out, all previously live bugs will have suffocated. Repeat in a week and then again in a week to suffocate any newly hatched bugs and end the cycle. According to his website, it is unnecessary to bomb your home- just clean the infected party's bedding at the same time as treatment or just put in a hot dryer.
I purchased the super-size bottles of Cetaphil on Amazon, a nit comb guaranteed to snag the impossibly small eggs that were making my Lasik-perfect eyes go blind, plus some plastic squeeze bottles. After reading the directions yet again, I set off to make bug killing history. I will say- this is not for the faint of heart. It is MESSY and time consuming. Think home hair dye done by the most neurotic person on the planet. Basically, you squeeze the cleanser back and forth at the root, making sure you are always touching the scalp until you have gone through 1-2 full plastic squeeze bottles of the stuff and have gone back and forth over the hair up and down, side to side 4 times. It was literally dripping from E's hair by the time we were done. After this, you then comb and comb and comb until you have combed out all the excess. They don't tell you on the website that this is actually more messy than step one because each time you run the comb through the hair you have a comb dripping with cleanser that you then have to wash off or wipe into a towel. After using 3 combs (starting with a large tooth one, stepping down to small tooth and ending with the nit brush that was as magical as Amazon claimed) I had saturated 2 full size towels with what looked like a teenage boy's idea of a good night in.
Step three was blowdrying. Since at this point my hands were now useless, Andy stepped in to blow-dry E's hair. Her hair looked pretty normal- just a little more stiff than normal. She slept with the stuff on and the next morning we washed it out.
Though the Nuvo method claims you don't have to pull out nits- that's why you repeat the treatment twice- I still combed out E's hair once a day to make sure we were making progress. The new nit comb I bought worked so much better than the blue combs that come with Nix and made the brushing process go much faster. The blue combs don't actually pull out anything but just help you separate the hair; the new comb I got will actually pull out the nibs if you work in small enough sections.
Bottom line, after two more treatments of Cetaphil I can confidently say that we are past this infestation. I am not dumb enough to think that one of our kids will never bring it home again but I now feel a lot better knowing a non-toxic treatment that actually works. Don't waste your money and time on Nix people. It doesn't work (after one of my research stints I found out that the damn bugs are becoming pesticide resistant) and it ruins your hair and scalp. I have also learned that it isn't necessary to wash every piece of fabric in your home in bleach on hot water- a spin in a hot dryer does the trick just fine. (I constantly threw winter hats and coats straight in the dryer after we would come inside just to be safe). Finally, I have learned that men are useless when it comes to this sort of thing and have no idea how to finely check a person's hair for lice or nibs. Sorry Andy, it's the truth.
So mothers out there- no matter what landscape you live in- when one of your children inevitably brings lice into your home relax, buy gallons of Cetaphil and a new movie to watch during treatments and pour yourself a large glass of wine. We will get through this together.
Thursday, December 4, 2014
The Annual Report
It has been 2 1/2 years since we moved into our 1800s farmhouse updated with 1970s "charm". When Andy and I house hunt (this is the second home we have bought and remodeled), we look for overall features we like that are harder to change- number of bedrooms/bathrooms, floor plan, location and overlook cosmetic issues that can be fixed "easily" or over time. Between Andy's construction experience and my creativity, we feel confident buying fixer-uppers. This house was perfect for us because it provided the location, land and outbuildings that Andy wanted and gave us many things to improve without (hopefully) getting our heads too underwater. When looking at fixer-uppers, it is really important to dig into the house a bit before jumping in to make sure you aren't getting into a bigger project than you can handle. Surprises always come up (like the well deciding to stop working the day after we moved in!) but you can prevent a lot of stress and headaches by looking at the bones of a house before you buy. With Andy's experience, he can confidently make a yes or no assessment but if you don't have this handy tool with you, find a trusted friend, contractor or home inspector to give you the low-down.
Though the home was originally built in the 1800s (we found newspaper insulation in the bathroom dated 1895), it was updated in the 1970s. Though this update unfortunately removed most of the original farmhouse charm, it did update plumbing, electrical and insulation. More recently, major systems like heating and septic were updated. This made us confident that as we torn into walls and floors, we would need to do minimal fixing of these more expensive things.
So, 2 1/2 years later, here is some of the progress we have made and some things we would still love to do.
Exterior Before:
 Exterior Progress:


What we have done:
Porch Before:
 Porch Progress:

Things we have done:


Things we have done:


Things we have done:


Things we have done:


Things we have done:


Things we have done:


Though the home was originally built in the 1800s (we found newspaper insulation in the bathroom dated 1895), it was updated in the 1970s. Though this update unfortunately removed most of the original farmhouse charm, it did update plumbing, electrical and insulation. More recently, major systems like heating and septic were updated. This made us confident that as we torn into walls and floors, we would need to do minimal fixing of these more expensive things.
So, 2 1/2 years later, here is some of the progress we have made and some things we would still love to do.
Exterior Before:

- Removed the old siding on 2nd floor and put in board and batten
- Painted upper board and batten (Raindance by Benjamin Moore color-matched by Sherwin Williams) and lower siding (Rushing River by Benjamin Moore color-matched by Sherwin Williams)
- Removed chimney on left side of house
- Ripped out and rearrange garden beds
- Created a gravel walkway and widened the driveway
- Removed (by accidental fire) the garage and prepped area for seeding
- Painted deck with Behr Deck Over
Things we plan to do:
- Take out the entrance concrete stairs on south side and replace with a larger deck
- Add shutters to front windows
- New gutters

Things we have done:
- Built-in storage
- Painted all walls and trim white
- Removed coat hooks
- Painted ceiling blue (Flint Smoke by Behr)
Things we plan to do:
- Repair all screens
- Replace light with fan/light
- New door from interior to exterior
- New exterior door
Kitchen Before:

Kitchen Progress:
Things we have done:
- Removed curtains
- Painted ceiling white
- Painted walls (Flint Smoke by Behr)
- Painted cabinets (Spanish Olive by Glidden)
- Painted handles black
- Removed paint from hinges (previous owners had painted all 30 of them faux wood!)
- Replaced light (can't see it here but we got a great one!)
- Replaced fridge (took this from our old house)
- Replaced stove (took this from our old house)
- Painted all trim and windows white
- Painted doors (Natural Linen by Glidden)
- Removed carpeting and painted stairs
Things we plan to do:
- Rip-up linoleum and refinish hardwood (we hope is still under)
- Tear down wall leading to dining room and move stove
- Build a peninsula or island
- New counter tops (thinking wood or concrete...)
- New blackspash (hard to see but the blacksplash now just continues from the counter tops)
Dining Room Before:

Dining Room Progress:
Things we have done:
- Painted ceiling white
- Painted walls blue (Flint Smoke by Behr)
- Took down blinds
- Painted trim and windows white
- Painted door (Natural Linen by Glidden)
Things we plan to do:
- Open up wall from kitchen
- Rip-up linoleum and replace with hardwood same type as under kitchen floor
- New light fixture
- Bigger Ideas: Expand 4-6 feet to south side (big wish)
Living Room Before:

Living Room Progress:
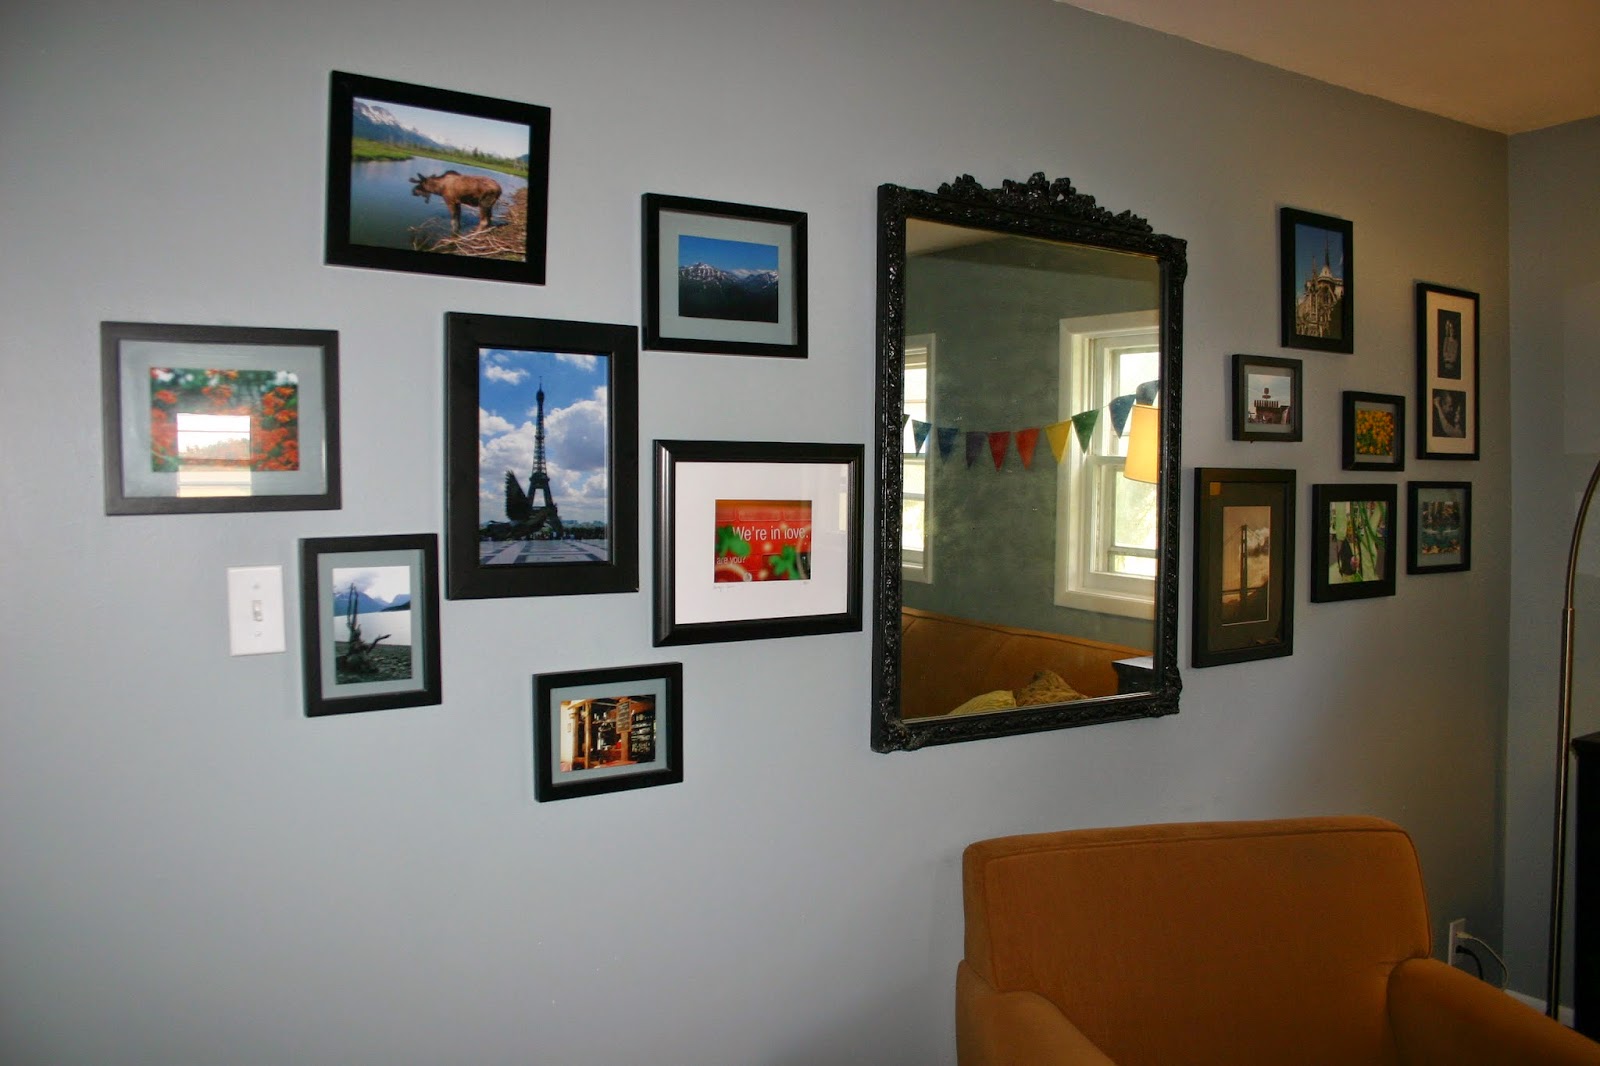
Things we have done:
- Painted ceiling white
- Painted walls blue (Flint Smoke by Behr)
- Took down curtains
- Replaced ceiling fan (the new one is a flat black)
- Tore up carpeting and refinished hardwood floors
- Painted trim and windows white
- Replaced beige outlets with white
Things we plan to do:
- Widen doorway from kitchen
- Build built-ins for TV and DVD storage
Kids' Playroom Before:

Kids' Playroom Progress:
Things we have done:
- Painted ceiling white
- Painted walls taupe-ish color (Puddle by Behr)
- Took down curtains
- Replaced light
- Tore out carpet and replaced with hardwood
- Painted trim and windows white
- Removed door from living room to playroom
- Replaced beige outlets with white
Things we plan to do:
- Put in a double sliding door to deck
Master Bedroom Before:

Master Bedroom Progress:

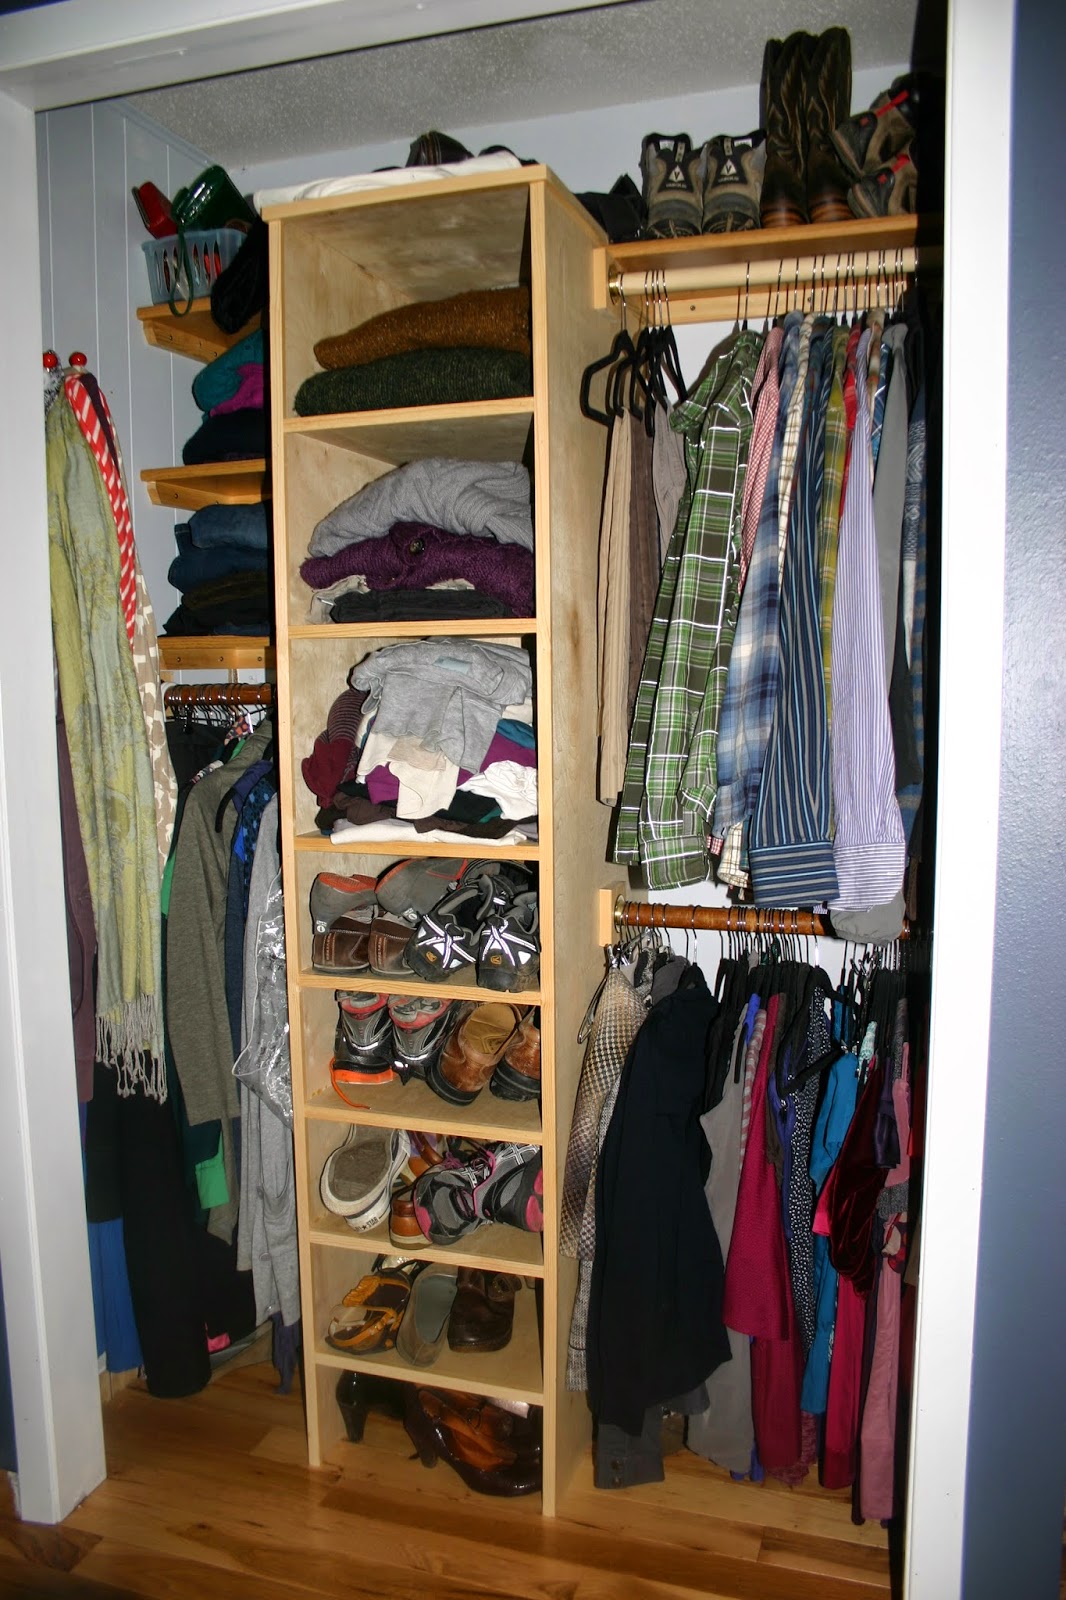
Things we have done:

- Repainted walls (after originally painting them a different color) (Blue Grey Slate by Glidden)
- Painted ceiling white
- Tore out carpet and installed hardwood floors
- Built a cube-style bookcase
- Replaced beige outlets with white
- Painted trim, doors, windows white
- Built a new closet organizer and removed bifold doors
Things we plan to do:
- New ceiling fan


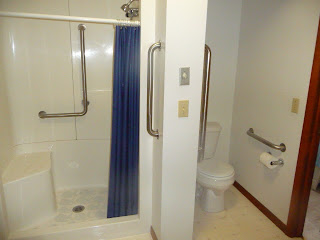
1st Floor Bathroom Progress:
Things we have done:
- Painted walls purple/grey color (Milestone by Behr)
- New ceiling light
- New shower curtain
- Removed some of the handicap bars
- Painted all trim and doors white
- Painted vanity (Puddle by Behr)
- Built a wood farm around existing mirror
- Replaced hardware on vanity and doors
- Replaced beige outlets with white
- Built shelves into the closet (originally just a clothing bar)
- Replaced vanity countertop
Things we plan to do:
- Replace light above mirror
- Bigger Ideas: tear out shower and do a larger tile enclosure with double shower heads, replace flooring
Laundry Room Before:

Laundry Room Progress:
Things we have done:
- Painted walls and ceiling white
- Replaced washer
- Tore out ceiling drywall to replace upstairs bathroom plumbing
- Moved and painted coat hooks from porch
Things we plan to do:
- Replace dryer
- Move utility sink next to washer
- Build built-in cabinet above laundry
- Build bench, cubbies and coat hooks on opposite wall of washer/dryer
- Paint trim/doors/windows white (EEP! Yes I claimed in a previous post that I was finished... this is truly the last remnants of unpainted trim in the house!)
- Tear up linoleum and refinish wood floor (**crossing fingers**) underneath
- Bigger Ideas: Build on an attached garage off laundry room and convert laundry room into a mudroom/laundry with door to garage
Upstairs Office/Craft Nooks and Hall Before:

Upstairs Office/Craft Nooks and Hall Progress:
Things we have done:
- Painted walls and ceiling white and green (Spring Cactus by Glidden)
- Made the stair wall a half wall
- Tore out closet for office nook
- Widened doorway to craft area
- Tore-up linoleum and painted wood floors
- Painted trim and doors white
- Built a quilting table and bookcase
- Replaced all lighting
- Replaced beige outlets with white
Things we plan to do:
Nothing comes to mind! Except perhaps replace the window in the quilt room eventually.
Nothing comes to mind! Except perhaps replace the window in the quilt room eventually.
2nd Floor Bathroom Before:

2nd Floor Bathroom DONE:


Things we have done:
- Complete renovation from framing out including new electrical, plumbing, flooring, window, tub, vanity, lighting, paint.
Things we plan to do:
DONE!!
DONE!!
F's Bedroom Before:

F's Bedroom Progress:

Things we have done:
- Painted ceiling (Arctic Ocean by Behr)
- Painted walls (Ancient Pewter by Behr)
- Moved ceiling fan from living room and painted hardware silver and put on new globes
- Tore out carpet and laid square tiles (classroom tiles)
- Painted all off-white trim/doors/windows white
- Built a closet organizer, painted closet floors and walls
Things we plan to do:
- Window coverings/blinds
- Convert this to the baby room with guest room bed
- Replace electric heater
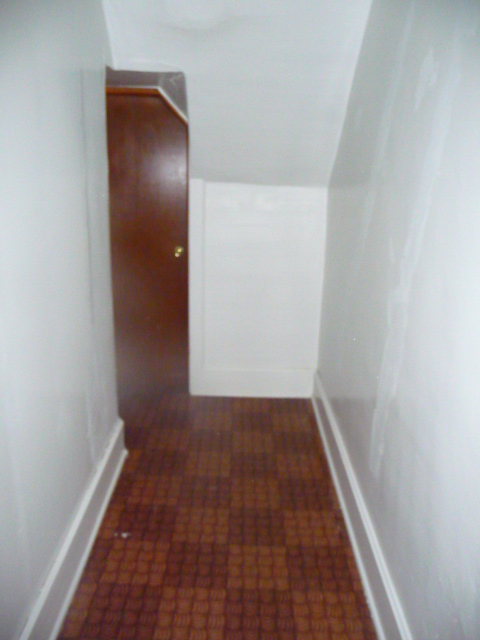
E's Bedroom Before:
 |
| This room is affectionately referred to as the "Hobbit" room because of the silly little door. When we first looked at this house, E immediately took a dive on the old cot still in the room. She got a good scrubbing in the tub that night... |
E's Bedroom Progress:


Things we have done:
- Painted white
- Painted walls (Phantom Mist by Behr and Memories by Behr on window wall)
- Put in new ceiling fan
- Tore out carpet and laid square tiles (classroom tiles)
- Painted all off-white trim/doors/windows white
- Put up removable, sticker-like flowers
- Replaced window
- Put up curtain
Things we plan to do:
- Tear out paneling and insulate and drywall
- Build bookcases in flat parts of walls
- Build built-in two twin beds on either side of window
- Build built-in wardrobe next to door
- Put in 2 dormer windows in slanted walls
Subscribe to:
Posts (Atom)