Tuesday, July 7, 2015

Another Room Off the List- Finished Kid's Bedroom

Three years ago, Andy convinced me to drive out to Decorah after a long day of teaching pubescent middle schoolers in St. Charles, Illinois to check out a house that just went on the market.  He had checked it out earlier that day with the realtor and was in love.  4 acres, lots of useable outbuildings and a house with "great potential".  After a 4 hour car ride with a 2 year old, I pulled into the drive, walked through the house with extreme trepidation while Andy pranced around gleefully with an expectant look on his face.  He almost had me until I made my way upstairs and stepped into the murder room.  Broken window, low ceiling, random floor covering and even a scary cot (which E proceed to immediately jump on).


Andy's puppy dog eyes got to me so despite my reservations, we bought the property knowing it was a fixer-upper but the upstairs bedroom would need immediate assistance to make it safe and livable for E.  Knowing they were only temporary fixes, Andy replaced the window, installed a fan and put in 12"x12" VCT commercial vinyl tile (a good flooring option that is cheap, easy to install and easy to maintain).  I gave the walls a fresh coat of paint and stuck flower wall decals on the walls.


It was a good temporary fix but we knew eventually we would need to replace the insulation and walls in the entire room.  Flash forward to this past winter:  With the imminent arrival of baby 3, we decided to dive into the project while Andy had 2 weeks off over Christmas.  We found some... unique things under the walls.
Wood siding under drywall

News clippings (this one from 1903) glued on the studs
But luckily, Andy was undeterred and soon had the room down to the studs.

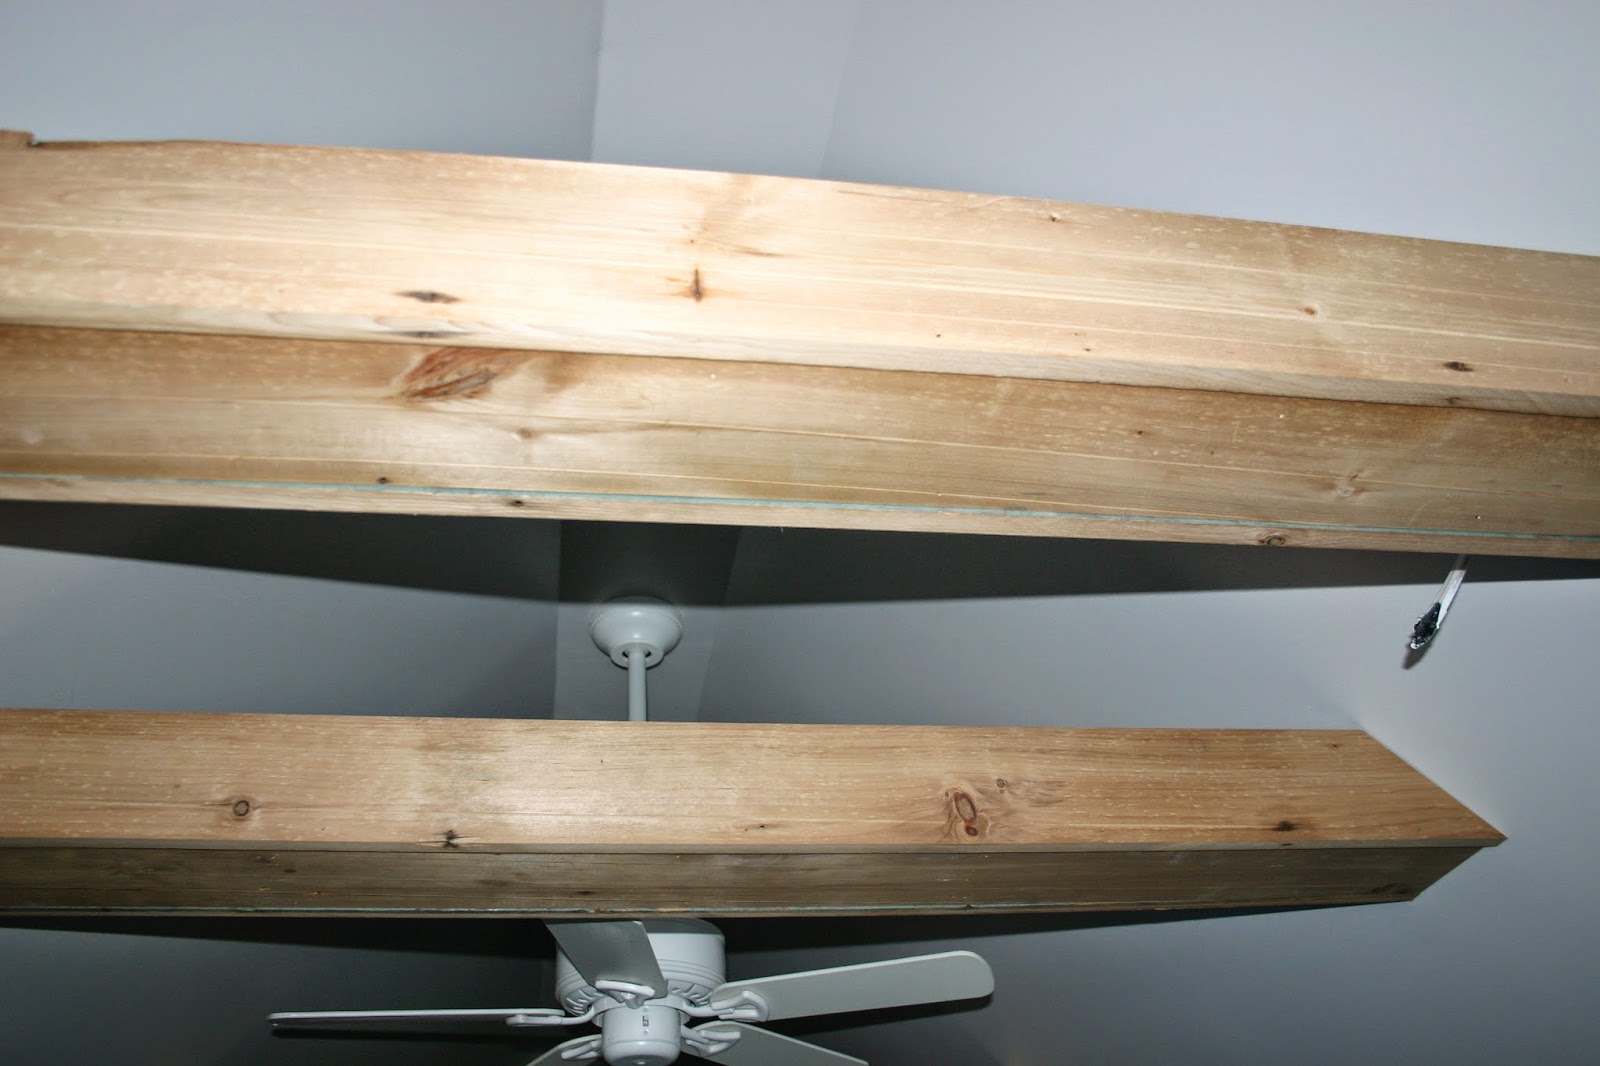
At this point, we decided to make the ceiling a loft ceiling, wrapping the supporting beams with the reclaimed wood we found under the drywall to give the room a rustic feel and make the room seem bigger and airier.

Best decision of all time and a huge improvement to the entire space.  Second best decision was hiring a professional to finish mudding and sanding the walls- he finished the day L was born so we were so thankful that this big job was finished before bringing a fresh baby home and having to worry about sanding dust in the house.

Running home while I chilled in the hospital with baby L, Andy got two quick coats of paint on the walls so we could move E and F's mattresses back into the room.  I am in a hot and heavy romance with this color- Shadowed Dapple Gray which is a Walmart color that I color matched in Glidden paint.  I have decided that this color is the answer to my white wall phobia- the perfect neutral color that makes the white trim work pop but makes a room look complete.  In the last couple of months, I have bought several gallons of this paint and used it to freshen up the laundry room and hallway leading upstairs.

After taking a few weeks off of the project, I painted all of the trim and Andy finished his custom lighting boxes and installed the fan- same fan we had before but with a longer drop to fall at the beams.

2 of the 4 lighting boxes Andy built in the beams
I did some custom furniture painting on an antique dresser and bed and shared details on those projects here, here and here.

Using more reclaimed barn wood, Andy built a door- a semi-tricky feat with one slanted wall to contend with.  He built it in the style of a barn door complete with barn hardware so I painted both sides in white and then gave it a distressed look with a sander.
New door- unpainted
Sanding the paint for a distressed look
Finished door


Finally, six months from the start of this project, I finished sewing two quilt tops for E and F's beds- starting with a fish fabric and the same pattern, I made a port hole effect using purples for E's quilt and greens/blues for F's quilt.  F calls it his "under the seas" quilt.  He is now requesting a "Wreck it Ralph" quilt.


The kids love their new room (perhaps a bit too much from all their wild antics after bedtime) and we notice a huge difference in heating/cooling throughout the room now that the room actually has insulation in the walls.  The fan helps keep the room cool in the summer and the in-wall electric heater unit is perfect on those cold nights.  Between the new bathroom and their bedroom, I think I might be kicking the kids out and moving upstairs.


And just in case you forgot where we started....

Crazy huge improvement.

Thursday, February 26, 2015

Reclaimed Wood Conversion

I never understood the love of beat up old wood being used in new projects. Don't get me wrong, I am a woodworker who loves the color, patterns, and and history of tight grain old growth timber, I just prefer it to be nicely milled, knot free and dimensionally stable. However, as of late, Megs has somewhat converted me. I am still only 50/50 just due to the amount of work it takes to reclaim and repurpose lumber, but the percentage swung quickly on this project.

During the tear out phase I encountered 3/4” thick, 6 1/2” wide shiplap boards all along the walls, just behind the paneling. They were half painted, half raw boards, some that spanned the full 15’ long walls.  

As in most old, dry walls I figured they would just disintegrate while being removed but with just the slightest of care I was able to pull them right off the walls using the ol’ hammer/ crow bar technique and pass them out the window. At this point I had no idea what I was going to do with these boards but they seemed in decent enough shape to use for something else around the farm.

The next morning I showed Megs the shape they were in and she was immediately excited about the possibilities. We later discovered that the collar ties needed to stay in the room for support so I hatched a plan. What if I was to double up the collar tie supports and wrap them in the wood from the walls to make them look like beams? Megs liked it so ahead we forged. 

The next issue was what were were going to do about the current finish on the boards. There was no way I was just going to slap up those nasty old boards how they were. I grabbed a length of board and set forth figuring out how to refinish. In 6 sections I sanded with 40 grit, 40 then 120 grit, 120 grit, scraped, single pass through the planer, completely clean through the planer. Megs and I conferred and the clean pass through the planer yielded beautiful golden… hickory we think. 

With the path set, I now had to contend with the issue of planning down a couple hundred feet of boards in sub freezing temperature in a shop that isn't big enough to plane 15’ boards. Luckily on all fronts, my parents were visiting for the weekend and the weather jumped up to a balmy 30-ish degrees. My Dad and I set up a work station in the yard and got to work. 

I bought my planner second hand with a couple sets of knives and the last I used it was to plane down a bunch of rock hard hickory for Meg’s cutting board. I obviously burned the hell out of those blades because the first board we tried to run through for this project burned, chattered and took all my force to push it through. 

The look on my Dad’s face was one of concern. He asked the last time I changed blades, which made me laugh once I removed the actual bowed dull hunks of… I can't even call them blades. A fresh set changed in and we were off to the races, with some the smoothest planing I have ever done. 

It took 3 total passes to get one side cleaned up of me feeding and Dad catching and stacking. 

Post-Planing

We ended up with a pile of shavings big enough for me to fill the 5x10’ chicken coop about 2” deep… a lot of shavings! 


We packed up the temporary workshop just in time for a couple inches of snow to fall out of the sky.

A note about planing. Make sure you scour the boards for any metal before running it through the machine. Not only will it ruin your blade set and leave a poor finish, it can be dangerous to send flying metal projectiles through the air. Small metal detectors are available for this very process but I don't do enough of this kind of work to warrant one, so a handy set of pliers and quick hands to the off switch are my method.

After all the boards were cleaned up and ready, I set up my table saw and cut off the shiplap edges. I was able to get all of the beams wrapped choosing the best boards out of the stack we had planed and still have at least 100 feet of boards left over for the next project. I'm thinking the back “wall” of some mud room lockers where we can hang all of our coats and store shoes and accessories, but I think that project will be a bit down the road.

All in all I am really happy with how the beams turned out and it was worth the time in the end. 
(wires sticking out of walls are for lights that will be installed soon)


And a reminder of what we started with
The look is great and it is nice to be able to carry on the tradition of the house by reusing the old boards in a unique way. The custom light boxes I am building now also will feature this reclaimed wood and I am toying with building a custom entry door with the same. More to come on that soon!

Tuesday, February 10, 2015

$10 ReStore Find to Fabulous Kid’s Bed


Our most recent project- renovating E’s room was kicked into full swing after I stumbled on a fantastic twin bed from Adourn.  I couldn’t leave it behind and couldn’t bear to see it sit in the basement until we redid the room thus beginning our current construction project.

A couple of weeks after purchasing the first bed (which will be F’s), I took the kids up to Winona, Mn and Lacrosse, Wi for some antique shopping hoping to score another twin bed that would complement the one I had.  For the first time in my entire life, I hit gold at the first store I stopped in (after the obligatory stop at Bloedow’s Donuts):  The Habitat for Humanity ReStore in Winona, Minnesota.  I have expressed my love for these stores in a past post when we purchased a bathroom vanity top at one so I won’t get too gushy again but let me just say if you haven’t ventured into one, you are missing out!  It’s truly amazing some of the things you will stumble on at seriously unbeatable prices.  

So there I was, 9 months pregnant with two trailing kids, hands in pockets when I found a WHOLE RACK of bed frames!  After a quick look through, I found the trifecta:  right size, right style and right price ($10!!!).  

The bed did not come with the rails, only a headboard and footboard but I was confident that Andy would be able to Macgyver something up.

I knew that I wanted to paint the bed and decided to try some chalk paint.  I stopped by a craft store in LaCrosse and they had a limited selection of American Decor Chalk Paints.  After conferring with E, we choose a light pink color, Promise.  

I wasn’t 100% sure it would work with the color of F’s bed but decided to give it a go.  I also purchased a jar of American Decor Creme Wax to use for a top coat on the painted bed.  With a coupon I had, the two paint jars plus a big can of stripper came to $20.

Still carrying a Peterson spawn, I passed the job of stripping the old, glossy polyurethane off the bed to Andy.  

The big things to know about using stripper is to do it in a well ventilated space, use drop cloths around the space and apply the stripper liberally.  It’s a messy job but much easier than trying to get polyurethane off with a heat gun.  Using an old brush, Andy put a heavy coat of stripper on the whole headboard.  Right away, the polyurethane starting to bubble up.  Andy then used a scrapper to scrap off the old finish.  It took four coats of stripper to get everything off.  It is important once you are done with the stripper to let the wood rest overnight to dry out any stripper that has seeped into the now bare wood.  

After letting the wood dry, I used 220 and 100 grit sandpaper to sand off any remaining poly and even out the finish.  
Before sanding

Before sanding you can see some remaining globs of poly

It took several passes with the sandpaper and numerous squares of sandpaper but once it was done, the wood was bare and very smooth.  After a wipe down to remove dust, the bed was ready to be painted.

I followed the instructions on the American Decor Chalk Paint and applied two light coats of paint.  
One coat of paint
My between coats trick of saving the brush without cleaning or drying out. I throw the bagged brush in the fridge.

A quick fast forward through dry time and I wasn’t happy with the color.  It wasn’t an offensive color or anything but just kind of a… blah, non color… somewhere between pink and grey.  

Back to the drawing board, I choose a rose pink:  Faded Courtly Rose from Walmart’s color line color matched in Glidden Satin paint. 


I still wanted to try a chalk finish but can’t get chalk paints in town so I decided to make my own.  I found a few “recipes” online but decided on one from lowes.com- mostly because I could get all the ingredients around town.  The supplies needed were:

Latex Paint (I got a quart of satin finish)
Stir Stick
Mixing bucket (I bought an empty quart paint can from the hardware store)
Plaster of Paris
Water

I mixed 1/3 cup of plaster of paris with 1/3 cup of cool water in the empty paint can and stirred until it was smooth.  


I then mixed in 1 cup of the latex paint and stirred it until it was completely mixed in.  

FYI- once I was done with it, I put the paint can lid on and stored it.  We used it again a couple of weeks later and all it needed was a quick stir and it worked great again!

Paint mixed, I applied two thin coats to the headboard and baseboard.  
one coat


two coats
When doing distressing, thin coats are best so the finish is smooth and it is easier to sand off paint to make a worn look.  Once the paint was completely dry, I used 220 grit sandpaper and sanded (with the wood grain) in areas that would naturally wear over time.  

My light pink paint snafu actually ended up being a good thing because the places that I sanded the rose pink paint then allowed the light pink paint to show through which really complemented the rose color.

After wiping away any dust, I applied the American Decor Creme Wax.  This is applied in thin coats with a clean, lint-free rag.  

If applied lightly, it dries in less than 30 minutes than can be buffed with another clean, lint-free rag to give it a little shine.  When I used this product on the kid’s dresser, I found that you could see rag strokes so it was better to rub with the wood grain and not in circles.  For furniture that will get a lot of use or might get wet/dirty, it is better to use a harder finish like a satin polyurethane.  

Andy installed casters to make the bed a bit higher so the footboard wouldn’t be sitting right on the ground.  Using salvaged metal bed rails and scrap wood, Andy built bed rails.  

When I bought the bed, I knew that I wanted to change the footboard a little to make it softer and to match the look of F’s bed.  Using this picture for inspiration, I drew a design on the bottom of the footboard so it would no longer be straight across.  To create a symmetrical design, I first marked the center of the footboard and used a ruler to create a straight line where the top of my design would be.

Starting at the center, I used my round quilting ruler to create the first round edge.  

If you don’t have a round ruler, do a scavenger hunt around the house for a circle object the size you want for the curve and trace it.  I then traced the curve and created a template to trace for the next curve section.

From here, I measured the space I had left- 10” and marked the middle (5”).  

I freehanded a curve from the edge to the top of my 5” mark and back down to the curve I had already created.  

I then traced this whole side on transparent paper, cut the curve then taped it to the other side of the bed and traced the curve.


Finished design
Unconfident in my jigsaw abilities, especially on a craved design I sent Andy out to the shop to cut the design out.  He used a jigsaw to trace my lines then buffed the edges.

Finally done, we put the entire bed together.


I love the sweet pink color and how delicate the bed looks with the decorated footboard.  Perfect for our girly 4 year old.  Together in the room, the two beds compliment each other beautifully in color and design.  The perfect mix of masculine and feminine in a shared bedroom.  I am in love and the kids are both thrilled with their grown-up beds.