Thursday, July 25, 2013

"I think I just hit a bear!"

Friday morning I was headed to work in the family Hyundai wagon. It is better on gas and even though I would prefer to drive my Subaru every day Megan insists, because she is frugal, no cheap is a better word.  I left the house about 7:15 and decided that because I didn’t have an early meeting that day I would take an alternate route to my normal choices of gravel roads or more gravel roads. The alternate route is all blacktop, as it’s called around here, and passes some really serene farmland. The journey is a few miles longer but the sun was shining, NPR was on the radio and temperature was perfect.
As with most secondary blacktop roads around here there is little to no shoulder…blacktop, 12” of gravel, 12” of “mowed” grass, the great Netherlands of Iowa, that’s the typical formula. As the road dipped and crested, twisted and turned I was enveloped with the happiness that only a good drive on a sleepy morning can give you. As I headed uphill towards one of the many farmhouses that dot the countryside I saw a bear sized raccoon in a full tilt spring breaking cover, and in one stride crossing the measly 2 feet of safety into my roadway. This bad boy neither looked concerned nor showed any signs of stopping, and all of this happened roughly 20 feet from the front bumper.
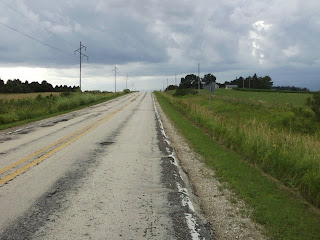
Scene of the animal attack, Farmhouse on right
I won’t bore you with a time and distance calculation, but hitting the breaks wasn’t even an option that my central nervous system was willing to entertain. My brain only formed S and H before I felt and heard the impact and the giant bastard was sent tumbling under my car. I finished the last two letters in my head and looked up into the rearview mirror just in time to see a trashcan can sized clump of fur spitting out all the plastic it had gathered while temporarily under my car.
Looking forward as I slowed, I realized that the farmhouse I had been approaching had a car at the end of the driveway waiting for me to pass so he could pull out. The driver witnessed the whole event and was sporting the classic eyes wide open, clenched fist in front of his mouth OOOOOOOHHH reaction. Seeing his expression instantly turned the situation humorous to me and I laughed out loud, not knowing the damage that had been done.  
Later that day, the quiet owner of the local body shop informed me I would need to replace the bumper, the grill, the splitter, both inner wheel wells, the air conditioning condenser and possibly the radiator; all told $1,524.64 plus tax. I took this news in stride already being assured by Allstate that animal “attacks” are covered under our comprehensive insurance policy. Bonus! No deductible and no increase in premiums… I feel like I’m in “Good Hands”.
I later relayed the story to my sister Jill, who is proud to be a city dweller and considers everything but manicured parks in Beverly Hills… “nature”. She was concerned if the beast had been killed or not. “Hell if I know, I wish so”, was my response. I wasn’t about to stop and check, because if it wasn’t killed by from the impact from a 1 ton car I surely wasn’t going to tussle with it. Truthfully, I’m unsure that if it came down do it I would have the raw strength to choke this thing out let alone fit my hands around is thick neck. Then in classic blasé fashion Jill asks “Don’t you have like, a gun in your car or something?
”WHAT!? No I don’t have a gun in car! They don’t issue you a gun to carry around in your car when you move to the country. Jeez-us…
With half a chuckle my sister scoffs “Well… I don’t know.”
Wednesday, July 24, 2013

Flowing Water = Happy Kids

We have several buildings on our four acres including a barn, silo, machine shed, several three-ways (lean to's) and two closed buildings which were for livestock.  The largest of the closed buildings is being converted into Andy’s shop (I'm sure he will get on soon and bore excite you with his shop conversion).  When we first looked at the house, we decided  that the smaller of the closed buildings would be perfect for a kids’ playhouse.  (Dreaming of a tube slide coming out the top...)

Playhouse is on the left; Andy's shop on the right
 We are in the process of cleaning out the playhouse (our best find was an old outhouse toilet!) but meanwhile, we are creating some activities for the kids to play with around the exterior.  I'm thinking Children's Museum meets Green Acres.  So, our first project for the play area is a water wall.  I got the idea from this picture I found on Pinterest:  http://pinterest.com/pin/547961479631788990/

I have been collecting bottles for a week or so.  Andy brought home several wood pallets from work (7 of which we used for the compost bins) which I thought would make the perfect base.  The only purchase we had to make for the wall was tubing from the hardware store which came out to $5. 

The pallets are very splintery, so I used a trim router from Andy’s shop with a round-over bit  to smooth out the edges.


It’s not perfect, but it did take away the worst of the splintering on the edges.

These are the containers that I ended up having to work with:

Let's take a moment to notice how many water bottles and yogurt containers we have.  Go Petersons!

I tried to lay out my plan but the bottles kept moving and rolling, so I gave up and winged it.  I used screws to attach the bottles and clips to attach the hose.


I poked holes in some of the bottles for a strainer effect and cut holes in others to get the water to flow in different ways.  Getting the tubing to work was the hardest; I had to redo several of these.  I was most successful if I attached the bottle first, put water in it, then poked the hole for the tube where the water pooled most.  It’s not perfect, but I got the water to flow through all the tubes and bottles.

If my kids were older, I would have had them help with the project but right now, we would have been fishing screws out of Fs mouth the whole time and E would have insisted on “doing it herself” which would have resulted in a screwing disaster.  Also, I would have probably made the wall so the kids could change the bottles/tubes but right now, that is a bit out of their league.  Maybe in a few years… for now, they love it just as it is!
I realized it was too tall to pour from the top, so I grabbed a random stool from an outbuilding and a stump to make a natural-looking ladder.  The cans at the bottom were also left in outbuildings. 


While E was busy playing with her new wall, Andy cut up a large stump into steps and I placed them on the other side of the playhouse (after spreading mulch in that area).  E LOVES this!

Also notice the fence in the background which was another outbuilding find!
What ideas do you have for our Children's Garden?  I'm thinking pot and pan music wall and crawl-though vine-covered tube but what else have you seen at museums?  We are hoping to be the envy of our "neighborhood"!

Monday, July 22, 2013

Compost Wrap-Up

Andy: Megan was very proud of herself when I got home. She marched me right out to her pallet masterpiece, and the only thing I could think to say was… I think you are one pallet short; I will never learn. 

Missing a pallet me thinks!
She proceeded to sheepishly explain that the pilot bit had broken off, as if she had nothing to do with it. Sigh. After explaining, very condescendingly I might add, that a hardened HSS drill bit is not meant to incur lateral forces by inept newbies (Can’t help it, I’m an engineer), I told her it looked beautiful. She then informed me with a vague wave of her hand, that after dinner I would be adding finger quote “fronts”. After a delicious family dinner and adding the final pallet to the bin system I moved on to designing the removable fronts. 


Ready for fronts

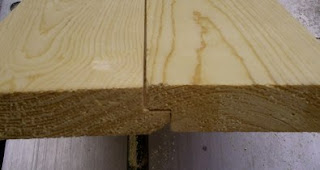
I dug through my mind of past designs I have seen and cross referenced my material supply; yes I think like this in my head. I thought this would be a perfect opportunity to use up some of the old 10" wide panel shiplap boards that separated the grain bunkers in the old grainery I was converting into my new shop. 


Shiplap style joint
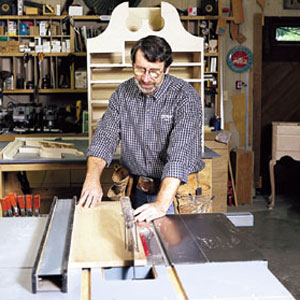
The pallets are 40” wide/ tall when stood on end so I rounded up as many lengths of pine 1x that I use to trim everything in the house and set to work cutting everything to size. As a time saver I ripped a piece of the 1x material to 7/8” wide, which is 1/8” wider than the thickness of the shiplap I would be using for fronts. This extra 1/8" would allow the front to side up and down easily while still maintaining a fairly snug fit.

This isn't me... just "some dude" demonstrating ripping

I lined up the first 1x to the front of the pallet and secured it with 4 – 1 ¼” exterior deck screws. This is the point where the speedy spacer comes in that I ripped to 7/8”; just sandwich it between the first and second 1x and you have a perfect space for the front to slide in… no measuring and easier to hold. 


First 1x being attached
Spacer and second 1x

Three bays later and all the slots for the fronts are complete. Just slide in as many widths of shiplap fronts  you need from the top, per compost material height, and call it a day.  


"Fronts" slot


Megan: Viola!  Finished!  Cost:  $Free.99 plus the cost of a new drill bit (thanks to Megan’s reckless drilling).  Now we have this great compost system but actually no idea how to use it.  The University of Iowa said build a three bin system, so we did, but the pamphlet did not explain how to use it so off to the Internet!  Basically, the information online says you can use it multiple ways.  The way we are going to try first is moving the pile down the line each month.  It seems the best way to get the compost to decompose quickly is to turn it.  With the three bins, we can shovel the pile into the next bin and start filling up the first again.  Our plan is to move the piles on the first of each month… this is not some master plan, we just figure between the two of us, we can remember to move them on the 1st


There is a lot of information about what to put in the compost and how to layer.  Maybe someday we will get really neurotic about this, but right now we are kind of winging it.  We keep a Tupperware on our kitchen counter and throw food scrapes in it during the day- mostly vegetables and egg shells.  According to the books, you shouldn’t put meat or dairy into the compost since it can attract animals and overheat it. At the end of the day (or two days if we get really lazy), we take the food Tupperware and add it to the pile.  We also throw any garden and yard cuttings we have on the pile- no weeds that have already seeded, though!  Once a week, or so, we sprinkle a layer of dirt and we are planning on putting in layers of old cow manure that has turned into compose already (we have a huge pile in the back of this from previous owners)… like I said, we are not scientific about this… just winging it right now to see how it goes!  Now if we can only remember in the fall and spring to actually use our compost… more to come!


Sunday, July 21, 2013

Waste Not, Want Compost

One of our top to-do list items from day 1 has been compost bins.  Not thinking about it when we bought the house, we learned there is no garbage pick-up in the country.  Makes sense thinking about it, but we never thought to ask.  For years, we dragged our city bins to the curb and magically they were whisked away to start fresh for another week.  Here, we take our garbage to designated dump-off sites.  It has taken a bit to work out a schedule that works for us but usually, Andy loads the car up and takes our garbage in bags to the site on Wednesdays.  A huge pain and one of the few things we haven’t adjusted to.  We also don’t have a garbage disposal (a big no-no with septic systems).  We have gotten pretty used to not having a garbage disposal, but just seems wrong to throw vegetable scrapes and egg shells away in the garbage.  SO- solution… composting!  The only experience I have with composting is the one summer my mom decided to order worms and do a bin.  All I remember is throwing vegetable scrapes in the bin and being bored senseless waiting for the “magic” to happen.  Worms move really slowly.  Now that we have tons of space, though, it is the perfect system for us.  We can reduce our garbage waste (and lower the garbage bags Andy lugs to the garbage dump site) and get free compost for our vegetable and garden beds (still working on building our beds but we will get there).

I found a compost bin plan in a University of Iowa pamphlet (here is a link to the plans:  http://www.extension.iastate.edu/publications/pm683.pdf) and decided to use recycled pallets Andy could get at work instead of 2x4s. Since Andy is so overloaded with other projects going on around the farm, I decided I could tackle this one!  I should say right now, that, while I don’t regard myself as useless in the tool-know how department, I am pretty inept.  I can hang pictures on the wall, put together basic furniture (out of a box) and hang curtains but that is about it.  Most of my projects take three times the time that it would take Andy and usually is done in a very round-about way.  Regardless, I figured I could tackle screwing some pallets together.


He was going to be gone in the evening so I had him set aside any of the tools he thought I might need.

 I didn't even bring down the level that he left because REALLY!?! A level?!? For a pallet compost bin?  Not gonna happen.  Also, I love the measuring tape and triangle thing… put those back in the box right away.  The clamps turned out to be really nifty, though, so I was glad he threw those in.  I set up the first two pallets and put a clamp at the top and a clamp at the bottom, making sure they were tightened and the pallets were pretty straight and even.

From there, I put screws in diagonally; two in the top, middle and bottom, first drilling a pilot hole in each spot.

 I set up the next two pallets but was getting eaten alive by mosquitoes and gnats so I ran back up to the house for bug spray and my boots seeing that the next pallets were going in a more grassy area and I was freaked out by the possibility of snakes laying wait in the tall grass for an unsuspecting city girl to get too close.


(My Bogs have turned out to be the best thing I have purchased since moving to the farm).  The next pallet went up much more smoothly now that I had a rhythm going.  I also got smarter about where to place the clamps so they didn't get in the way of the drill.

 I am building a three bin system, which is supposed to be the most efficient with decay.  I realize when I get to connecting the fourth pallet (you need seven total for the three bins) that unbeknownst to them, Lululemon made a sweet pocket in their yoga pants for screws.  Much easier!  Thank you Lululemon!
Now I am really moving, and getting cocky, when…


FUUUUUUUUUUUUDDDDDDDDDDDDGGGGGGGGGGGGGGGGGEEEEEEEEEEEEEEE!
I broke the pilot bit off when I only had one more pallet to put on.  Andy said he hasn't even done that before.  Well, I guess that ends day 1 of the compost bin build.  To be continued after a trip to the hardware store for another bit.  Not lookin’ too shabby, though.


Monday, July 15, 2013

Up to our Necks

We are compulsive DIYers who have found their ultimate fixer-upper in rural Northeast Iowa. With a continuous project list that ranges from interior and exterior house improvements, landscaping, gardening, and generally just learning how rural utilities work, we will be up to our necks for years to come.

Andy and I are both from the suburbs of Chicago; never more than 10 minutes from a Jewel. 

We bought our first home in Dekalb, Illinois- a large college town.  

It was the perfect starter home- 2 bedrooms, 2 bathrooms- with some minor improvement projects so we could get our feet wet.  Throughout the 5 years we lived there, we painted every room (several rooms got multiple color applications!), gutted the bathroom, replaced kitchen countertops, ripped up SMELLY old carpet throughout, converted a “den” into a 3rd bedroom by adding a closet, landscaped, put a new roof on and painted the exterior.  We were just starting to putter around the house, with not much else to improve when a new job took us to rural Iowa!

The house hunt started in town.  We looked at several homes within walking distance to the main street and several parks but were discouraged by the small yards and fixer-uppers that really were “tear-er-downers”.  Our realtor took us out to a house about 5 miles from town and we fell in LOVE with the countryside.  We immediately felt at home and loved the peacefulness of the area as well as the idea of lots of space to spread out.  We were sold on acreage living.  It took two houses before we found OURS.  Andy loved the four acres of land, numerous outbuilding and endless possibilities for workshops, playhouses, etc.  Megan was not so sold on the 70s interior (including rust shag carpeting), gravel road and the 15 minute “commute” to town.  Andy had to sell it a bit to Megan (it took about 10 minutes…. We are not picky house hunters) but eventually everyone was on board.  What really sold it was E- she got out of the car and went berserk running around the lawn chasing the butterflies.  On selling day, the house looked like this:

A big white block but lots of potential and pretty good bones.  After a whirlwind move and rocky start (we had to call in the well repair man the day after the moving truck dropped our stuff off), a year later we are settled in and here to stay!

We are blogging all of our adventures as we DIY our way though house projects and learn more about living in the country (are chickens in our future?!?) to share our mistakes and successes as well as have a record of our time in our home for our future.  Maybe someday we can laugh at the ridiculous “city” mistakes we make (Megan JUST found out Allis Chalmer is a brand of tractor, NOT a last name… Megan to Andy, “Wow, there are a lot of Allis-Chalmers in the area!”  Andy’s response, “Bahaaaa.  That is a tractor, idiot”.)  With two kids in tow, battling nap times and the munchies, we make the best of what we have and look forward to the next adventure.