Thursday, October 3, 2013

Vain For Our Vanity

After a week or so of work and a few weeks of blogging about it, we are finally wrapping up our master bathroom vanity update.  Really, the bathroom happens to be off the master bedroom but it is the main bathroom for the whole house due to the circular floor plan so an update was much needed.  Just to refresh your memory, this is what the bathroom looked like when we first moved in a year ago:
We believe the bathroom was part of a 1970s addition on the back of the house, evident by the beige countertop, floors and outlet covers as well as gold and silver mixed accents.  Our first task was replacing the beige countertop with a "new" (thanks to a great Habitat ReStore find) white one as well as new two handle faucet.
Andy then added a frame around the existing mirror from salvaged barn wood.
Per one of our marriage deals, I come in next with paint.  I took off the doors and hardware and quickly primed the vanity cabinet.  I planned from the beginning of this remodel to use the same color paint I used to paint the built-in porch benches- a light grey.  I really liked how the benches turned out and thought it would be perfect in the bathroom. I only had a spit of paint leftover so I knew needed to get another quart but luckily, I had extra time to work due to an especially long nap time that I decided to put as much on as I could over the primer to get an idea of how it would look.
The picture is not a great representation, but the color didn't work at all.  It blended into the countertop and floors too much and didn't give any visual interest to the vanity.  Since the toilet faces the vanity and therefore, gets a lot of viewing time, I knew it wouldn't work.  Despondent, I grabbed my paint chips to try to find something that would work.  Brown, dark grey, purple.. I was all over the board.  I checked our leftover paint in the basement to see if there was anything that would work and found Puddle (see spotlight on the can and hear angels singing)... a Behr paint that we used for the playroom walls.  And, more angels singing... quarter of the can left.
Much better!  Oddly enough, the color looks more brown in the playroom and more grey in the bathroom but it works.  It is a great, rich color that makes the white countertop really standout.  To finish off the vanity, I purchased three new drawer pulls from Anthropologie.  Combined, they cost the same as the countertop but I think make the vanity more unique.
The final breakdown of cost for the project is as follows:

White Countertop from Habitat Restore: $25
Faucet from Habitat Restore: $15
Miscellaneous plumbing for faucet: $10
Wood frame around mirror: Free (reclaimed lumber from Andy's workshop tear-down)
Door knobs from Anthropologie:  $25
Paint for vanity: Free (extra from playroom)

Total:  $75

No need for magazines in the bathroom anymore- we can gaze lovingly at the "new" vanity for as long as our bathroom needs last.  Will we replace the light above the mirror?  On my next trip to the Lowes at Rochester.  Will we update the floor?  Probably down the line.  Will we paint the trim and closet doors white?  Definitely as soon as I work my way around to it.  But for now, we can appreciate one job done!  Time to bust out the champagne.


Monday, September 30, 2013

Re-Purposed Reflection

Ever so slowly, Megs has been turning me on to using found items around the farm. I have always been, and will be in my heart, a lover of a fresh sheet of plywood. There is something so optimistic about a 4 x 8 foot sheet of opportunity. It softly whispers to me… I can be anything you dream of with just a few cuts of your saw. If Yankee Candle sold a fresh cut lumber candle, I would be first in line to buy, along with damp campfire, and vaporized cutting oil, but I digress. However, most of the projects we do on this old farm make my joyous, dimensionally stable wood look out of place. And when I do complete a nice modern looking piece of furniture, Megan enters and faux paints it to make it look old… thanks for teaching her that one Adourn! (We love your store though)

Despite all my complaints, Megs called it right when she asked if I could make a frame for the current vanity mirror in our bathroom out of some old wood.
Master bathroom when we moved in.  Since then, we installed a new vanity sink

When I was tearing out the bunker walls in the grainery, my new shop, I saved as much of the good looking 8” shiplap boards I could. You might remember those boards from such projects as the compost bins and soon to be exterior porch table. (Best Troy McClure voice)

I asked Megs how wide she would like the frame border and in typical fashion she walked me into the bathroom, cocked her head slightly, squinted one eye, held up her finger and thumb by the mirror and proclaimed… mmmmm, like that. Once I had converted that into useful human information, 2 ½” to be precise, I headed to the shop to rip some lumber. I found 2 “good” looking boards that still had character, nail holes, divots, etc, I got to making dust. A quick sand with some 120 grit paper cleaned up the face of the boards while creating more depths with the untouched inclusions.

What Megs usually looks for in these types of projects is 20 minutes worth of work, 4 butted joints, and for me to glue the boards in some fashion to the mirror… bam, done! I on the other hand am not capable of completing jobs in that fashion. I have tried, but I just can’t do it, it hurts my soul and I feel my talent lies in being anal with my work. I started by measuring the distance between the wall and the face of the mirror (5/16”) and cutting a 1” wide rabbit around the inner perimeter of the frame. This would allow the frame to sit tight on the wall as well as the mirror, creating an encased frame appearance.

Original mounting hardware


Mounting hardware hidden in the framework
I also cut a relief groove in the top frame side to accommodate the current mounting hardware that holds the mirror to the wall; we can’t have that showing! Then I re-sawed the bottom side of the frame to the remove 5/16” worth of stock. I had to do this because unlike the other 3 sides, the bottom sits right on the vanity sink backsplash and face mounting my new frame is the only option.

Once all the individual sides were milled I took them all inside to measure dry fit, and mark them for length. The famous Norm Abraham once said, only measure when you have to, which I try to follow whenever I can. As an engineer I would love to talk about why this principal is so important but the short of it is, if the parts follow the edict of Form, Fit, and Function who cares what the measurement is! Errors are made in measurement so skip it when you can. I lined everything up, scribed my lines and headed back out to cut the 45 degree bevels at the corners. Some fine tuning, glue, and a couple of brad and pin nails to hold it all together and the job is done.


The warm look of the natural wood completely transforms the feel of the bathroom and maintains some of the heritage of the old farm. Repurposing old lumber from the grainery into the bathroom… she’s a smart chick my wife. 
We agree next thing to go in the bathroom is that light!  We are thinking this.

Friday, August 16, 2013

ReStore-ing the Master Bath

Anyone who has tackled any sort of restoration project in their home knows budgets can get out of control really fast.  We save a lot of money by doing all the work ourselves and borrowing tools when we can but costs always seem to pile up fast.  One of our money saving tricks without compromising quality is purchasing items from a ReStore.  I learned about the Habitat Humanity ReStore a few years ago and am now obsessed!  Basically, ReStores are nonprofit home improvement and donation stores for building materials, furniture, appliances and odds and ends.  I have seen anything from lighting to tiles, french doors, toilets, trim, stoves, cabinetry, dressers and dining sets.  Most items are "gently" used but sometimes a retailer will donate new items that they have an overstock of.  All the proceeds of the ReStore go back to Habitat for Humanity who help build homes in the community.

Most people know that I HATE bargain bin shopping- even more now that I have kids- but I don't mind the ReStore too much because they are usually organized pretty well and I usually find something to take home for a great price.  Even so, I have to gear up before I go into one with the kids because 2 normal children turn into 2 octopuses with 8 arms each grabbing everything within reach.  F gets strapped to me in the Ergo carrier and E goes in the stroller.  Still, we usually manage to knock over a display of doors or rearrange the knob bins while we are there.

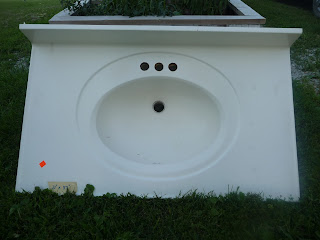
Now with any kind of resale shop, you never know what they have at any given time until you get there.  I always keep a list of things we are looking for at any given time with measurements.  Right now, my list includes several light fixtures, shutters, exterior doors and storm doors.  Whenever I am in a town with a ReStore, I try to pop in and see if I find anything on my list.  In the past year, we have found several great items that have found their way into our remodeling projects.  Top of my list for the past year has been a white vanity sink for the master bath.  Currently, the sink has this 70s-beige disco thing going:

Actually, disco is even too nice.  It has a 70's-beige old person feel to it.  We knew from day one the bathroom needed a quick, inexpensive update so I have been looking for a new sink to replace the beige. On a trip to the ReStore in La Crosse a few months ago, we found this gem:
I loved the square shape of it and simple lines of the sink.  We ended up getting it for free because there is a crack down the left side of it.  Since it was free, we decided to take it and see if we could repair the crack- it is long but not deep.  I think the crack could have been fixed but the sink was not as large as the current one so Andy would have had to build a new vanity for it to sit on.  Doable but more time we don't have, so back to the drawing board.  (You may see this sink later though in another project because I still love it).

Last week, I was visiting family in Chicago so I stopped by the ReStore in Aurora, Illinois.  I love this ReStore because it is HUGE and has a ton of stock.  I hit pay-gold, finding 2 white sinks both the right size!!  (Imagine nerdy mommy dance in the middle of the aisle with F hanging on in the Ergo and E getting hangry in the stroller **hangry is our term for irrational anger due to hunger).  One was a shiny white; the other matte white.  After a quick call to Andy at work, we choose the matte finish.  Best part- the sink was $25 (and the money then goes to Habitat)!
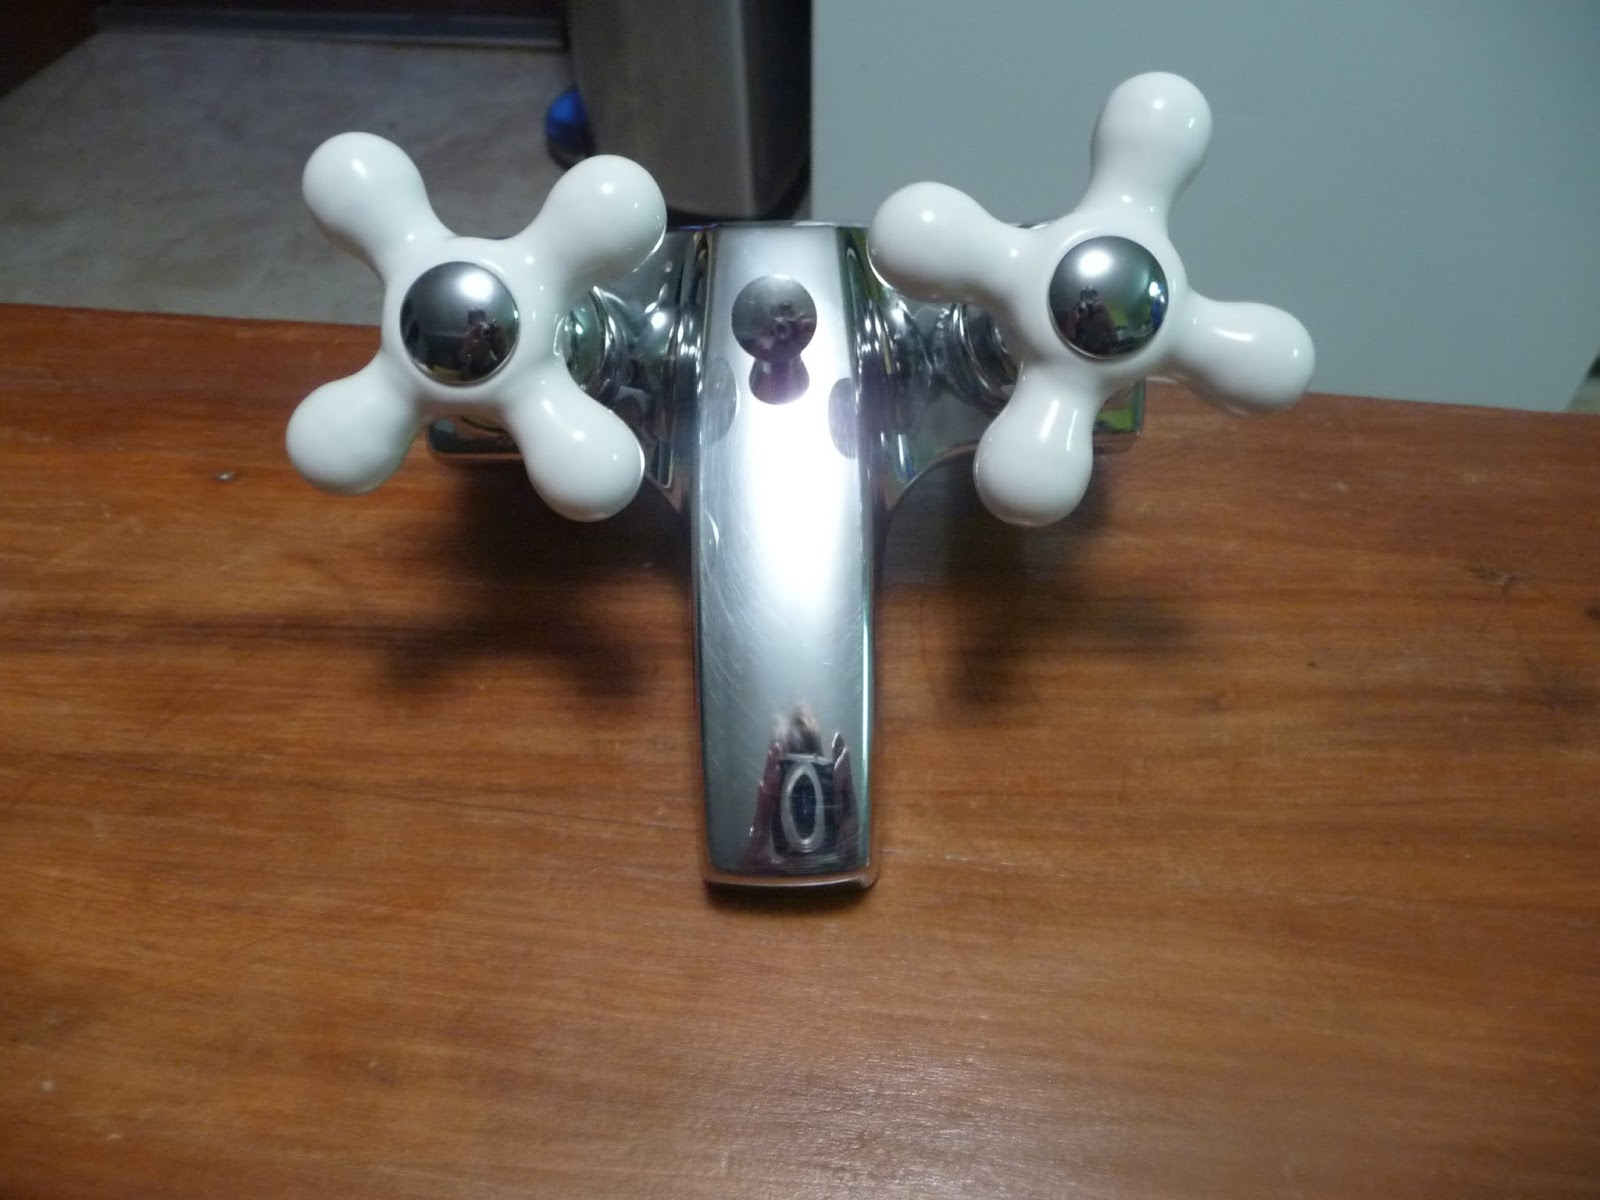
After squeezing my new sink in the back of my Subaru, I was re-invigorated and determined to find a faucet.  I took a quick peek at the big-box home improvement websites and saw their basic faucets started at $30 and were really generic looking.  So, adding a faucet to my ReStore list, I decided to move on.  Luckily, since we have so many projects going, we are not in any huge rush to get started on the bathroom update- we figure when we find the pieces we need, we will get started.  After an unsuccessful stop at the Addison, Illinois ReStore, I headed back home.  A week later, we found ourselves back in La Crosse for some hiking and came across this gem:
I LOVE the double white handles and square faucet shape.  Can you see the price tag?  $15!! Money much better spent than the generic $30 new ones.  A good scrub with CLR and....
...so shiny you can see my camera in it!
So, now that we have all our pieces, I have Andy pulling the old sink off so he can put the new one on (I am hearing grumblings of glue...).  Also, we are setting aside our old sink and faucet to donate next time we are at a ReStore to help Habitat for Humanity continue to build homes for those in need.  The only thing I haven't found for the bathroom yet is a vanity light so if anyone sees a good one, send it my way!