
Andy and I made the quick (and relatively easy) decision to tear the bathroom out and start fresh. After two days of demo, this is what the bathroom currently looks like.


Pretty sweet. Luckily Andy hasn't run into any other major issues though he has come across several layers of drywall/plaster on the walls, some "fantastic" old wallpaper and flooring
 |
| Miscellaneous old flooring |
 |
| Wallpaper on drywall layer #2 |
 |
| Wasp nest |


So now that we are getting down to the bare bones, Andy and I are negotiating the design and layout of the new space. I looked at a lot of design books and magazines as well as Pinterest boards and settled on a style I have named "English Countryside Bath". I'm thinking claw foot tub, rustic wood floor, roaring fire, sheepskin bath rug. Ok, scratch the roaring fire but everything else stays. I want the bath to feel warm and inviting and like it has been there forever but still matches with the rest of the house. The biggest must for me for this design is the claw foot tub. These can run you at least $1000 but thanks to Craigslist, we are hoping to swipe one for much less than that. The nice thing about claw foot tubs is you can have them refinished for $350-500 (which if you got it for free, isn't too bad) and you can easily paint the outside to freshen them up.
The other big piece of furniture in the room is the vanity. My plan is to find a thrift store dresser to paint up and fit with a sink- probably a vessel sink with faucet coming out of the wall. The bathroom is small and hard to find storage solutions with the slanted wall so I am thinking a dresser vanity would be perfect for storage of towels and bathroom basics. Since it is a kid's bath, we don't need much more storage than that so I think it will work out well.
Finally, the last design piece of the bathroom is the flooring. This is what got me into trouble to begin with when I had a vision of painted rustic subfloors... which lead to the discovery of rotted, rustic subfloors. Once we decided to rip out the bathroom, Andy and I were planning on laying a plywood subfloor and just painting that for the time being. On a whim, I looked up floor on Lumber Liquidators and found a perfect pine floor which would only cost $100 for the whole room! The flooring is unfinished. Usually when we buy wood floors (like in the playroom) we buy finished since it is so much easier and ends up costing about the same once you put all the supplies into finishing unfinished flooring but since we are going for a rustic look, and the room is so small, unfinished works well for the bath. I am planning on staining them- possibly something like this picture I found originally and then protecting them with a coat of Polyurethane.

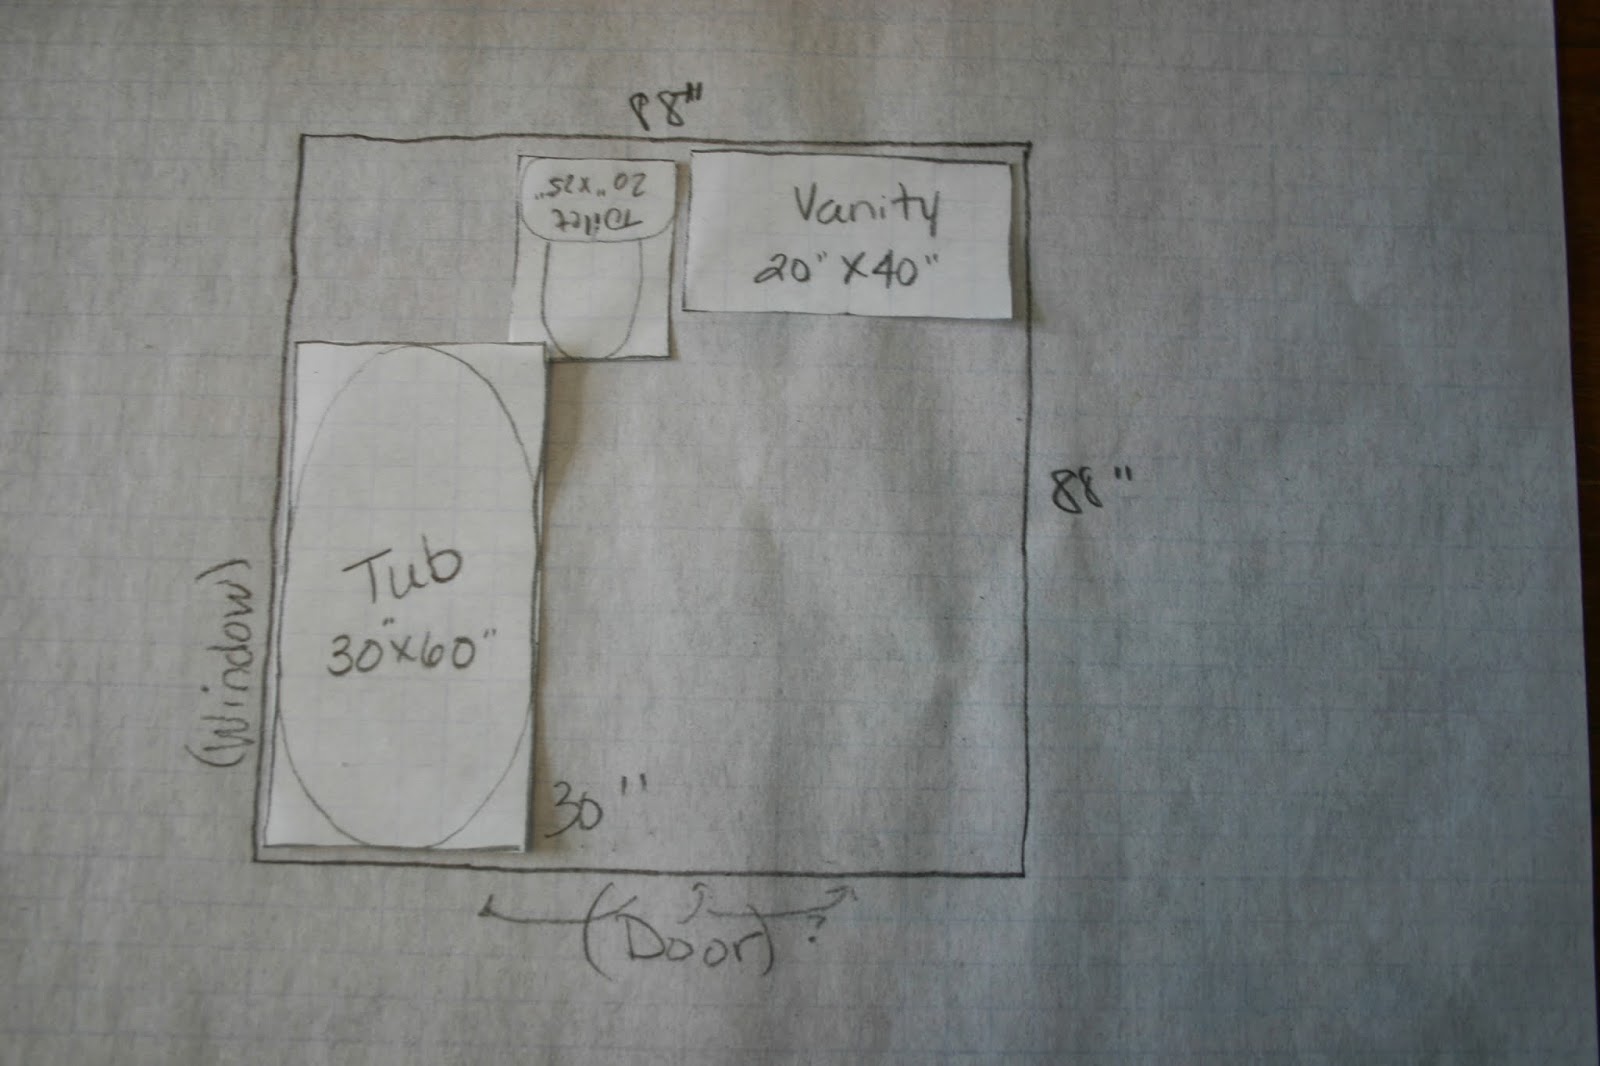
I am a very visual person, so to get a feel for the layout, I first tried marking the bathroom perimeter in the living room and using our coffee table as a tub. After dragging the coffee table around once, I decided I could come up with something better. Channeling Andy's compulsiveness, I grabbed some graph paper and created a bathroom layout to scale. I then drew a tub, toilet and vanity to scale using generic measurements and cut these pieces out. This way, I could move around the furniture in every configuration to get a better feel for spacing and flow. Our main challenged in the room is the slanted wall which means the tub has to go on one of the two perpendicular walls so we can outfit it with a shower head. Also, the slanted wall makes it hard to put a vanity there since there really wouldn't be a good place to put a mirror. Luckily, we can be flexible about the placement of the door since that wall has to be torn down anyway and we are planning on putting in a pocket door. After all of those considerations/issues, these were our top choices:
 |
| Option 1- Door stays where it is, tub along window wall and toilet and vanity on slanted wall. |
 |
| Option 2- Door moves to middle of wall with toilet along slanted wall. |
 |
| Option 3- Door moves to middle of wall with toilet under window and vanity along same wall. |
We aren't set 100%- we will buy the tub and vanity and see what their exact sizes are but we are leaning toward option 3. We talked a lot about option 2 but I just couldn't imagine walking into the bathroom and looking right at the toilet.
Now that our overall vision is pretty set, Andy and I are scouring thrift stores, Habitat Restores, Craigslist and salvage stores for the perfect mix of vintage and modern- all while sticking to a tight budget. We hope to regale you with our exciting shopping excursion to Minneapolis (all the locals call it "the cities" but we still haven't gotten that lingo yet) where we plan to hit three salvage stores and hopefully pick up a claw foot tub we have negotiated through Craigslist. Wish us luck!
No comments:
Post a Comment