Monday, September 15, 2014

To Chicken or Not to Chicken, That is the Question

It has been four months since we picked up our box of tiny baby chicks at the post office.  We have tried a lot of new things since moving from the suburbs to a rural landscape.  Some of which were duds and some of which we would continue to do no matter where we lived.  Chickens fall into the latter category.  We love them.

We started with 26 chickens that were mail ordered from Dunlap Hatchery.  I found this company through a backyard chicken book and was really happy with their service and quality of chickens.  Every time we go to the post office, E asks if we are getting chickens.  We are definitely turning our kiddos into farm children.  15 of the chickens were straight run (mixed male/female) White Cornish Cross, used for broilers (chickens you eat, 5 of the chickens were pullet (females only) Barred Plymouth Rocks and 6 of the chickens were pullet Black Astralorps.  The Black Astralorps are especially beautiful with green feathers in their undercoats.  The pullets are all egg layers.

Barred Plymouth Rocks and Black Astralorps
9 weeks after we got the White Cornish Cross chickens, we took them to a nearby Amish farm to be butchered.  Andy was (of course) out of town on the day of the slaughter so I had to catch and cram 15 chickens into cages in the back of my mini van.  I don't think Honda had chicken transport in mind when it designed its' lay-flat seats.

For this unsavory task, I put on crappy clothes incase I got some... ahem, crap on my clothes as well as my Bog boots and work gloves.  I had originally planned to feed the chickens in the morning and quickly grab them as they unsuspectingly gobbled up their food.  Thankfully, my farming resource friend told me not to feed them 12 hours before butchering to help keep their insides cleaner.  So, though they were not distracted with food, the broilers are pretty dumb so I was able to grab up the first 5 very quickly.  The next 5 got a bit smarter and came after a bit of chase.  By now, the egg layers were smart enough to group up in a corner, prepared to attack as a group if necessary.  The last 5 broilers proved a bit tricky, especially because I was putting them in a cage with a tricky lid that I couldn't get closed (yes, at one point, I had a chicken escape and bounce around the car a bit).  The last chicken I had to grab was a larger rooster (the roosters were obvious compared to pullets as they were about a pound heavier) and proved to be my biggest fear when starting this task.  I finally got him in but for a bit wondered if I would have to break its' neck myself just to get the damn thing in the car.  Thankfully, on this occasion I was spared from committing murder.

The Amish family did a fantastic job and had my chickens slaughtered, cleaned and bagged by 4 pm that afternoon.  The total cost for 15 chickens was $29.10.  The very kind father of the family made me take my 90 cents change, though I proclaimed several times it was unnecessary.

We have eaten 2 of the chickens so far and they are delicious.  I am not super particular about buying "farm-raised", "free-range", etc because those terms can be very broad but let me say,  it is really nice eating food that you know how it lived and what it ate.

As far as cost breakdown of these chickens, here is a pretty good estimate of how much each cost by the end:

Price per chicken from Dunlap (plus vaccine)- $2.05
Price of shipping (divided by 26)-$0.61
Feed costs per chicken (this is the hardest thing to track so this is an estimate)-$2
Slaughter fee-$1.74

Total per chicken- $6.40

So, we really aren't saving any money raising them ourselves but it is also not really any more expensive then buying from the store- especially if you look at price of "free-range" chickens which is what they really are.  FYI-I did not put in the costs of equipment or bedding in the per chicken price since theses are start-up costs and will be minimal each year.  If you want to know what kind of equipment you need to start up, check back to our first chicken post.  Bottom Line:  We definitely plan to order more broilers in the spring.

Once the broilers cleared out of the chicken house, the egg layers were able to really stretch out.  They have such a personality compared to the broilers.  They are very active, jumping and "flying" around and are more skittish around people.  One of the biggest surprises after the broilers were slaughtered was how slowly we went through food all the sudden.  The 26 chickens would go though 2 troughs a day; 11 egg layers go through 1 every day or two.

Andy built a perch for sleeping and nesting boxes.  You don't need a nesting box for every bird or they will just sit in them all the time so 1 per every 3 or 4 is enough.  Andy cut the lids of 5 gallon buckets and attached them to a stand for quick, easy and free nesting boxes.

After building the perches, Andy picked up each bird and set them on the perch.
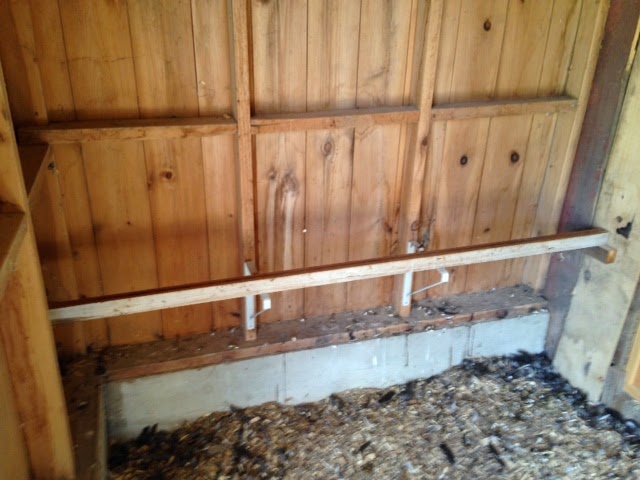
It took a few nights, but finally all of them found a perch.

Andy also built a platform for the waterer to keep the bedding out of the water.  It is scrap wood with chicken wire stretched over top and keeps the water a couple of inches off the ground.  Another option is hanging the waterer from the ceiling.

The chickens love getting out of their house to so some pecking around the property.  At first, only a few birds would come out at a time and we had some issues with Murphy, our dog trying to herd them.  Back to back nights ended up with one chicken short after a nightly head count.  After not finding the missing bird on night one, we called it our first loss, assuming it had wandered off or would be meet death by raccoon over night.  On the second day, head count was down to 9 and I was DETERMINED to find this chicken!  What do you yell when looking for chickens?  Ridiculous things like, "here chicken", "come here lady", "Come, blackie" (we have, at the point had yet to name them and the missing two were the Black Astralorps).  E came to the rescue, looking in some nearby day lilies finding BOTH missing chickens huddled in a corner on top of each other.

Now the chickens are much bolder, sometimes traveling all the way up to the house, other times venturing to the horse pasture or into the barn.

You know when an eagle is flying around because all the sudden you will notice the chickens run/fly back into their house very quickly.

E and F love the chickens and help with feeding them and filling their water tank and take turns terrorizing them trying to pick them up.


E has adopted the runt of the litter and named her "Jello".  One day, E brought Jello all the way to the garden beds where I was working to tell me Murphy was bothering her.  Poor Jello looked helpless, yet resigned in E's arms.

Now Andy and I frequently realize we are calling this silly chicken Jello.

No eggs as of yet but we expect them anytime.  One question I have been asked is why we have all females and if we need a rooster to get eggs.  The only purpose of a rooster is to fertilize eggs; female chickens will lay eggs no matter what (just like human females) but the eggs will only turn into chicks if they are fertilized by a male.  We don't want to deal with hatching our own chicks because we would need more equipment and then you have to worry about vaccinating them yourself (chicks are vaccinated for Marek's disease with is a highly contagious viral disease in chickens).

Even without getting the benefits of the eggs yet, we love having the chickens.  It is so satisfying to see them around the yard and they are very low maintenance.  As far as cost per bird, this is harder to figure out since they don't have a set "end of life" date.  Before calculating feed costs, they would be $3.30 each.  I would estimate another $3 per bird of feeding costs so far so about $6.30 each.  Seems like a lot since they haven't started producing yet, but if you think ahead, during summer months we should get 11 eggs a day and probably 4-5 a day during winter months.  So, similarly to the broilers were probably are just breaking even with our cost verses just buying from the store but I have been told that there is nothing better than fresh farm eggs so I think it will be worth it.

So, back to my original question.  TO CHICKEN!  One day, Andy and I will have moved to a city somewhere and have chickens roaming our rooftop- that's how much we enjoy this little hobby!


**You can get salmonella from handling live chickens so make sure you wash your hands after holding them!

Thursday, September 4, 2014

IKEA Curtain Tracks + Adorable Fabric= Love

Awhile back, I promised a few detailed posts on some things in our bathroom remodel.  Like most things around here, it took a little longer to get to it than we'd like so sorry about the delay!  Tis the reality of full time jobs, two kids and four acres to manage.

One of the things that we had to troubleshoot a lot in the bathroom was trying to get a shower/tub combo in a small space with one slanted wall.
Here is the bathroom when we moved it.  You can see about the tiling in the tub the flat wall begins to slant about 4' up.

I think this is a challenge for many upstairs bathrooms that were likely once attic renovations.  Our downstairs bathroom only has a shower so with two kids in the house, a tub is a must and we wanted a shower as well for guests to be able to use.  After several layout discussions, we decided that moving the tub/shower to a flat wall would be the best way to make it work.  If we had chosen a traditional skirted bathtub, we could have tiled the whole wall surround and used a shower curtain/rod combo.  We decided to make things as challenging as possible and went with a freestanding claw foot tub.  We chose this because of the "look" we were going for and it saved some considerable money- at least $100 for the tub and probably $300 for all the supplies for tiling (tiles, special tile board, grout, wet cutter rental, etc).  Installing a freestanding tub is obviously really simple- you just have to make sure all the flooring, trim work and painting is done before you get the tub in and you have set the hot/cold water holes and tubing in the correct spots.  Our challenge was figuring out a way to get a shower curtain around the entire tub with one slanted wall.

Several companies make an oval track specifically for claw foot tubs.  These can get pricy and with the slanted wall, we would have had to modify any of these tracks since they attach vertically to a flat surface.  I also looked at a few online hacks where some inventive people designed their own tracks.  This also seemed like a lot of work.

In a fit of genius, I remembered IKEA makes curtain tracks that come with curved sections.  Measuring the flat ceiling space above the tub, we ordered 3 straight KVARTAL tracks, 4 curved tracks and 8 ceiling fixtures.

Two straight tracks would make up the long sides and one straight track would be cut to make up the two short sides.

After getting all the tracks, we realized since we were cutting one track, we were missing a connection piece so we ended up having to pick up another straight track just for the connection.  The entire track system came out around $60- by far the cheapest option around and was easily adaptable to our odd space.

The biggest headache with this track system was figuring out how to attach a curtain to it.  I ordered two bags of the KVARTAL glider and hooks which slide right into the track.  A note- slide these onto the track before you have it completely mounted on the ceiling.  Obvious to most, but apparently not to all.  IKEA makes several options of curtain hooks to hook into the gliders.  I choose the RIKTIG hook so it couldn't be seen from the outside of the curtain.

Another note- if you choose this kind of hook, you will then only need the glider on the track, not the glider and hook or the curtain will not be facing the right way... Once we realized this mistake, Andy, perched on top of the claw foot tub, holding up the curtain track with one hand was bombarding me with little plastic hooks from the other hand.
Hard to see in this picture, but the wall to the left of the picture is the slanted one.

Ok, so track system up, now onto the curtain.  A typical shower curtain would not have worked for this project for two reasons- it would be too short since I was hanging it from the ceiling and I would have needed to buy several to get the curtain all the way around the tub.  If you are not a sewer, they do make extra long shower curtains that might work but would likely be pretty pricey.

A note before I get into the specifics of how I cut and sewed the curtains- I am by no means a sewing expert.  I learned to sew from my mom and pretty much exclusively make quilts.  I have dabbled a bit in Halloween costumes and pillows but other than that, I am a novice at home decor.  So, this all worked for me but there are likely other, easier ways to go about it.  I definitely attacked it with a quilter frame of mind.

I measured the circumference of entire tub as well as the height from ceiling to the base of the tub (leaving the claw feet exposed) to get my basic dimensions.  Using a yardage calculator online, I determined that I would need 9-11 yards of fabric for the entire curtain.  It took several fabric stores but I finally found the perfect cotton fabric from Jo Ann Fabrics- it was the coral color that I was using as an accent, had some turquoise which matched the garbage basket I'd just purchased and was whimsical and fun for a kids bath.

Kismet.  To my dismay, though, there was no way there was 9 yards of fabric on the roll... probably 3-4 in my estimation.  Luckily, I found a great complementary fabric with the same background color in a cute dot pattern.

Again, no way this had 9 yards on it but I was hoping between the two fabrics, I would squeak out at least 9 yards and figure out later how I would mold them into one curtain.  After some crossed fingers and breath holding, the store clerk rolled out the two fabrics and between them, I had just over 9 yards.  I went ahead and took both and figured if I was still short, I could add some trim or something to make up the difference.  With a 40% off one item store coupon, the fabric came out to $65.

After washing and ironing all the fabric, I laid it out in a few different patterns to decide how I would sew the two fabrics together.  I decided the most balanced look with the yardage I had was using the cute print on the top and bottom and having a thick band of the polka dot in the middle.

I double checked my tub circumference and height measurements again as well as my fabric yardages to determine my cuts.  Here is my super, scientific measurement sheet:

Andy is horrified/embarrassed my my building/measuring sketches but it works for me.  The diagram shows the two fabrics- leaves on top and bottom and dots in the middle.  Using my room height, I knew I needed 80" finished height so determined by my fabric yardage, I would need 13" on top and bottom and 54" finished fabric in the middle.  Adding 1/2" on all sides of the fabric which I would serge off and 1/2" seam/hem allowance, I got my cut measurements which are listed on the left side of the picture.  Using the circumference of the tub and the width of the fabric (40"), I calculated that I would need 4 panels.  The numbers on the bottom left of the sheet are the total inches of each fabric I had: 238" in the plain (dots) and 126" in the patterned (leafs).  I divided these number by 4 for the 4 panels I needed to to get 59.5" and 31.5" respectively.  If you can calculate my measurements above, you will see that I barely squeaked out enough fabric!

So, tricky measurements done, I cut my fabric using my quilters cutting tools of a rotary cutter, plastic rulers and cutting mat. To make sure I cut my fabric square, I folded the fabric length wise and squared off the end using the fold as my straight line.  Once my fabric was square, I measured my cut measurements from above for each fabric:  in the leaf pattern I cut 15" 8 times (2 needed for each panel); in the dot pattern I cut 56" 4 times.

In any sewing project- or building project for that matter- cutting is the most important step.  It is important to make sure the fabric is straight and even and you are measuring correctly and cutting straight.  For these reasons, I think the rotary cutter and quilting rulers are a necessity.

For Christmas this year, I got a Huskylock Serger which made this project much easier.  If you look at the inside of your shirt, you will see at the seam a bunch of interlocked stitches.  This is what a serger does (among other things that I am still learning about).  It cuts the fabric and sews an edge that will not fray.  This is a great time saver for this kind of project because I can serge all the edges and not have to create a double folded hem.  Before sewing anything together, I serged all the edges that would be connected to fabric as well as my upper and lower hems.  This cut off 1/2" fabric.


I did not serge the edges that would form the long, vertical sides.  After serging, I sewed the two fabrics of each panel together with a 1/2" seam allowance.  Once I had my four panels sewn, I used my serger on the long vertical sides.  I sewed two panels together, making 4 panels into 2 so it would be easier to use in the shower.  You know you've done a great job cutting when 2 80" panels meet up perfectly!

Using a 1/2" seam, I hemmed all the edges.

You can see the serged edge in white thread and the hemmed thread in pink.

My biggest head scratcher in the curtains was connecting the hooks I purchased at IKEA to the tops.  There were no clear instructions or obvious ways to do it- no matter how much Andy proclaimed "just make a pocket!".  Yes Andy, sewing 28 individual pockets for each hook sounds super easy.  In the end, I used fusible tape and folded a new upper hem to tuck the hooks into.  Using the holes in the plastic curtain liner that would go inside the fabric curtain as my measuring guide, I folded in a hook every 4 1/2" and then ironed the gap in between with the fusible tape.


Honestly, this is a temporary solution which I will be fixing soon because the hooks at the edge of every curtain are coming up since the tape is not strong enough to hold them (the rest of the hooks are holding fine).  Hopefully, I will think of a solution soon and get back to you but I think the tape is a good way to start and was very easy to do- likely you will just need to sew the hooks in after getting them initially placed with the tape.

These hooks easily slide into KVARTAL track gliders and look great on either side of the curtain.  The finished curtain functions beautifully, covering the entire tub when it is shower time and adds a lot of fun to the bathroom.


Tuesday, August 26, 2014

My Complete and Total Failure as a Farmer

Confession:  I am a terrible vegetable gardener.  After having the best intentions last summer, Andy building four amazing vegetable boxes and then working this spring to prepare the boxes with grids following the "Square Foot Gardening Method", this is the conclusion I have come to.  Vegetable gardening is just not my thing.  I'm actually super embarrassed to admit it.  We live on four acres surrounded by amazing farmland and fantastic farmers.  I feel like it is a necessity to our farm life.  I actually love gardening in general (though, Andy will be the first to shout that I have let weeds get out of control even in those beds this summer) and have some seriously generational gardening genes in my family thanks to my mother and grandmother but let me tell you.  I have decided that vegetables are just not my thing.  While I am horrified to admit it my garden currently looks like this:

Can't decipher the walkway from the beds due to all the weeds

More chaos
While I am totally embarrassed to be writing this post, I don't want to give the impression that all of our projects are a success.  Vegetable gardening can actually be kind of expensive (especially if you let your produce go to waste), so I think it is really important to determine what you actually want to eat from your garden and how you want to use the produce harvested.  Though my conclusions certainly won't be the same as anyone else, I will still go through a list of what I had success with, what I didn't and why so if you are thinking of starting a vegetable garden, you might have a good idea where to start.  I also have provided links to my favorite recipes that you might find useful.

Failures:
-Snap Peas
-Lettuces
-Spinach
-Kale
-Peppers
-Cantaloupe

With the exception of the cantaloupe (which was planted the week it decided to stop raining so it died) and snap peas (which ripened the week we were on vacation), all of these veggies are pick and eat as they ripen.  I think this is the category of plant that most vegetable gardeners love but this is not for me.  I plan meals for the whole week on Friday and don't think about what is going to be ready in my garden and meal plan around that.  The lettuces, spinach and kale need to be cut every few days when it is ready and we really don't eat that many salads so it would get forgotten then quickly overgrown.  I got a couple of peppers off the plants but again, would set them aside and forgot about them when grocery shopping.

On the Fence/Yet to be determined:
-Flowers
-Tomatoes
-Potatoes
-Soy Beans
-Butternut squash
-Pumpkins

With the exception of the flowers, these vegetables have not fully ripened yet so I am not sure if they will end up being useful or not.  I planted a few flower seeds- marigolds and red zinnias to help keep out pests.


Most of them did bloom and actually look really pretty... I just don't know if I would want to take the space out of the beds again for them.  I think if I had smaller beds, I would definitely not waste the space again but since mine are pretty massive, I might give it a go again next year.

I have tried tomatoes two summers now- last summer was too dry and cool that they never ripened and I have a feeling it will be the same this year.  I would love to can some salsas and diced tomatoes but if they don't ripen by frost this year, I am not planting them again next year.


The soy beans are almost ripe.  We have gotten a lot of grief for planting soy beans when so much of the Iowa farmland is devoted to soy but we really like eating edamame and they are easy to bag and freeze.  As long as I remember to harvest these, I will do them again.

I am excited for the butternut squash and pumpkins.  These were both easy, low maintenance plants and nice because you can easily see the vegetable grow and know when it is ready to pick.

The only downside is they take up a lot of space but as long as they ripen according to plan, I would do these again.

Successes: 
-Carrots
-Onions
-Apples
-Asparagus
-Rhubarb

This really shows how lame of a gardener I am because of the successes, 60% I didn't have anything to do with- they were already planted and established when we moved here.  Of the two that I planted- carrots and onions, these were just simple.  The onions are easy to plant because you plant sets (which are just bulbs) and then can harvest and store for a long time so there is no rush to use them quickly.  I just pulled carrots yesterday, which the kids LOVED doing.  We only had a few squares of them so they are manageable enough to just cut up and eat as snacks for the week.

I think the reason I like the apples, asparagus and rhubarb is they are harvested over a few weeks and you get a lot of yield for little work (once the plant is established).  With each of these, when they were ripe we would do some recipes right away for dinner or snacks (asparagus side dishes, apple crepes, rhubarb muffins, apple pie etc), can/freeze some plain (we just did 20 lbs of peeled and sliced apples in bags ready for fillings throughout the winter) and can/freeze jams or sauces (rhubarb jam, applesauce, pickled asparagus).
Apple Crumble Pie

The bottom line is I think I prefer to grow things that I can make into snacks or condiments as opposed to dinner.  Though it is a lot of work, after a night's laboring through canning you can have a whole year's worth of applesauce, jam, salsa, sauce, etc.  I like this because I don't have to use up the vegetable the week it is ready to be harvested but you still get great flavor for the whole year.

Things I should have planted but didn't:
-Zucchini
-Strawberries and other berries
-Bananas (yeah, I know there is no way I would ever be able to plant these unless we moved WAY South but man, I wish we could the way my family runs through them)

Why did I not plant zucchini?  I really have no idea other than I just lost track and never got around to it.  Luckily, several friends in the area have given me plenty of extras from their patches so I have been able to shred it (in the food processor) and freeze baggies of it already shredded or make it into breads/muffins.  This zucchini streusel bread is AMAZING, these cookies are yummy (and freeze well too) and we did these fritters for dinner one night which were fantastic.

I didn't do any berries this year, but I think the kids would love to snack off of them as they ripen and this is also an easy fruit to turn into jams.

So, considering I have a freezer full of cut up vegetables/fruits and a shelf full of canned sauces/jams/pickled vegetables I guess I can't really be called a failure.


But countered with the pounds of produce I have let die in the beds I can't be called a success either.  Ultimately, I think I am a very selective vegetable gardener and probably won't continue once Our Acreage Adventure is over.  Hopefully, we will always be near a fantastic farmers market!