Thursday, September 4, 2014

IKEA Curtain Tracks + Adorable Fabric= Love

Awhile back, I promised a few detailed posts on some things in our bathroom remodel.  Like most things around here, it took a little longer to get to it than we'd like so sorry about the delay!  Tis the reality of full time jobs, two kids and four acres to manage.

One of the things that we had to troubleshoot a lot in the bathroom was trying to get a shower/tub combo in a small space with one slanted wall.
Here is the bathroom when we moved it.  You can see about the tiling in the tub the flat wall begins to slant about 4' up.

I think this is a challenge for many upstairs bathrooms that were likely once attic renovations.  Our downstairs bathroom only has a shower so with two kids in the house, a tub is a must and we wanted a shower as well for guests to be able to use.  After several layout discussions, we decided that moving the tub/shower to a flat wall would be the best way to make it work.  If we had chosen a traditional skirted bathtub, we could have tiled the whole wall surround and used a shower curtain/rod combo.  We decided to make things as challenging as possible and went with a freestanding claw foot tub.  We chose this because of the "look" we were going for and it saved some considerable money- at least $100 for the tub and probably $300 for all the supplies for tiling (tiles, special tile board, grout, wet cutter rental, etc).  Installing a freestanding tub is obviously really simple- you just have to make sure all the flooring, trim work and painting is done before you get the tub in and you have set the hot/cold water holes and tubing in the correct spots.  Our challenge was figuring out a way to get a shower curtain around the entire tub with one slanted wall.

Several companies make an oval track specifically for claw foot tubs.  These can get pricy and with the slanted wall, we would have had to modify any of these tracks since they attach vertically to a flat surface.  I also looked at a few online hacks where some inventive people designed their own tracks.  This also seemed like a lot of work.

In a fit of genius, I remembered IKEA makes curtain tracks that come with curved sections.  Measuring the flat ceiling space above the tub, we ordered 3 straight KVARTAL tracks, 4 curved tracks and 8 ceiling fixtures.

Two straight tracks would make up the long sides and one straight track would be cut to make up the two short sides.

After getting all the tracks, we realized since we were cutting one track, we were missing a connection piece so we ended up having to pick up another straight track just for the connection.  The entire track system came out around $60- by far the cheapest option around and was easily adaptable to our odd space.

The biggest headache with this track system was figuring out how to attach a curtain to it.  I ordered two bags of the KVARTAL glider and hooks which slide right into the track.  A note- slide these onto the track before you have it completely mounted on the ceiling.  Obvious to most, but apparently not to all.  IKEA makes several options of curtain hooks to hook into the gliders.  I choose the RIKTIG hook so it couldn't be seen from the outside of the curtain.

Another note- if you choose this kind of hook, you will then only need the glider on the track, not the glider and hook or the curtain will not be facing the right way... Once we realized this mistake, Andy, perched on top of the claw foot tub, holding up the curtain track with one hand was bombarding me with little plastic hooks from the other hand.
Hard to see in this picture, but the wall to the left of the picture is the slanted one.

Ok, so track system up, now onto the curtain.  A typical shower curtain would not have worked for this project for two reasons- it would be too short since I was hanging it from the ceiling and I would have needed to buy several to get the curtain all the way around the tub.  If you are not a sewer, they do make extra long shower curtains that might work but would likely be pretty pricey.

A note before I get into the specifics of how I cut and sewed the curtains- I am by no means a sewing expert.  I learned to sew from my mom and pretty much exclusively make quilts.  I have dabbled a bit in Halloween costumes and pillows but other than that, I am a novice at home decor.  So, this all worked for me but there are likely other, easier ways to go about it.  I definitely attacked it with a quilter frame of mind.

I measured the circumference of entire tub as well as the height from ceiling to the base of the tub (leaving the claw feet exposed) to get my basic dimensions.  Using a yardage calculator online, I determined that I would need 9-11 yards of fabric for the entire curtain.  It took several fabric stores but I finally found the perfect cotton fabric from Jo Ann Fabrics- it was the coral color that I was using as an accent, had some turquoise which matched the garbage basket I'd just purchased and was whimsical and fun for a kids bath.

Kismet.  To my dismay, though, there was no way there was 9 yards of fabric on the roll... probably 3-4 in my estimation.  Luckily, I found a great complementary fabric with the same background color in a cute dot pattern.

Again, no way this had 9 yards on it but I was hoping between the two fabrics, I would squeak out at least 9 yards and figure out later how I would mold them into one curtain.  After some crossed fingers and breath holding, the store clerk rolled out the two fabrics and between them, I had just over 9 yards.  I went ahead and took both and figured if I was still short, I could add some trim or something to make up the difference.  With a 40% off one item store coupon, the fabric came out to $65.

After washing and ironing all the fabric, I laid it out in a few different patterns to decide how I would sew the two fabrics together.  I decided the most balanced look with the yardage I had was using the cute print on the top and bottom and having a thick band of the polka dot in the middle.

I double checked my tub circumference and height measurements again as well as my fabric yardages to determine my cuts.  Here is my super, scientific measurement sheet:

Andy is horrified/embarrassed my my building/measuring sketches but it works for me.  The diagram shows the two fabrics- leaves on top and bottom and dots in the middle.  Using my room height, I knew I needed 80" finished height so determined by my fabric yardage, I would need 13" on top and bottom and 54" finished fabric in the middle.  Adding 1/2" on all sides of the fabric which I would serge off and 1/2" seam/hem allowance, I got my cut measurements which are listed on the left side of the picture.  Using the circumference of the tub and the width of the fabric (40"), I calculated that I would need 4 panels.  The numbers on the bottom left of the sheet are the total inches of each fabric I had: 238" in the plain (dots) and 126" in the patterned (leafs).  I divided these number by 4 for the 4 panels I needed to to get 59.5" and 31.5" respectively.  If you can calculate my measurements above, you will see that I barely squeaked out enough fabric!

So, tricky measurements done, I cut my fabric using my quilters cutting tools of a rotary cutter, plastic rulers and cutting mat. To make sure I cut my fabric square, I folded the fabric length wise and squared off the end using the fold as my straight line.  Once my fabric was square, I measured my cut measurements from above for each fabric:  in the leaf pattern I cut 15" 8 times (2 needed for each panel); in the dot pattern I cut 56" 4 times.

In any sewing project- or building project for that matter- cutting is the most important step.  It is important to make sure the fabric is straight and even and you are measuring correctly and cutting straight.  For these reasons, I think the rotary cutter and quilting rulers are a necessity.

For Christmas this year, I got a Huskylock Serger which made this project much easier.  If you look at the inside of your shirt, you will see at the seam a bunch of interlocked stitches.  This is what a serger does (among other things that I am still learning about).  It cuts the fabric and sews an edge that will not fray.  This is a great time saver for this kind of project because I can serge all the edges and not have to create a double folded hem.  Before sewing anything together, I serged all the edges that would be connected to fabric as well as my upper and lower hems.  This cut off 1/2" fabric.


I did not serge the edges that would form the long, vertical sides.  After serging, I sewed the two fabrics of each panel together with a 1/2" seam allowance.  Once I had my four panels sewn, I used my serger on the long vertical sides.  I sewed two panels together, making 4 panels into 2 so it would be easier to use in the shower.  You know you've done a great job cutting when 2 80" panels meet up perfectly!

Using a 1/2" seam, I hemmed all the edges.

You can see the serged edge in white thread and the hemmed thread in pink.

My biggest head scratcher in the curtains was connecting the hooks I purchased at IKEA to the tops.  There were no clear instructions or obvious ways to do it- no matter how much Andy proclaimed "just make a pocket!".  Yes Andy, sewing 28 individual pockets for each hook sounds super easy.  In the end, I used fusible tape and folded a new upper hem to tuck the hooks into.  Using the holes in the plastic curtain liner that would go inside the fabric curtain as my measuring guide, I folded in a hook every 4 1/2" and then ironed the gap in between with the fusible tape.


Honestly, this is a temporary solution which I will be fixing soon because the hooks at the edge of every curtain are coming up since the tape is not strong enough to hold them (the rest of the hooks are holding fine).  Hopefully, I will think of a solution soon and get back to you but I think the tape is a good way to start and was very easy to do- likely you will just need to sew the hooks in after getting them initially placed with the tape.

These hooks easily slide into KVARTAL track gliders and look great on either side of the curtain.  The finished curtain functions beautifully, covering the entire tub when it is shower time and adds a lot of fun to the bathroom.


Friday, August 1, 2014

Our Kiddos Get the Best Space in the House

A lot of people ask us how we accomplish so many home improvement projects with two children running loose all the time.  We give lots of answers- we work most evenings and weekends, the kids "help" out, we rarely go out to dinner/date nights, it is our hobby, etc.  Bottom line, for us it really is a hobby and something we have done since day one of our marriage (spending our Honeymoon painting the poorly painted red walls in our apartment Vanilla Milkshake).  But now with our ever growing family, we have not given up our hobby but there have been scarifies.  Mostly time.  Our current example?  I cut into our kid's bathroom floor on a frosty day in February and just now I am bringing you the final result.  5 months of renovation.  The bathroom wasn't totally unusable during this whole period- we probably had 3 months of it being closed up completely.  Obviously, if we had hired contractors or subcontractors for part of the work this timeline would have been shortened but Andy and I have never hired out, preferring to do the work ourselves for two reasons:  we can and it saves a TON of money.

So, now that you know we aren't superheroes, with this post I am giving you a summary of the completed product.  We discussed posting every aspect of the remodel along the way, but honestly we spent every waking moment working on it and not writing about it.  Instead, I will give you a total overview of our work and supplies today and then come back with a few posts detailing some of the jobs that an average homeowner could accomplish.

If you have forgotten what the bathroom looked like a mere 5 months ago, here is a refresher:

After trying to remove the flooring for a quick update, we discovered rotten subfloors and decided to take the whole room down to the studs.  There are a couple posts here, here and here with some details on our initial process in the remodel.

This is where we are today, 5 months later:


This is the view from the adjoining quilt room (we still need to finish painting the trim in the doorway white).  You will notice right away that the layout is completely different and we move the door opening a bit to the left.    The green color of the quilt room is Spring Cactus, Glidden.  On the lower walls of the bathroom, Andy installed car siding 5' tall so it goes right to the start of the slant one wall has.  He added trim to the bottom and top of the siding.  The siding was painted with a coat of Zinnser primer and 3 coats of semi-gloss white paint.  The upper walls are painted with Brown Taupestone, Better Homes and Gardens color matched in Glidden.

Now for some details.

The tub was one of our first purchases and helped center our whole theme of the room.  We found the tub on Craiglist for $200.  It was in pretty good shape but Andy sandblasted the outside and painted it with a primer and oil-based paint (hoping to get him to do a post later with these details).  The outside color is Relaxing Evening Rain, Better Homes in Gardens which we color matched in Sherwin Williams.  The feet were painted the same color.  This is the one detail in the room that I honestly don't love 100%.  I wish we had painted it the same color as the upper walls instead but that ship has sailed!

The faucet is a 3-Handle claw Foot tub faucet with riser by Barclay in chrome which we ordered from Home Depot.  We had A LOT of discussion over the shower aspect- hand held, riser or no shower.  We decided on the riser.  It will likely only get used when we have guests staying since the kids take baths up here but we thought the riser was more practical in the end than a hand held which has the potential of making a mess.  We love the curved neck design of this faucet and the three handles- hot, cold and shower.  This was a bit of a splurge at $230, though still a great deal compared to others we looked at.


I sewed the curtains using two fabrics I purchased at Jo Ann Fabrics.  It took 9 yards of fabric to get all the way around the tub.
We looked at specific claw foot tub track systems but with one wall coming in on a slant, we would have had to seriously modify anything we used and generally starting at $100 this would have been annoying.  In a brilliant moment of genius, we remembered the KVARTAL system from Ikea which has curved sections (we used this on a closet in our previous house).  It took 3 straight sections, 4 curves and 8 ceiling brackets.  We also used the KVARTAL plastic tracks as well as the metal hooks sewing onto the curtains.  I will write a post later with these details because it was kind of a pain and there wasn't much help found online.

The flooring was installed by Andy after repairing the joists and installing a new, not rotted subfloor.  It is an unfinished pine from Lumber Liquidators that we found online.  Normally, I would always recommend getting finished flooring since the cost and time of doing staining and poly yourself usually ends up not saving you anything in the end but in this case, the room is so small that we did save a lot getting unfinished.  The cost of the flooring was $100.  I wanted the natural look so we chose to leave the floors unstained and put several costs of staint polyurethane on it (following the apply, sand, apply directions on the can).

One of my favorite details of the room is the sheepskin rug, RENS from IKEA.  Not the most practical of bathmats but works fine for a second bathroom and is so soft.  F loves laying on it when we put on his diaper after baths.  I sprayed it with Scotchgard so hopefully it will hold up.  Thankfully, with IKEA prices it was only $30 so we can replace it if needed.  They have a faux one for $10 but it wasn't nearly as nice looking or as soft.

To save some money, we reused the toilet that was in the room already.  I got a turquoise wastebasket from Home Goods to add some color in addition to the coral accents I have in the room (don't mention coral to Andy or his eyes start to twitch).  We centered the toilet under the window so it was a little far to reach to a wall hung toilet paper holder, so I picked up a chrome freestanding one at Kohls.


The sink and vanity are the centerpieces of the room.  I wanted a furniture look to the vanity so I had shop in Chatfield, Minnesota, Adourn custom paint the dresser.  She mixed a chalk paint to complement our wall color for the dresser and added an adorable surprise on the sides of the drawers.
The knobs were the perfect pop of color I was looking for (coral) and add some fun and whimsy to the room.
This custom piece was $220- MUCH cheaper than any vanity I found anywhere and so much more unique.  Andy fitted in the Kraus Vessel sink we ordered from Home Depot for $100.

This was one of the things that set us back time-wise.  The sink was delivered with a crack in the side so we had to return it and order a new one- which was of course on back order for a month!  Andy shortened the top drawer right under the sink to fit the plumbing and put a slot in the middle drawer so we wouldn't loose too much storage space.
The faucet is the Delta Porter 1-handle high arc faucet in chrome ordered from Home Depot for $85.
Above the sink, is a tricky space with the car siding and slanted adjacent wall so we had to do a lot of re-planning to fit a light and mirror.
The light was ordered from Destination Lighting and is a Minka Lighting sconce wall light in brushed nickel for $80.  Obviously by my lighting choices, I am a bit obsessed with the exposed Edison bulbs right now.  I was a little worried about the finish with chrome faucets in the bathroom and a brass/brown ceiling light but I think it works and makes the bathroom look less "showroom" and fits with the old house.  We purchased a great oval mirror for this space from an antique shop (actually, after several email pictures and phone calls, my parents picked it up) but with the light we choose, it just wouldn't fit.  I finally found this mirror at the same antique shop that fits perfectly in the space and is just fine for a second bathroom.  It was originally painted gold but I repainted it with a color match of the vanity color in a Behr flat sample paint (yes, I walked through Home Depot carrying one of the dresser drawers).
We put in four hooks for towels on one of the walls at easy kid height.  In that corner, we are also storing a two-step stool from IKEA that is perfect for the kids when using the sink (which is high for them since it is a vessel).  I wanted to paint it coral- maybe just the top step but Andy's eye twitch couldn't handle it and his Scandinavian bare wood roots won so I am leaving it natural... for now.

The ceiling pendant is a Globe Electric Edison vintage pendant in brass/brown ordered from Amazon for $35 (a steal!!).  We had to shorten the cord considerably but I love the look.
Since it is such a small space, Andy installed a pocket door with locking hardware.  It was pre-primed but I still need to paint it in semi-gloss white (as well as that pesky door trim).

Finally, a little flashback.  In our first house, we also remodeled the bathroom, taking it down to the studs.  Here was the bathroom when we did our first walk-through:
 And here is what we did to it:  (sorry, not the best after pics but it's a tight space).


While I still love it (and especially miss the tankless toilet), I think it is super amusing how widely different the two spaces are.  I don't know if our tastes have changed or we have just altered our vision because of location and house type/age.  I can't wait to see what we do to the bathroom in our next house (Andy is cringing now)!

And just a little something to leave you with, the view from our fantastic space (complete with new window installed by Andy!).
Loving us a little farm living.

Friday, March 21, 2014

English Countryside Bath in Rural Iowa

After running into rotten subfloors in our upstairs bath,

Andy and I made the quick (and relatively easy) decision to tear the bathroom out and start fresh.  After two days of demo, this is what the bathroom currently looks like.


Pretty sweet.  Luckily Andy hasn't run into any other major issues though he has come across several layers of drywall/plaster on the walls, some "fantastic" old wallpaper and flooring
Miscellaneous old flooring
Wallpaper on drywall layer #2
 and a wasps nest that went from the exterior of the house all the way into the interior wall.
Wasp nest
With all the layers of walls we are tearing out, we should gain a couple of inches in the room!  One of the things that Andy and I always laugh at when we watch shows where homeowners take the reins in demo is the crazy people who go at rooms with sledgehammers.  I have never seen Andy use a sledgehammer in any demo.  His tools are a crowbar, utility knife, drill and brute force.  Gets the job done efficiently with easier clean-up when it is all said and done.


So now that we are getting down to the bare bones, Andy and I are negotiating the design and layout of the new space.  I looked at a lot of design books and magazines as well as Pinterest boards and settled on a style I have named "English Countryside Bath".  I'm thinking claw foot tub, rustic wood floor, roaring fire, sheepskin bath rug.  Ok, scratch the roaring fire but everything else stays.  I want the bath to feel warm and inviting and like it has been there forever but still matches with the rest of the house.  The biggest must for me for this design is the claw foot tub.  These can run you at least $1000 but thanks to Craigslist, we are hoping to swipe one for much less than that.  The nice thing about claw foot tubs is you can have them refinished for $350-500 (which if you got it for free, isn't too bad) and you can easily paint the outside to freshen them up.

The other big piece of furniture in the room is the vanity.  My plan is to find a thrift store dresser to paint up and fit with a sink- probably a vessel sink with faucet coming out of the wall.  The bathroom is small and hard to find storage solutions with the slanted wall so I am thinking a dresser vanity would be perfect for storage of towels and bathroom basics.  Since it is a kid's bath, we don't need much more storage than that so I think it will work out well.

Finally, the last design piece of the bathroom is the flooring.  This is what got me into trouble to begin with when I had a vision of painted rustic subfloors... which lead to the discovery of rotted, rustic subfloors.  Once we decided to rip out the bathroom, Andy and I were planning on laying a plywood subfloor and just painting that for the time being.  On a whim, I looked up floor on Lumber Liquidators and found a perfect pine floor which would only cost $100 for the whole room!  The flooring is unfinished.  Usually when we buy wood floors (like in the playroom) we buy finished since it is so much easier and ends up costing about the same once you put all the supplies into finishing unfinished flooring but since we are going for a rustic look, and the room is so small, unfinished works well for the bath.  I am planning on staining them- possibly something like this picture I found originally and then protecting them with a coat of Polyurethane.

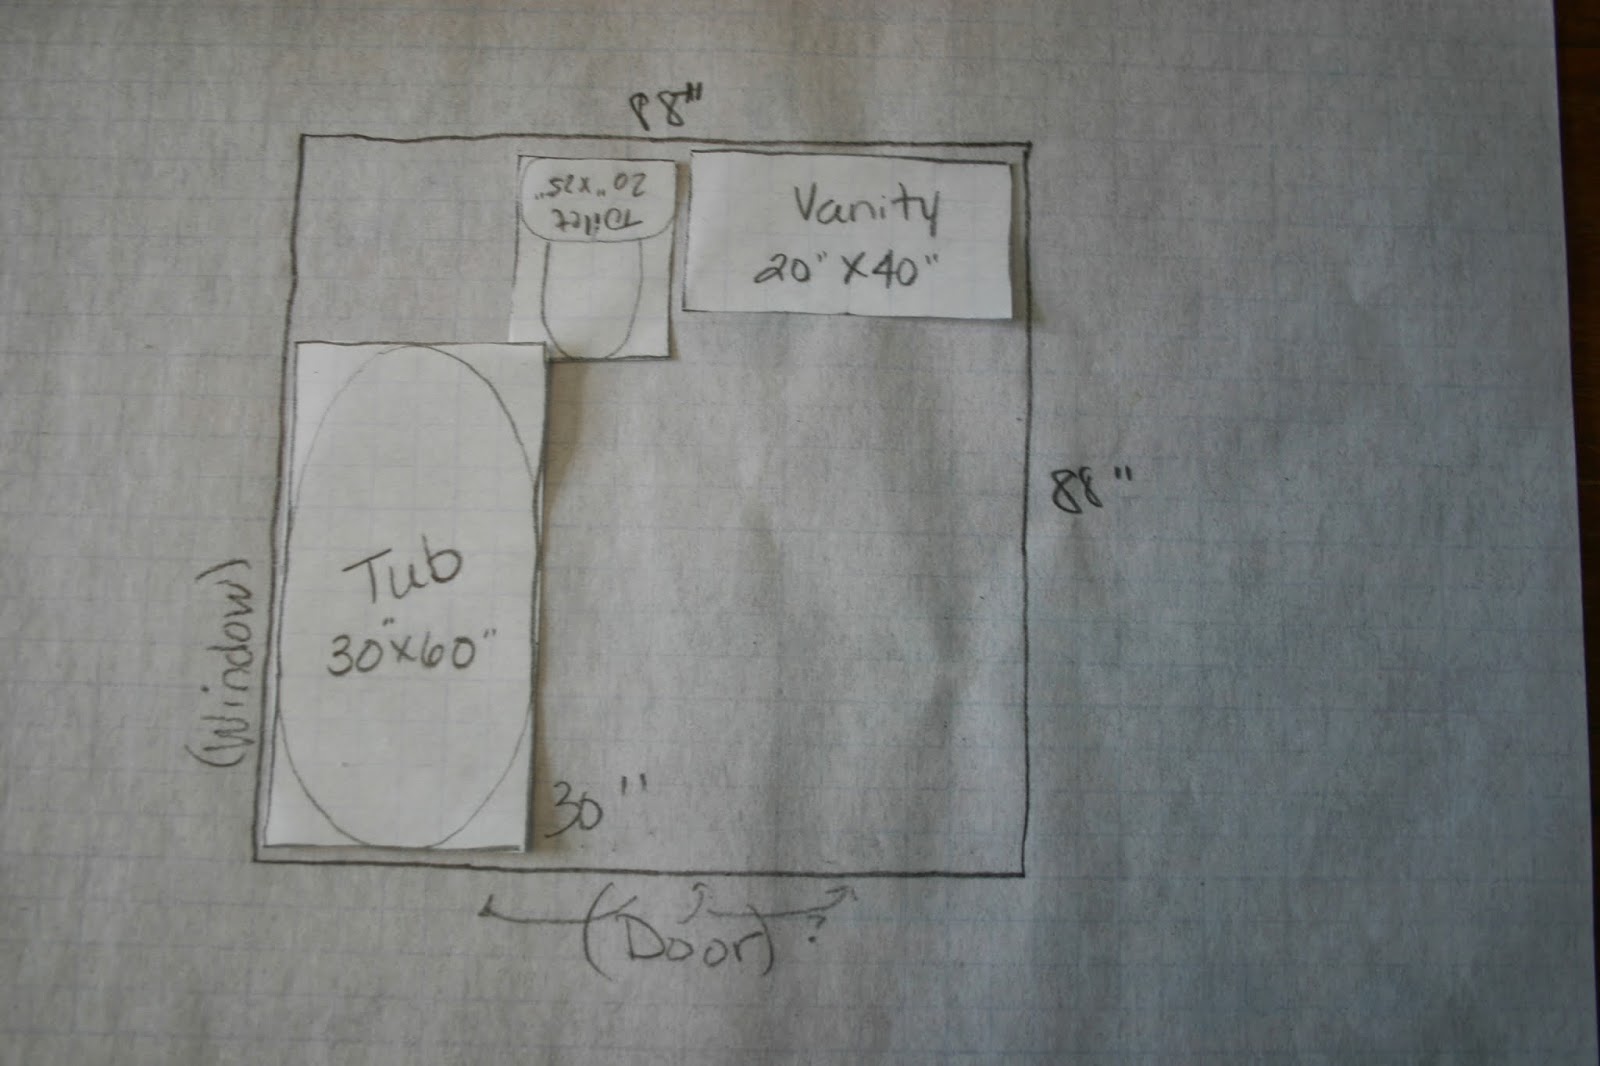
I am a very visual person, so to get a feel for the layout, I first tried marking the bathroom perimeter in the living room and using our coffee table as a tub.  After dragging the coffee table around once, I decided I could come up with something better.  Channeling Andy's compulsiveness, I grabbed some graph paper and created a bathroom layout to scale.  I then drew a tub, toilet and vanity to scale using generic measurements and cut these pieces out.  This way, I could move around the furniture in every configuration to get a better feel for spacing and flow.  Our main challenged in the room is the slanted wall which means the tub has to go on one of the two perpendicular walls so we can outfit it with a shower head.  Also, the slanted wall makes it hard to put a vanity there since there really wouldn't be a good place to put a mirror.  Luckily, we can be flexible about the placement of the door since that wall has to be torn down anyway and we are planning on putting in a pocket door.  After all of those considerations/issues, these were our top choices:
Option 1- Door stays where it is, tub along window wall and toilet and vanity on slanted wall.

Option 2- Door moves to middle of wall with toilet along slanted wall.
Option 3- Door moves to middle of wall with toilet under window and vanity along same wall.

We aren't set 100%- we will buy the tub and vanity and see what their exact sizes are but we are leaning toward option 3.  We talked a lot about option 2 but I just couldn't imagine walking into the bathroom and looking right at the toilet.

Now that our overall vision is pretty set, Andy and I are scouring thrift stores, Habitat Restores, Craigslist and salvage stores for the perfect mix of vintage and modern- all while sticking to a tight budget.  We hope to regale you with our exciting shopping excursion to Minneapolis (all the locals call it "the cities" but we still haven't gotten that lingo yet) where we plan to hit three salvage stores and hopefully pick up a claw foot tub we have negotiated through Craigslist.  Wish us luck!