Tuesday, August 26, 2014

My Complete and Total Failure as a Farmer

Confession:  I am a terrible vegetable gardener.  After having the best intentions last summer, Andy building four amazing vegetable boxes and then working this spring to prepare the boxes with grids following the "Square Foot Gardening Method", this is the conclusion I have come to.  Vegetable gardening is just not my thing.  I'm actually super embarrassed to admit it.  We live on four acres surrounded by amazing farmland and fantastic farmers.  I feel like it is a necessity to our farm life.  I actually love gardening in general (though, Andy will be the first to shout that I have let weeds get out of control even in those beds this summer) and have some seriously generational gardening genes in my family thanks to my mother and grandmother but let me tell you.  I have decided that vegetables are just not my thing.  While I am horrified to admit it my garden currently looks like this:

Can't decipher the walkway from the beds due to all the weeds

More chaos
While I am totally embarrassed to be writing this post, I don't want to give the impression that all of our projects are a success.  Vegetable gardening can actually be kind of expensive (especially if you let your produce go to waste), so I think it is really important to determine what you actually want to eat from your garden and how you want to use the produce harvested.  Though my conclusions certainly won't be the same as anyone else, I will still go through a list of what I had success with, what I didn't and why so if you are thinking of starting a vegetable garden, you might have a good idea where to start.  I also have provided links to my favorite recipes that you might find useful.

Failures:
-Snap Peas
-Lettuces
-Spinach
-Kale
-Peppers
-Cantaloupe

With the exception of the cantaloupe (which was planted the week it decided to stop raining so it died) and snap peas (which ripened the week we were on vacation), all of these veggies are pick and eat as they ripen.  I think this is the category of plant that most vegetable gardeners love but this is not for me.  I plan meals for the whole week on Friday and don't think about what is going to be ready in my garden and meal plan around that.  The lettuces, spinach and kale need to be cut every few days when it is ready and we really don't eat that many salads so it would get forgotten then quickly overgrown.  I got a couple of peppers off the plants but again, would set them aside and forgot about them when grocery shopping.

On the Fence/Yet to be determined:
-Flowers
-Tomatoes
-Potatoes
-Soy Beans
-Butternut squash
-Pumpkins

With the exception of the flowers, these vegetables have not fully ripened yet so I am not sure if they will end up being useful or not.  I planted a few flower seeds- marigolds and red zinnias to help keep out pests.


Most of them did bloom and actually look really pretty... I just don't know if I would want to take the space out of the beds again for them.  I think if I had smaller beds, I would definitely not waste the space again but since mine are pretty massive, I might give it a go again next year.

I have tried tomatoes two summers now- last summer was too dry and cool that they never ripened and I have a feeling it will be the same this year.  I would love to can some salsas and diced tomatoes but if they don't ripen by frost this year, I am not planting them again next year.


The soy beans are almost ripe.  We have gotten a lot of grief for planting soy beans when so much of the Iowa farmland is devoted to soy but we really like eating edamame and they are easy to bag and freeze.  As long as I remember to harvest these, I will do them again.

I am excited for the butternut squash and pumpkins.  These were both easy, low maintenance plants and nice because you can easily see the vegetable grow and know when it is ready to pick.

The only downside is they take up a lot of space but as long as they ripen according to plan, I would do these again.

Successes: 
-Carrots
-Onions
-Apples
-Asparagus
-Rhubarb

This really shows how lame of a gardener I am because of the successes, 60% I didn't have anything to do with- they were already planted and established when we moved here.  Of the two that I planted- carrots and onions, these were just simple.  The onions are easy to plant because you plant sets (which are just bulbs) and then can harvest and store for a long time so there is no rush to use them quickly.  I just pulled carrots yesterday, which the kids LOVED doing.  We only had a few squares of them so they are manageable enough to just cut up and eat as snacks for the week.

I think the reason I like the apples, asparagus and rhubarb is they are harvested over a few weeks and you get a lot of yield for little work (once the plant is established).  With each of these, when they were ripe we would do some recipes right away for dinner or snacks (asparagus side dishes, apple crepes, rhubarb muffins, apple pie etc), can/freeze some plain (we just did 20 lbs of peeled and sliced apples in bags ready for fillings throughout the winter) and can/freeze jams or sauces (rhubarb jam, applesauce, pickled asparagus).
Apple Crumble Pie

The bottom line is I think I prefer to grow things that I can make into snacks or condiments as opposed to dinner.  Though it is a lot of work, after a night's laboring through canning you can have a whole year's worth of applesauce, jam, salsa, sauce, etc.  I like this because I don't have to use up the vegetable the week it is ready to be harvested but you still get great flavor for the whole year.

Things I should have planted but didn't:
-Zucchini
-Strawberries and other berries
-Bananas (yeah, I know there is no way I would ever be able to plant these unless we moved WAY South but man, I wish we could the way my family runs through them)

Why did I not plant zucchini?  I really have no idea other than I just lost track and never got around to it.  Luckily, several friends in the area have given me plenty of extras from their patches so I have been able to shred it (in the food processor) and freeze baggies of it already shredded or make it into breads/muffins.  This zucchini streusel bread is AMAZING, these cookies are yummy (and freeze well too) and we did these fritters for dinner one night which were fantastic.

I didn't do any berries this year, but I think the kids would love to snack off of them as they ripen and this is also an easy fruit to turn into jams.

So, considering I have a freezer full of cut up vegetables/fruits and a shelf full of canned sauces/jams/pickled vegetables I guess I can't really be called a failure.


But countered with the pounds of produce I have let die in the beds I can't be called a success either.  Ultimately, I think I am a very selective vegetable gardener and probably won't continue once Our Acreage Adventure is over.  Hopefully, we will always be near a fantastic farmers market!

Sunday, December 22, 2013

Cottontail Dinner

Megs is always hounding me to “take pictures for the blog, take pictures for the blog”. This event was no different but she did add the caveat… don’t make it gruesome. Although I think hunting helps to sustain a healthy habitat, the act is not for the light of heart. So when I showed Megs the action shots of cleaning said animal she was concerned for our viewers. Please note that this blog post contains pictures and descriptions of responsible hunting and if you are not interested please join us again on our next posting!

A few months ago Megs and I started to notice a trend. When I was able to get out early on Saturday morning for some “woods” time, I was a lot more enjoyable to be around during the rest of the weekend. I love my job but it comes with a lot of desk time and I really need to get out into the fresh air as much as possible to balance my sanity.

One of my absolute favorite spots to spend time outdoors recently is my buddy’s mom’s place. It is 120 acres of rolling woods and fields, northeastern Iowa cliffs and river valleys. It is a great spot all year round. My buddy AA introduced me to squirrel hunting last year and I have grown to love the activity. Most people, including myself would never dream of eating the garbage-fed tree rats in the city suburbs, however around here country squirrels are considered free range in most people’s minds.

Not an attractive woods selfie, it doesn't get much better
The idea is to get out to the woods in the dawn hours and find a grove of oaks to sit quietly and wait. Getting out early is important because you want to be in place before the squirrels wake up and come down from their nests because once they are on the forest floor they are impossible to see or shoot.

I have been out to hunt squirrels 8-9 times but only have come back with a squirrel in hand once or twice. There are always squirrels out there but grey squirrels are small and not worth the effort for the most part. Red squirrels are where it is at, but more accurately, the hunting part of the event is overshadowed by sitting quietly out in the woods and watch the world transition from night to day. Birds start to chirp, turkeys cackle, deer grunt and spit (not a majestic creature the deer), and all the nocturnal animals head to their dens.

On this outing the weather had turned cold and not much was moving around, including the squirrels. I was the only idiot not tucked up in their respective beds staying warm and dry that morning. After about an hour of meditation I stood up, stretched and decided to take a meandering valley out of the woods and back to the car. Bushwhacking through scratchy terrain is most people’s idea of torture, especially my sister, but I was having fun. Suddenly there was a flash of fun nearly under my feet. During my heart attack I realized it was a decent sized rabbit… good enough for dinner. Pop!

Once ol’ fluffy was bagged up I headed home. Megs always told me she was fine with my hunting as long as I didn’t bring anything home. Rabbit, however, is one of those animals that show up on high class menus so I thought I could swing it, and to my excitement Megs was on board. She even picked the recipe, beer braised rabbit with rosemary gravy. I set out to prep the beast for cooking. Some water, gloves, my knife and a plastic bag for the offal. I decided to lay down a spare scrap of house wrap to catch all of the what-have-you’s and keep my shop floor clean. I won’t go into detail how to clean a rabbit, you can look online…I did.
Furred

Un-wrapped

Once prepped and washed thoroughly in the sink, I cut it in 6 major components then drenched it in egg and rolled it in flour.  I heated some olive oil in our favorite La Cruset dutch oven and browned the rabbit chunks, in batches on both sides. Once that was complete I added all the chucks back into the pot and covered it with salt, pepper, rosemary, a bottle of dark beer, and a container of chicken stock. An hour later yielded a cooked rabbit, and it was now time to use the cooking stock to make gravy… I love you gravy.  Make a rue, add it to the stock, ka-pow, gravy!

Looks a little more store bought now

I liked the rabbit flavor and the gravy this recipe made was outstanding but I think the cooking instructions for the rabbit made it tougher than it could have been. We all ate it but I was the only one who ate the leftovers. One of the ladies at work makes a rabbit “McNugget” that are fabulous and I will plan that for my next foray into loveable edibles. My next foray could fairly come soon as I just found a rabbit superhighway in the back part of our property.


Stay tuned to hear all the antics of my first deer season and the 3 projects I am behind on writing about!

Ap

Saturday, December 7, 2013

Hunt Day Recipes: Sourdough Cinnamon Rolls and Garbage Energy Bites

Today marked day one of shotgun deer season here in Iowa.  Our previous life in Illinois did not include any hunting (unless you count the night Andy stuck his BB gun out of our bedroom window to ping a rogue raccoon that had climbed up on the roof).  Once we moved to Iowa, we quickly learned (much to Andy's delight) that it is pretty much the norm where we are at.  Our first experience with shotgun season was a year ago- a few months after we had moved here.  Andy was excited to head out on his first 'hunt', though he hadn't gotten his license yet so he was just going as a spectator.  I remember the day clearly- shotgun blasts ringing across the fields all day long which had me convinced the zombie apocalypse had finally happened while deer frantically ran through our property with a frenzied look in their eye looking for a safe haven.  Deer hunting always makes me think of "My Cousin Vinny" when Mona Lisa Vito (played by Marisa Tomei) is outraged at Vinny Gambini's (Joe Pesci) nonchalance about going hunting.  "Imagine you're a deer. You're prancing along, you get thirsty, you spot a little brook, you put your little deer lips down to the cool clear water... BAM! A fuckin bullet rips off part of your head! Your brains are laying on the ground in little bloody pieces! Now I ask ya. Would you give a fuck what kind of pants the son of a bitch who shot you was wearing?"

Now, I am a pretty typical, meat-eating American and I am very aware of where the meat that I eat comes from.  I don't love the idea of hunting, but I also realize it is a necessity in many areas and won't get all outraged at Andy's interest in hunting.  Despite this, though, I have put my foot down on Andy bringing home a carcass.  I literally have no interest in eating deer so our deal is, if he catches one (my terminology for shooting because it sounds less gruesome) he will donate it.  There is a local food bank that will take the deer and give it to needy families in the area.  A win-win in my book.

So, Andy has been preparing for his big hunting adventure all week.  He was like a boy at Christmas, laying out his clothes, sewing hand-warmers, checking with his hunting buddies that they had their plan down.  It was pretty amusing how confident he was that he would catch something.  Looking at the weather forecast for today, the high was going to be a mere 11 degrees.  I was actually a bit gleeful at the cold weather as I think it evens the ground a bit for the deer but I also was concerned about Andy keeping warm and staying well fed.  So I devised a menu for hunt day to supplement the food that would be a the base house (pancakes, eggs, chili, lots of white bread, etc):  Sourdough Cinnamon Rolls and Garbage Energy Bits.

Sourdough Cinnamon Rolls

For the Dough-
1 cup sourdough starter (we were just given some from a neighbor and it is like having a tamagotchi pet again- you have to remember to feed it and care for it but so far it is worth the trouble)
3/4 cup milk 
2 T butter, room temperature
1 egg
1 t salt
1/4 c granulated sugar
3 1/4 c bread flour
1 t instant active dry yeast

For the Filling-
1 T butter, melted
2 T granulated sugar
2 T brown sugar
1 T cinnamon

For the Frosting-
2 1/2 ounces cream cheese, room temperature
3 T milk
1 1/2 cups powdered sugar

For the dough, warm the sourdough starter and milk until just simmering.  Remove from heat and whisk in the egg.  In the bowl of a food processor with the blade attachment, mix the salt, sugar, flour and yeast. 
Yes, that IS E's foot on the counter.  My trusty helper is sitting on the counter pressing the pulse button when needed.

 Pour in sourdough starter mixture and butter and pulse until just combined.  It will be really sticky and moist.  Dump onto a floured towel and sprinkle some flour on top.  

With floured hands, kneed quickly into a smooth ball.  

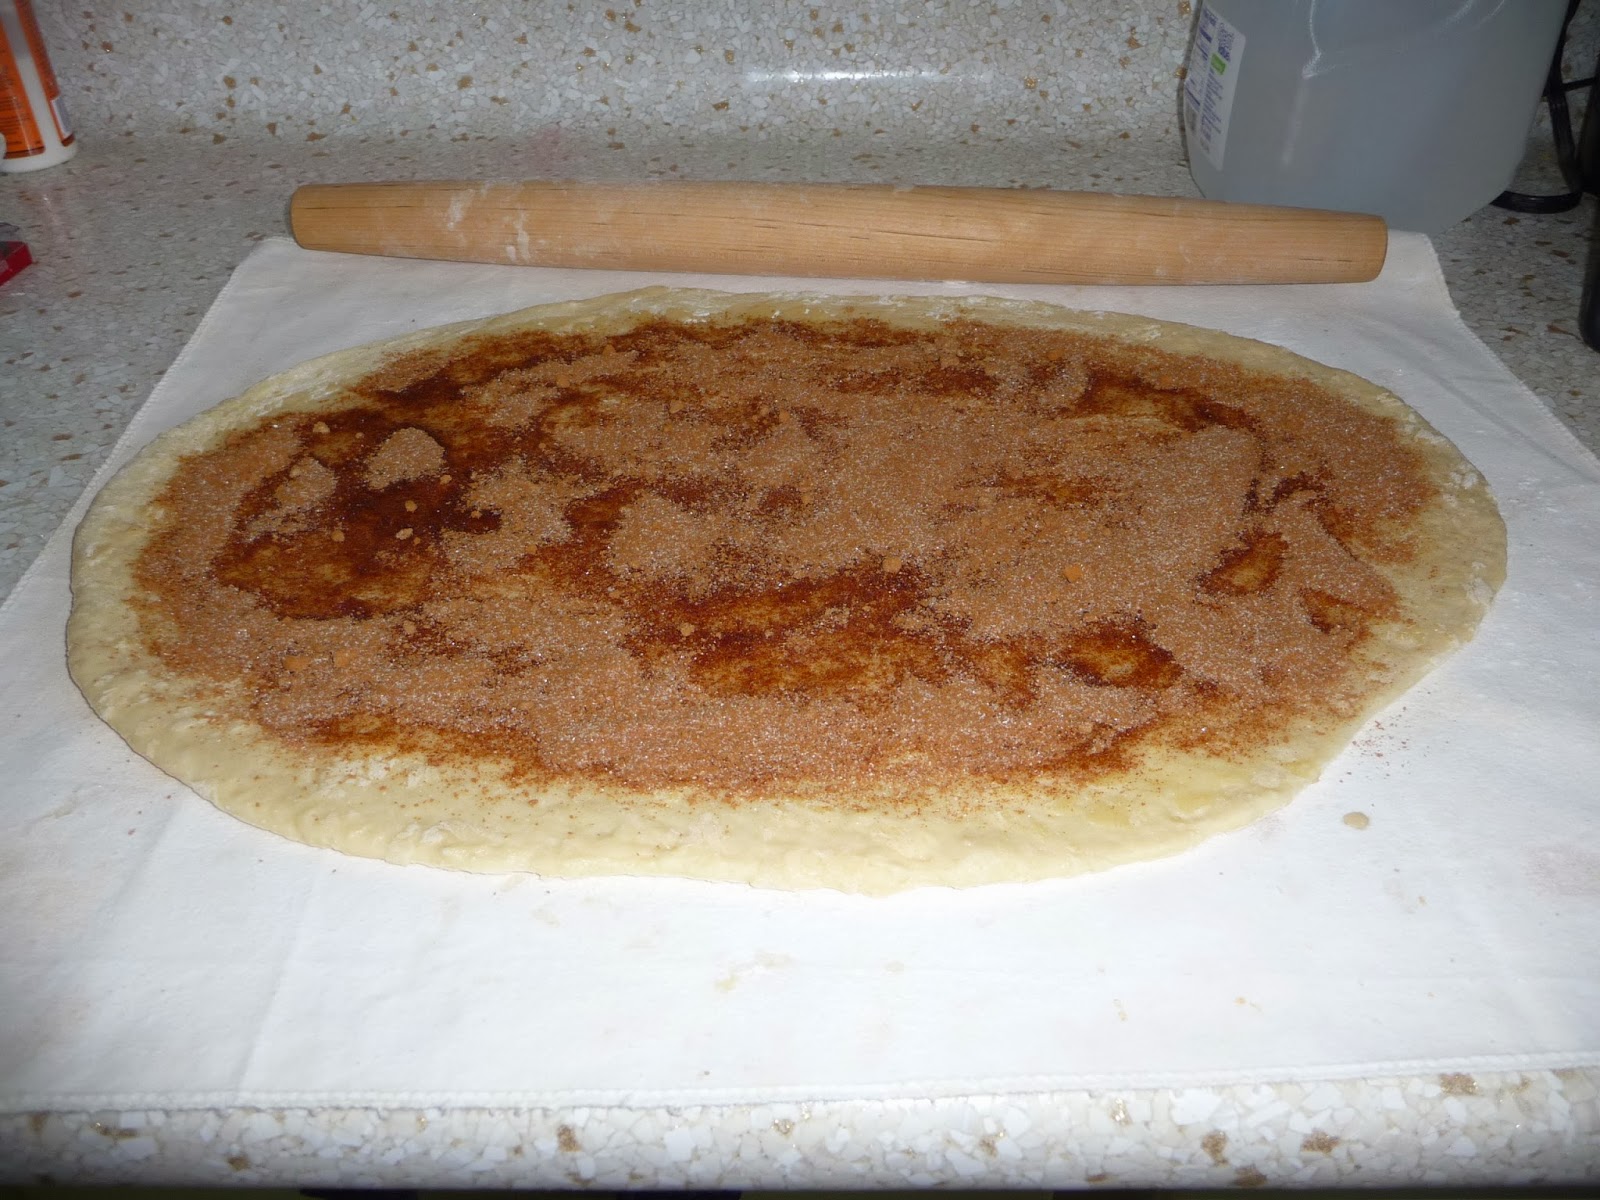
Cover with a towel and let rest for 15-20 minutes.  After the dough has rested, roll into a 15x24 rectangle. 

 Brush 1 T melted butter on top.  Mix the rest of the filling ingredients and sprinkle evenly on top.  

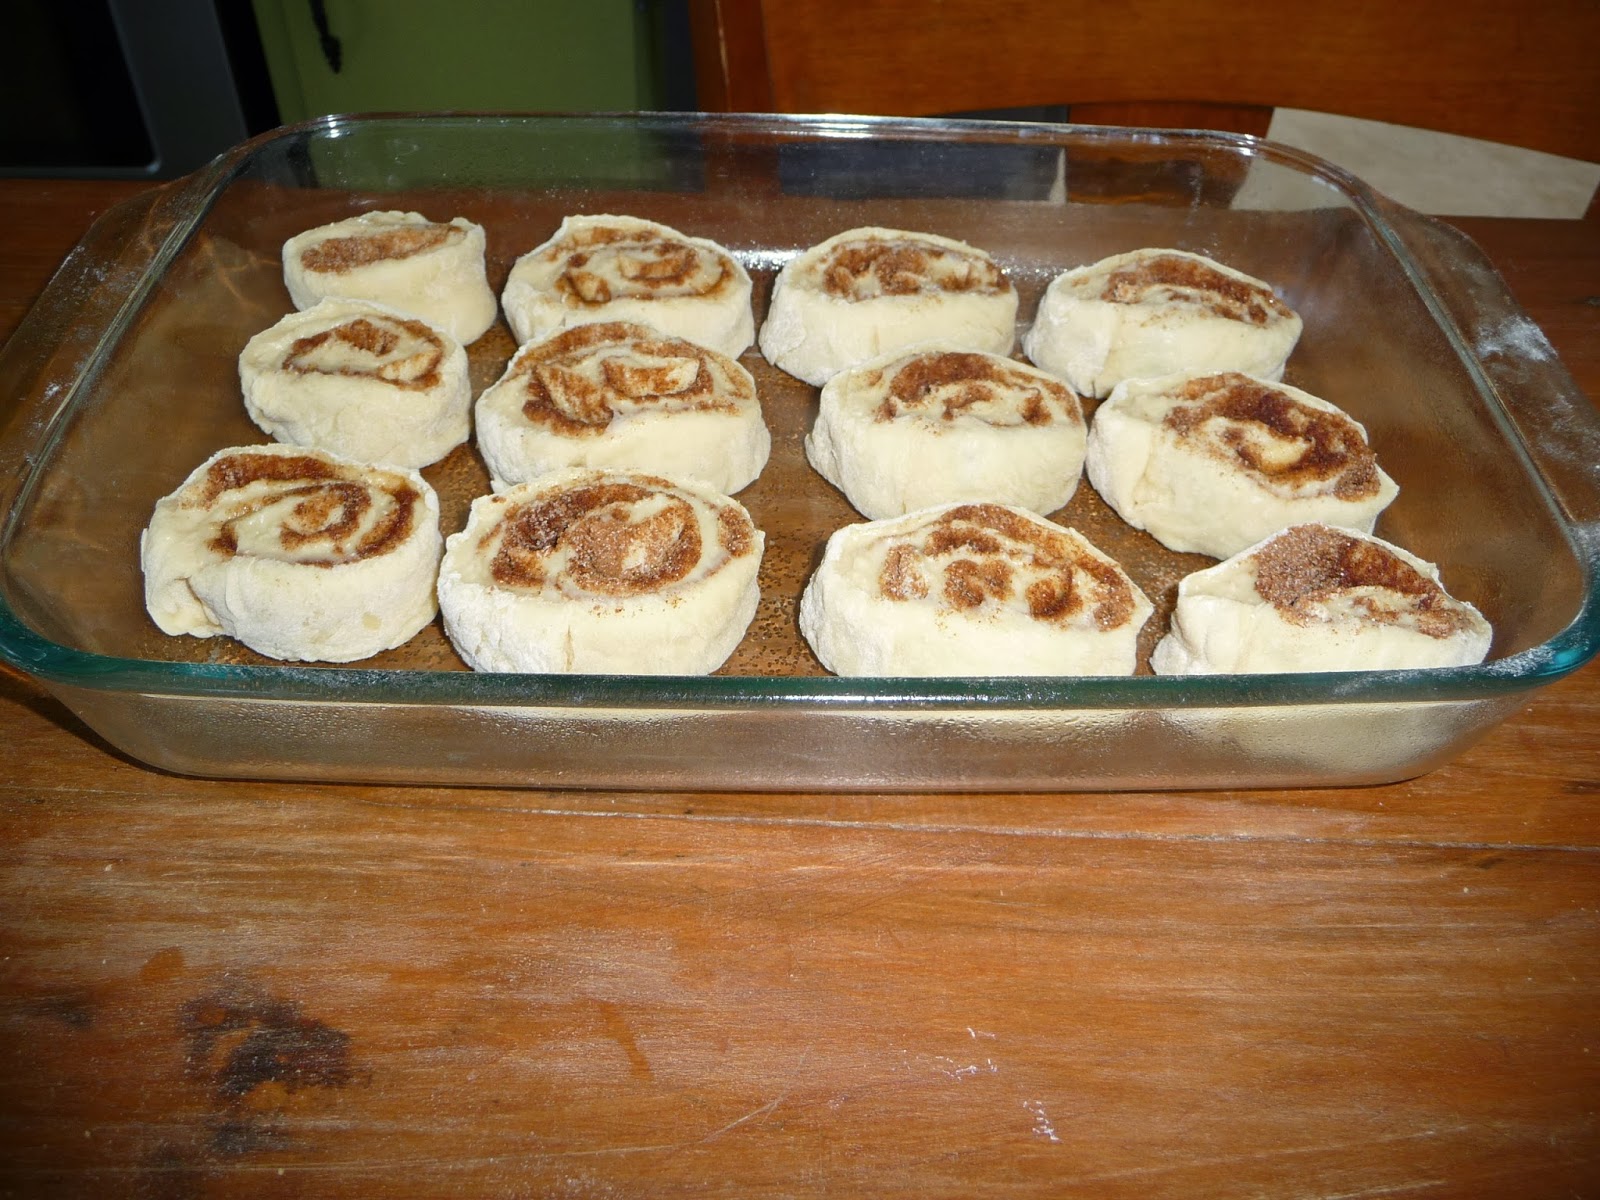
Starting with the long side, roll up the dough, pinching the seam to shut.  Cut the rolls into even 1 1/2" sections. 

 Place rolls in a greased 9x13 pan, leaving space in between each roll.  

Cover and put in a warm place for at least an hour until they puff up to touching.  
My secret weapon is putting a heat pad under any bread I am trying to rise

Preheat oven to 350 and bake for 20-25 minutes.  Let cool (or if you are like me, spread frosting on hot rolls which will cause it to fall off but allow you to eat piping hot cinnamon rolls-yum!!)

For the frosting, whip cream cheese until fluffy.  Beat in milk and powdered sugar until smooth.  Spread over rolls and serve immediately.

Notice the 2 rolls I took out before Andy took them on the hunt for breakfast for myself and the kiddos at home.  YUM.


Garbage Energy Bites
Adapted from gimmesomeoven.com

When I knew Andy would be out in the cold, I had imagine him needing a snack to really stick to his bones.  In my mind, I imagined making him the craft kids make as a bird feeder- seeds stuck by peanut butter on a toilet paper roll.  While Andy found this amusing, he did not find it appetizing.  So, I went back to the drawing board and found a great recipe for Trail Mix Energy Bites at gimmesomeoven.com.  The site has a ton of variations but I decided to use the peanut butter based one.  I call mine garbage bites because I basically took whatever nuts we had on hand and threw them in.

1 cup puffed rice cereal
1/2 cup peanut butter
1/2 cup mini chocolate chips
1/4 cup chopped almonds
1/4 cup chopped pecans
1/2 cup sunflower seeds
1/3 cup honey
1/3 cup dried cranberries
1/4 cup wheat germ
1 T chia seeds

Stir all the ingredients until coated well.  

Cover and refrigerate 1-2 hours.  Press into a greased baking dish and cut into granola bar size pieces or roll into balls.  Keep in fridge to maintain shape (though they don't have to stay in the fridge for freshness).


My snack plan seemed to work because Andy came home tonight (empty handed) with a full tummy and generally pretty warm and comfortable!  Success!

Tuesday, August 27, 2013

Homemade Apple Butter Recipe

Our apple tree is raining apples.  Literally.  I go outside everyday with the kiddos to pick-up apples off the ground.  I have almost been brained a couple of times from kamikaze apples dropping from the tree.  Even though we had nothing to do with the planting and cultivating of said tree, I am driving myself crazy trying to use all the apples for something.  I hate seeing so many go to waste!  After a successful canning session making applesauce, I decided to try apple butter with the "fallen" apples (apples that are on the ground, not apples that went to the high school dance with the bad boy).

Apple butter must have been "invented", when the pioneers were making applesauce and forgot about it on the fire for a long time.  Applesauce cooks low and slow and eventually is cooked down into a silky, butter-like consistency.  Add in some sugar and spices, and it is a delicious condiment.  I found lots of recipes online, but mostly adapted mine from http://www.pickyourown.org/applebutter.htm.

Ingredients:
Makes about 8 pint-sized jars of apple butter

Applesauce, divided (either jarred or homemade from about 20 lbs of apples)
2 cups brown sugar, divided (I used brown; the recipe above uses white; other recipes don't use any and some recipes use up to 4 cups of sugar)
2 T cinnamon
1 t cloves
1/2 t allspice

Step 1-  Make the applesauce.  I did homemade again and it took about 20 lbs of apples- 2 full large pots of cut-up apples.

Step 2- Put the applesauce into a large crockpot until it is 1" from full.  Since I made my applesauce, I didn't have time to do the crockpot in one day so I put the applesauce in the fridge overnight and started my crockpot at 8 pm the next day.  I had about 6 cups of applesauce leftover so this went back in the fridge for later.

Step 3-  Add 1 cup brown sugar and spices to applesauce and stir.  Cover, leaving a gap to let out steam.  Based on the advice from the website above, I used bamboo skewers to prop my lid up a bit.

Turn the crockpot on low and let cook until it is reduced by about half.  This took about 12 hours in my crockpot.  I did stir it a few times but didn't have any issues with it burning on the sides.  Remember all crockpots cook differently... mine seems to cook pretty evenly and heats up pretty slowly.

Step 4-  Add in the rest of the applesauce and 1 cup brown sugar and combine.  I had about 6 cups left and it filled the crockpot back to 3/4 full.  Continue to cook on low, partially covered for 2-3 more hours.

This is a good time to get your jars ready.  Wash them in hot, soapy water and then sanitize in the dishwasher on the "sanitize" cycle or on the stove in boiling water for 10 minutes.  Put the lids in a bath of almost boiling water for 5 minutes (do this right before you are ready to can).

Step 5-  I wanted my butter really smooth, so I used a hand-held blender to smooth it out.

Turn the heat on your crockpot to high and get it to boiling so it is ready to can.  (If your crockpot doesn't get hot enough to make it boil, move the apple butter to a pot on the stove over medium high heat).

Step 6-  Carefully poor the molten (lava-like), hot apple butter into the hot jars 1/4" from the top.  Put on the lid and lightly tighten the ring.

Step 7-  Process the jars by putting them in boiling water (1" over tops of jars) for 10 minutes (check this based on your altitude!).  Take them out carefully and put the processed jars in a draft-free place overnight.  After they have cooled, check to make sure the button is depressed.

Processed correctly, these should last 2-3 years jarred or 2-3 weeks in the fridge.  So far, we have had this on toast and on graham crackers (F's favorite).  I am excited to try some melted over roasted pecans and sprinkled with salt.  Sounds like the perfect fall treat to me!

Monday, August 19, 2013

My Accidental "Naturally Grown" Applesauce

One of our coolest inherited items on our farm is a huge, beautiful apple tree.  The tree sits on the south side of our house and gives great shade where the kids like to play.  Last summer, we had just moved in and were going through a drought so we totally ignored the tree.  We picked up fallen apples and threw them into the neighboring field but other that that, did nothing.  This summer, we enjoyed watching it bloom, than again forgot about it as we got busy with our other projects.  And then came the caterpillars... and caterpillars... and caterpillars.  They were literally falling from the tree.  And though E loved collecting them (calling them "Mr. Caterpillar") we had no idea how to get rid of them.
E with "Mr. Caterpillars"
I research online and found out we should have sprayed our tree in the spring to prevent the caterpillars from making bags all over the tree.  So, we made a note to do this next spring and again, ignored the tree.  Well, August has come and our tree is filled with apples ripening.  Lots of apples have fallen to the ground so I started researching (my favorite thing) things to do with "yucky" apples since it seemed wrong to just waste them.  I learned you could make applesauce out of these apples as long as they were sweet and not sour (like Granny Smith) apples.  We don't know what kind of tree we have (we are guessing Jonathon) but Andy taste-tested and declared them sweet so it's applesauce time!

Esther and I spent a few days picking up apples from the ground that still looked pretty good.
Several websites I read said you can often ask apple orchards for discarded apples as they keep bags of them in the back for cheap so if you don't have an inherited apple tree sitting in your yard, this is a good option.  A lot had worm holes (due to not spraying) but I was confident we could cut out the bad sections. We collected a lot in just a few days.  I washed the apples in cold water right before I was ready to use them.
Once the apples were washed, I used my apple corer to cut and core then checked the slices and discarded any that were too spoiled.  I didn't find any bugs (thankfully).
My discards went in a bucket for the compost heap (circle of life).
The good pieces went into a large pot with an inch of filtered water (you can also use apple juice).
I filled up the pot with apple slices, put the lid on, then put it on the stove over high heat.  Once it started to sputter, I turned the heat down to medium.  It took about 20 minutes for the apples to turn to mush.
Once they were REALLY soft, I put them through a hand-cracked food mill.  You can also use a strainer or KichenAid sieve/grinder attachment.  I thought the food mill worked fine for $30 and didn't take much time at all.
Once the applesauce was made, I put it back in the pot and kept it warm while I did another batch.  (It took me two full pots for all the apples I had collected). The only thing I added was cinnamon.
Meanwhile, I prepped my jars by washing them in warm, soapy water and then sanitizing them in boiling water for 10 minutes. (The instructions on the Bell jar box)
The lids were put in a pan with hot, but not boiling water for 5 minutes.
Once the applesauce was ready, I spooned it carefully into the jars, cleaning up any that got on the outside or rim, to a 1/4" from the top.  I set the lid on top and gently tightened the ring around them.  The filled jars were put in a large pot and covered with water 1" above the lid.  For my sea level, the jars needed to boil for 15 minutes.

 I lifted the jars out of the water with a jar lifter and let them cool overnight.

Once the jars cooled, I checked their seal by making sure the button in the middle was pressed down.  So, by completely forgetting about our apple tree then ignoring it once we realized it was infested with caterpillars, we ended up with 8 jars of FREE, naturally-grown applesauce!  I call that a yummy win.

Thursday, August 1, 2013

Ice, Ice Baby

One of our small gardening projects this spring was putting in an herb garden.  I cleared out the old garden around the house and moved everything around, creating a nice spot for herbs right next to the side door.
I kept it really simple, just putting in the herbs we use most- chives, parsley, 2 kinds of basil, 2 kinds of thyme, mint and sage.  I also planted some lavender and hyssop in the back to add some color and height.  All the herbs were from one of my favorite Decorah spots- Seed Savers Exchange.  We have been using the herbs frequently in meals and vinaigrette but they have grown tremendously and needed some serious trimming.  Instead of letting a lot of good herbs go to waste, I decided to try herb ice cubes.  Extremely simple and took about an afternoon.  I cut down each plant by half and washed them thoroughly.
Make sure you dry the herbs really well or they will become a mess when you cut them.  I chopped each herb into small pieces.
Once they were chopped, I put 1 tablespoon into each ice cube tray compartment and filled with water.
A quick trip to the freezer and MAGIC!  Frozen 1T amounts of herbs ready to go!
I popped the frozen cubes into labeled baggies and threw these into the freezer for use later.
The best part was I was able to use one of my ice cubes a few days later in a recipe.  I was so nice just taking one cube out of the freezer instead of spending the time washing and cutting herbs.  A very successful way to save herbs!  Now, any suggestions on ways to preserve (freeze, can, dry, etc) my lettuce, cabbage and kale plants?  They are getting out of control and we can only eat so much of salad and kale chips!!!