Tuesday, March 11, 2014

The Tarantino Project

Yeah, so this bathroom's gettin' torn out.


So, I'll pull a quick "Tarantino" and back up this story to last Friday night.  After finally choosing a paint color for the bathroom and getting the ceiling and walls painted, I decided to remove the linoleum and plywood flooring.  Andy is on a business trip and would usually handle this sort of thing but I decided to sort of surprise him with a finished project (and my awesomeness) when he returned.  (It wasn't really a surprise since I consulted him on what I needed to do, but the thought was the same).  The linoleum was actually in fine shape but it didn't match which the character we are trying to restore to the house- modern farmhouse charm.  The plan for now was to take out the linoleum and paint the sub floor underneath with a blue and beige stripe.
Flooring inspiration
We had success removing linoleum and painting the sub floors in the upstairs hallway.  One huge note before I get into my process- linoleum and adhesive prior to 1977 may contain asbestos so if you are unsure of the date of your flooring, have a contractor check first.  We were sure this flooring was less than 10 years old so we didn't have to worry.

My first order of business (after tucking the kiddos into bed for the night) was removing the toilet.  I Googled "removing a toilet" and found two helpful resources:  a Home Depot article and a YouTube video.  I can't imagine what people did before the Age of the Internet!  I was a little concerned at the Home Deport article's project time of 2 hours but I figured I could bang it out in a night.  I pretty much followed the directions exactly though when I got to removing the tank from the seat, I realized I hadn't grabbed the right tools from Andy's shop.  Instead of walking outside in the pitch black and possibly being abducted, I decided to try and tip the whole toilet on it's side.
Unfortunately I didn't have anyone to take a picture of me standing on it with one foot after I had conquered it
Success!  No problem at all.  I dragged the toilet on a drop cloth out of the room and removed all the wax around the ring, clogging the pipe with an old towel to prevent sewer gases from gassing me out.

The 2 hour time frame was bogus- it took about 15 minutes (so it would probably take a normal person about 5 minutes).

Now that the toilet was removed, it was time for serious business- removing the flooring.  I closed off the room with a drop cloth and again went to my trusty friend, Google finding a helpful video to get me started.  Andy coached me through operating the circular saw over a FaceTime call until I felt comfortable with lowering the blade and using the machine safety.  I have never even held a circular saw before but of all the tools, I felt pretty comfortable with this one and felt like it is pretty safe.  I set the blade height to just less than the depth of the plywood floor so the blade would essentially just score the wood.  One of Andy's big tips was not to just drop the blade in flat to the floor but turn it on and move it at a downward angle until it was flush to the floor.  The few times I forgot to do this, the blade just skipped over the top of the floor.  I cut a square grid into the floor, getting as close to the edges of the room as the saw would allow.

It seriously took less than 10 minutes.  As I am using this no joke power tool with my new work gloves on and Andy's respirator over my nose and mouth I am singing Katy Perry's "Roar" feeling like tough shit.  I think I have found a new stress reliever and workout (my legs were burning!).  I would have taken a video of my amazing feat but I didn't want my phone to get all dusty.

After I cut the grid (then checked in with my mom, assuring that I still had all fingers and toes), I starting chipping out the plywood with a crowbar and hammer.  I have no idea if this is the proper way but it worked fine.  I put the crowbar to the edge of the section I was working than hit it with a hammer until I got it under the plywood than jacked up the plywood with my serious muscles.


The plywood was held down by thousands of staples so when I would hit a staple line, I had to use serious muscle to get it up but I was successful.  I do have a video of this process- don't mind the terrible camera work as it was just propped on the tub as I was working.  Also, don't mind the huge shot of my butt as I am working.

That's about as glamorous as it gets around here, people.  I didn't worry about the edges but got as close as I could.  To finish the edges, Andy recommended using a sawzall but that tool was a bit more scary to me with an exposed blade.

Once I got the main sections up, this is what was uncovered.

The opening of the room is pretty good- very similar to what we found in the hallway.  Then we come to a square in the middle of the room with 4 layer of linoleum over a wood piece- someone probably tried to patch a rotted area.
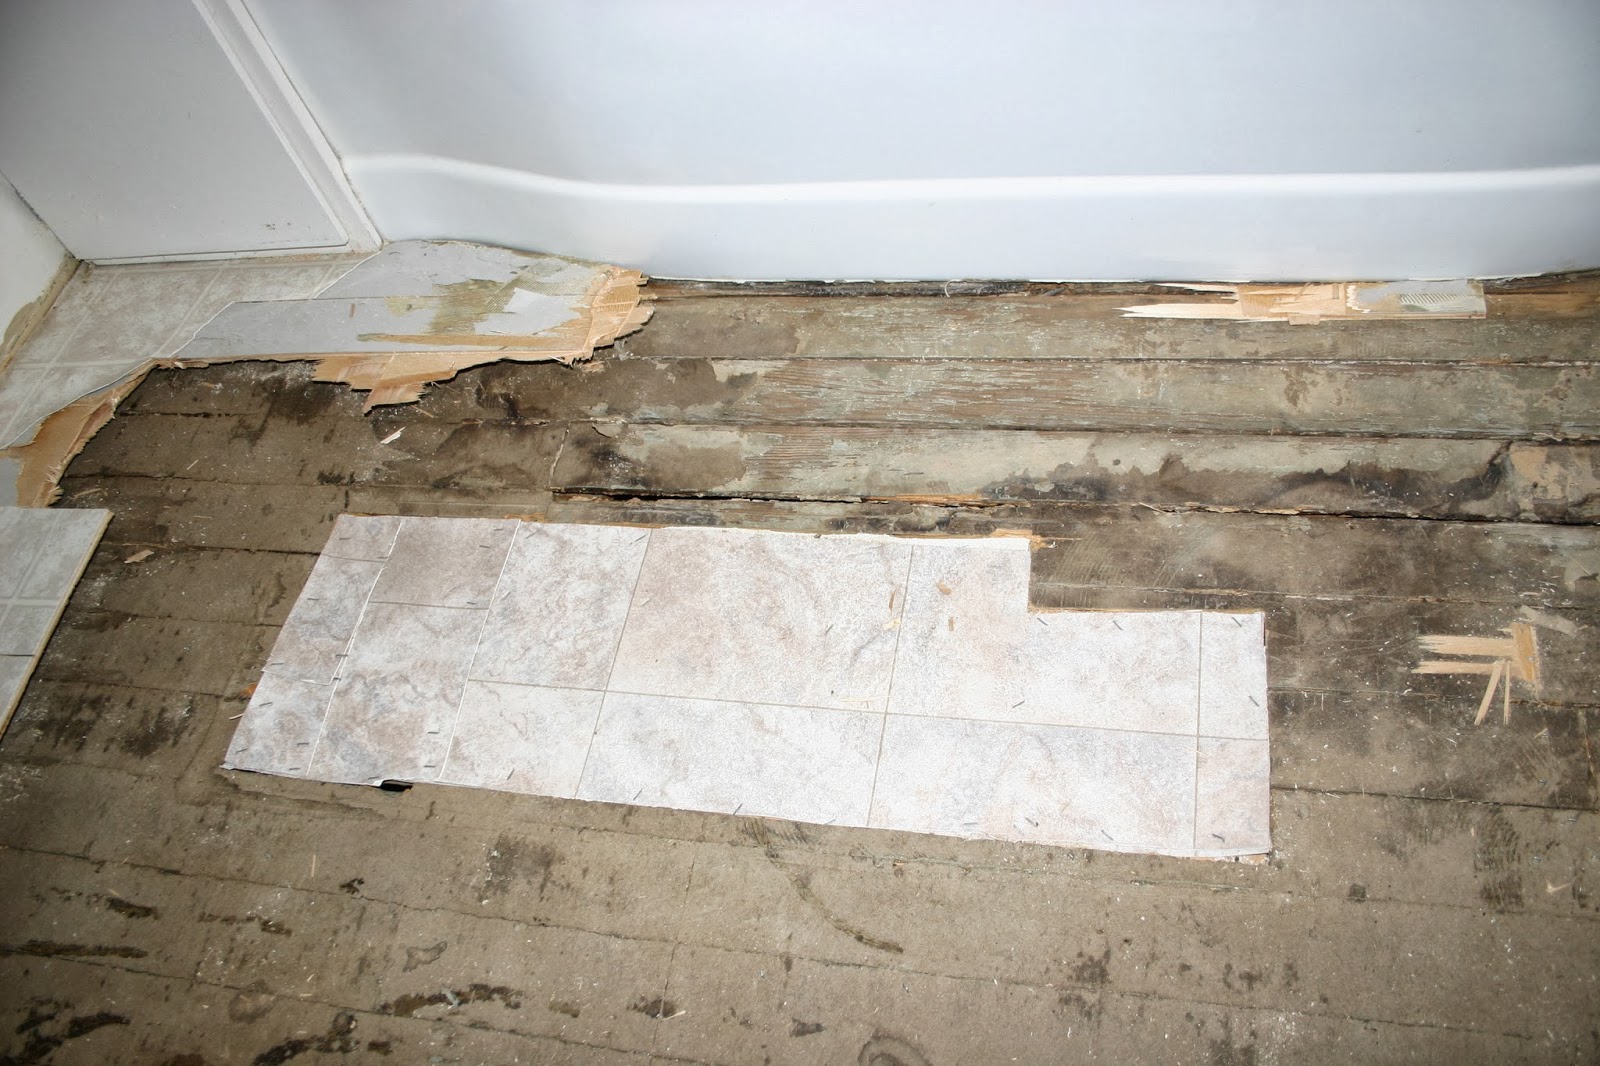
Then past the square toward the tub it gets really ugly- lots of rot especially around the tub.

Wood butting up to the tub... really no wood and a huge hole
At this point I know that Andy is not getting a finished room on his return from China.
Andy blissfully unaware of the situation at home
Whenever you take up a floor, you need to be prepared for what you find under and go into the tear-out process with an open mind.  Luckily, Andy and I are used to this and had some back-up plans going in depending on what I would find.  Yes, we could have just left the floor or painted the linoleum but we are both the type of renovators that we like to fix the bones instead of slapping stuff on top.  Do I want my kids taking baths over a rotted floor?  No thank you.  So though we are now faced with a bigger issue, we are both glad to have found it and now fix it.

Options?  Well, no matter what, the whole floor needs to come out and be replaced with a plywood sub floor.  Just patching the rotted places is not really an option since we can tell the rot continues under the tub. We could have just removed the fixtures (tub and sink), replaced the sub floor and placed everything back as it is now but for us, it is an easy choice- gut it.  We had planned to do a total bathroom gut in a few years anyway and now it is just getting pushed up.  That means a couple other projects we had planned this year will get put off and it means that we won't be choosing glamorous and expensive fixtures but we are both happy with the decision to take care of the whole problem now.

Unfortunately since Andy is out of town until Friday, this leaves me with a trashed bathroom and toilet sitting in my quilt room but alas, that is pretty much the story of our life.  I am busy with ideas and layouts for our new bath and will share our plans soon!  So, this story started with a paint job and ended with a total gut- a True Tarantino Event.

Sunday, October 20, 2013

Color Cravings

Andy and I LOVE food.  Back before everyone had cell phones with cameras and instant upload capabilities to Facebook, we were taking pictures of our meals.

We have been know to take entire vacations based on what we are craving.  Shrimp on bannock bread... San Francisco!  All you can eat mussels...Asheville!  Pastries and coffee at 3 pm... Vienna!  One of the best moments at a restaurant is that second your food is placed in front of you and you know, know you made a great choice.  Everyone tastes a bite off all the plates and you can crow that yours is the best.  Alternately, one of the worst moments at a restaurant is when your plate is set in front or you and you instantly know you chose wrong.  Maybe you realize you really wanted salty and not sweet (the hardest choice when out to brunch!), maybe you expected oven roasted chicken and you got chicken fingers, regardless, you know, without even tasting that you should have picked something else.  That is how I felt when I painted our bedroom last summer.

We we first moved into the house, every room was white or had paneling.
Bedroom Before
Though I have seen lots of houses that look great with white walls accented with colorful furniture, accessories and art, we prefer to have really colorful walls that somewhat become the art of the room.  I spent hours in Home Depot choosing color swatches for the five rooms I planned to paint the week between closing on the house and the movers coming with our belongings.  After a color mistake in our first house in DeKalb, I knew to have all my color swatches together so the rooms would flow well.  I choose two colors for our bedroom- Milestone by Behr for the accent color and Manhattan Mist by Behr for the three other walls.  On the color swatches, the two colors looked pretty grey but right when I started painting, I quickly realized they were much more purple.
Bedroom in summer 2012 after first round of paint
Milestone (the darker color) was actually really beautiful but not what I had envisioned for the bedroom.  Manhattan Mist was the worst offender, turning blue in some lights and a sickly lavender in others.  It would probably suit a not-girly girls room pretty well but as I was painting, I knew instantly it was not right.  Regardless, at 8 months pregnant, all I cared about was covering the paneling so onward we went!

A year later, we finally decided to replace the orange shag carpeting in the room with hardwood and I jumped at the opportunity to repaint the walls before Andy installed the new hardwood.  I also have been working on painting all the trim in the house white (a slow process) so I jumped into the bedroom to paint the trim while we had furniture moved and no worries about dripping on the floor.
Take that, nasty shag carpet!
I brought my home improvement binder to Home Depot one night to choose the new color.  My home improvement binder sounds really nerdy but it actually helps a lot.  I have all the paint chips from each room in the house as well as magazine clippings for things I want to do in the future.  Though I was under a time crunch (I arrived at 8:45 and the store closed at 9) and nervous about making another wrong choice, amazingly enough I found it.  THE color!  Not too blue, not too grey.  Dark enough to make the bedroom feel warm and enveloping but not cave like.  Blue-Grey Slate by Glidden (I had the store color match the paint in Behr).

It took me two coats of the paint/primer in one.

I cut in with a small handle, angle brush and then rollered the walls with a 3/4" nap roller.
Amazing painting clothes picking a movie on Netflix
Plus, I had some extra "help" (she painted a picture of herself on the wall)...

Result?  A cozy, inviting room just begging you to climb to get cozy under the covers.

Trim and doors all painted white too with new black door knobs
I'm also giving you a sneak peek of the finished hardwood floors and a bookcase Andy finished this weekend.  He is on assignment to work on these posts during his 13 hour flight to China!  Hopefully the in-flight meal he chooses turns out to be Blue-Grey Slate and not Manhattan Mist...

Friday, August 23, 2013

Slappin' on a Little Color

One of our standing home improvement deals is Andy builds, I paint.  I actually don't mind this deal so much... I enjoy the instant gratification of painting and seeing an immediate change.  I also love setting up a movie while I paint (and now as a result of having painted 30+ rooms, can spout off scenes from the BBC "Pride and Prejudice" verbatim... though I do have to take a painting break every time Mr. Darcy jumps into the pond.  He clearly needs my full attention).  Before kids, once I started painting, I wouldn't stop until the whole room/piece was finished.  Now, I work around nap times and bed times and eventually get it done.  This project took me 3 nap times and 2 bed times to finish.

Always, the hardest task when painting is color choice.  I made one wrong choice when we moved into our DeKalb house and that has made me a bit trigger-shy since (which will happen when you paint an entire kitchen then repaint it the next day).  Since I already painted the porch white (SO unusual for me!), I decided I wanted to use some subtle color on the benches.  Enter grey.  Grey is a tricky color.  It looks grey on the little color chip in the store, then once it comes home with you, suddenly morphs into beige, or blue, or lavender (check out the light walls in our bedroom, urf!).  So, I was a little nervous but after going through EVERY light grey color chip in the store, I was pretty confident in my choice:  "Time Worn Stone" by Better Homes and Gardens.  I am a self-admitted paint snob so I did a color match in Glidden brand- 1 quart of semi gloss (I always do semi gloss for furniture and eggshell for walls).  Had I been at Home Depot, I would have gotten Behr paint, which is my favorite, but alas... Decorah only has a Walmart, sigh.

My tools of choice:
I used a pretty small, angled brush for all the cutting in and corners.  I used the little roller for everything else.  The roller had a flat nap pad on it which is what is recommended for furniture.  The little baggies are sitting next to everything so when I have to stop (when nap time is over!) I put the roller in a bag and brush in a bag, close it as much as I can, and throw it in the fridge.  Brushes keep for days like this so you only have to clean-up once!  Everything got one coat of primer first (Zinsser 1, 2, 3).
Yeah, my sweet painting clothes- Old Navy pj pants and my high school "Pajama Game" t-shirt.  Of course, I have the iPad set up and and am catching up on episodes of "Burn Notice".  After the coat of primer, the benches needed two coats of paint.  I just squeaked by with one quart of paint.  We are thrilled with the results.
The light grey really looks sharp on the white walls but is neutral enough to go with the outside color of the house and kitchen cabinet color (which you can see through the window joining the porch to the house).  I considered making bench cushions but decided the cost wasn't worth the product.  I may add covers to the bottom cubbies so you don't see all our "junk" and I am keeping my eyes out for some jazzy pillows and rug (the one in the pic was returned.  We decided it was too small for the area and just looked weird) to add some fun color and pattern to the space.  More on that to come.  For now, the kids love playing out here on rainy days and we love having an organized area to take off boots and relax for a bit.