Yeah, so this bathroom's gettin' torn out.
So, I'll pull a quick "Tarantino" and back up this story to last Friday night. After finally choosing a paint color for the bathroom and getting the
ceiling and walls painted, I decided to remove the linoleum and plywood flooring. Andy is on a business trip and would usually handle this sort of thing but I decided to sort of surprise him with a finished project (and my awesomeness) when he returned. (It wasn't really a surprise since I consulted him on what I needed to do, but the thought was the same). The linoleum was actually in fine shape but it didn't match which the character we are trying to restore to the house- modern farmhouse charm. The plan for now was to take out the linoleum and paint the sub floor underneath with a blue and beige stripe.
.JPG) |
| Flooring inspiration |
We had success removing linoleum and painting the sub floors in the upstairs hallway. One huge note before I get into my process- linoleum and adhesive prior to 1977 may contain asbestos so if you are unsure of the date of your flooring, have a contractor check first. We were sure this flooring was less than 10 years old so we didn't have to worry.
My first order of business (after tucking the kiddos into bed for the night) was removing the toilet. I Googled "removing a toilet" and found two helpful resources: a
Home Depot article and a
YouTube video. I can't imagine what people did before the Age of the Internet! I was a little concerned at the Home Deport article's project time of 2 hours but I figured I could bang it out in a night. I pretty much followed the directions exactly though when I got to removing the tank from the seat, I realized I hadn't grabbed the right tools from Andy's shop. Instead of walking outside in the pitch black and possibly being abducted, I decided to try and tip the whole toilet on it's side.
 |
| Unfortunately I didn't have anyone to take a picture of me standing on it with one foot after I had conquered it |
Success! No problem at all. I dragged the toilet on a drop cloth out of the room and removed all the wax around the ring, clogging the pipe with an old towel to prevent sewer gases from gassing me out.
The 2 hour time frame was bogus- it took about 15 minutes (so it would probably take a normal person about 5 minutes).
Now that the toilet was removed, it was time for serious business- removing the flooring. I closed off the room with a drop cloth and again went to my trusty friend, Google finding a
helpful video to get me started. Andy coached me through operating the circular saw over a FaceTime call until I felt comfortable with lowering the blade and using the machine safety. I have never even held a circular saw before but of all the tools, I felt pretty comfortable with this one and felt like it is pretty safe. I set the blade height to just less than the depth of the plywood floor so the blade would essentially just score the wood. One of Andy's big tips was not to just drop the blade in flat to the floor but turn it on and move it at a downward angle until it was flush to the floor. The few times I forgot to do this, the blade just skipped over the top of the floor. I cut a square grid into the floor, getting as close to the edges of the room as the saw would allow.

It seriously took less than 10 minutes. As I am using this no joke power tool with my new work gloves on and Andy's respirator over my nose and mouth I am singing Katy Perry's "Roar" feeling like tough shit. I think I have found a new stress reliever and workout (my legs were burning!). I would have taken a video of my amazing feat but I didn't want my phone to get all dusty.
After I cut the grid (then checked in with my mom, assuring that I still had all fingers and toes), I starting chipping out the plywood with a crowbar and hammer. I have no idea if this is the proper way but it worked fine. I put the crowbar to the edge of the section I was working than hit it with a hammer until I got it under the plywood than jacked up the plywood with my serious muscles.
The plywood was held down by thousands of staples so when I would hit a staple line, I had to use serious muscle to get it up but I was successful. I do have a video of this process- don't mind the terrible camera work as it was just propped on the tub as I was working. Also, don't mind the huge shot of my butt as I am working.
That's about as glamorous as it gets around here, people. I didn't worry about the edges but got as close as I could. To finish the edges, Andy recommended using a sawzall but that tool was a bit more scary to me with an exposed blade.
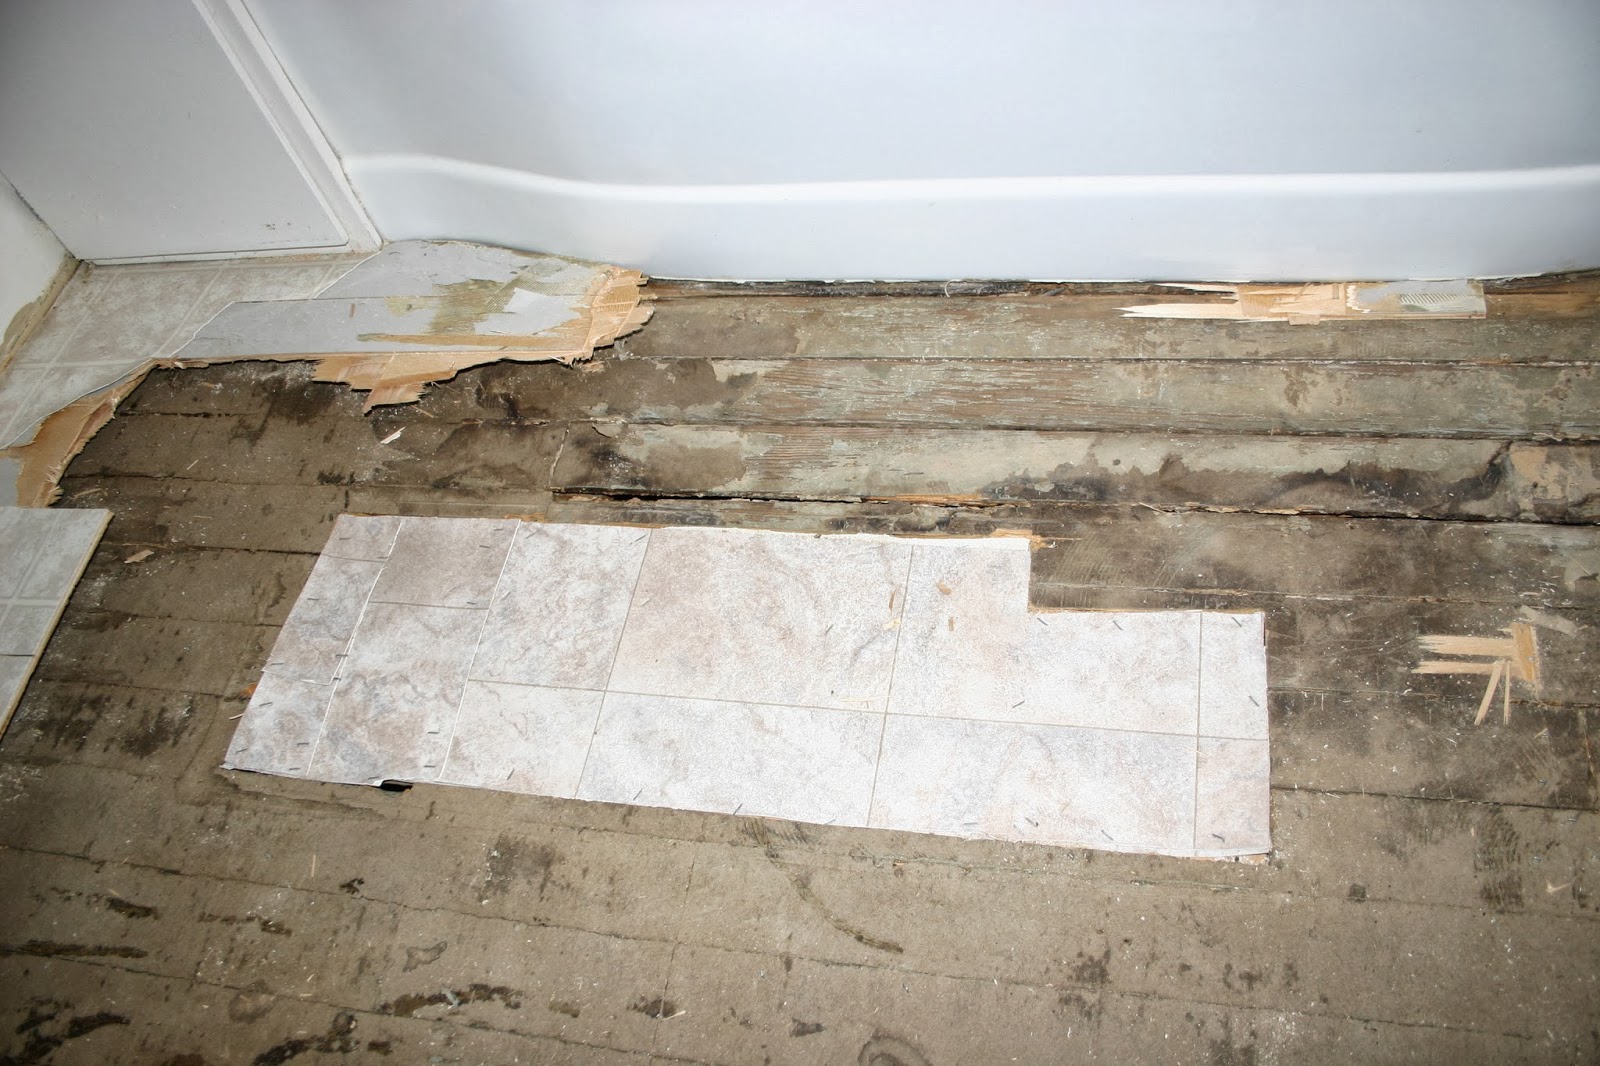
Once I got the main sections up, this is what was uncovered.
The opening of the room is pretty good- very similar to what we found in the hallway. Then we come to a square in the middle of the room with 4 layer of linoleum over a wood piece- someone probably tried to patch a rotted area.
Then past the square toward the tub it gets really ugly- lots of rot especially around the tub.
 |
| Wood butting up to the tub... really no wood and a huge hole |
At this point I know that Andy is not getting a finished room on his return from China.
 |
| Andy blissfully unaware of the situation at home |
Whenever you take up a floor, you need to be prepared for what you find under and go into the tear-out process with an open mind. Luckily, Andy and I are used to this and had some back-up plans going in depending on what I would find. Yes, we could have just left the floor or painted the linoleum but we are both the type of renovators that we like to fix the bones instead of slapping stuff on top. Do I want my kids taking baths over a rotted floor? No thank you. So though we are now faced with a bigger issue, we are both glad to have found it and now fix it.
Options? Well, no matter what, the whole floor needs to come out and be replaced with a plywood sub floor. Just patching the rotted places is not really an option since we can tell the rot continues under the tub. We could have just removed the fixtures (tub and sink), replaced the sub floor and placed everything back as it is now but for us, it is an easy choice- gut it. We had planned to do a total bathroom gut in a few years anyway and now it is just getting pushed up. That means a couple other projects we had planned this year will get put off and it means that we won't be choosing glamorous and expensive fixtures but we are both happy with the decision to take care of the whole problem now.
Unfortunately since Andy is out of town until Friday, this leaves me with a trashed bathroom and toilet sitting in my quilt room but alas, that is pretty much the story of our life. I am busy with ideas and layouts for our new bath and will share our plans soon! So, this story started with a paint job and ended with a total gut- a True Tarantino Event.