Thursday, September 18, 2014

A $20 Stair Makeover

Since we moved into our house just over 2 years ago, the stairs leading from the kitchen to the second story have looked like this:

They were carpeted (with a really ugly carpet) and to make matters worse, the carpet went up the sides of the walls, like a carpet fungus.  While tearing out carpet is usually one of the first projects we tackle, we waited on this one because we had no idea what the stairs would look like under it and had the issue of the carpet climbing up the walls to deal with.  

In typical Megan and Andy fashion, though, we finished up the project we were currently working on earlier than we expected on our weekend.  With nothing else better to do, Andy decided that it was THE day to deal with the stairs.  We investigated the stairs from the underside (looking up from the basement stairs) and determined that the stairs were likely made from pine and looked in pretty good shape.  Andy felt pretty confident, so face clad in dust mask and tools in hand, he made quick work of tearing the carpet off the stairs.  

There was a little padding on the stairs that also had to come up.  

Left were thousands of staples and carpet tack- the torture tool hated most by home owners.  

Andy used his favorite tools- a crowbar, pliers and hammer to take up the carpet tack and staples. 


 Once the stairs were unveiled we were thrilled to see they were in good shape.  They are banged up as one would expect in an old house but definitely salvageable.  

Thankfully there was drywall under the carpeted sections that went up the walls so this turned out to be as simple as pulling the trim off, pulling the carpet and removing staples.  
Death by staple removal
Another worry we had prior to tearing out the carpet was whether the stairs would be more or less treacherous without carpet.  The stairs are clearly left from days when the upstairs was merely an attic so they are narrow and slightly steep.  We couldn't live with the current carpet though, so we decided to take it off planning on painting the stairs but prepared with some back up runner ideas to attach if the stairs felt too slippery.  The first day or two of bare stairs was a bit nervousing (totally made up word) but once we got used to not feeling carpet, we both felt confident on the bare stairs so we continue with Plan A- painting the stairs.  

We have been amused how many projects we have done in this home that have mirrored projects we completed in our first home and this definitely follows the pattern.  Our home in DeKalb, Illinois had a converted attic staircase with a carpet runner which we tore out and replaced with a hand painted runner.
DeKalb stairs- Risers and rail are brown, outside of tread is light blue and middle of tread is navy blue

Before I could get to painting, Andy had to replace the grate on the riser of the second stair.  The grate was screwed to the face of the riser and would easily get caught by shoes and bend out of shape.  Andy took apart the adjoining tread and rebuilt the runner, installing a grate on the backside so it wouldn't get caught as people went up and down the stairs.  

We picked out this decorative grate from Amazon


The riser is removable in case we need to get to the duct work underneath.  

I wanted to do something different in this house so I hit the internet and Pinterest.  I am really good at executing other people's ideas but rarely can think of something completely on my own.  After lots of searching, I found the perfect, simple design from paintedtherapy.blogspot.com.  If you check out the link, you will notice that I pretty much copied the design, down to the colors exactly.  Often times there is no reason to reinvent the wheel.  

Andy filled in major holes and sanded down the stairs to prep them for paint.  

After a really good dusting and cleaning, I coated the entire staircase and wall where there was carpet with Zinsser 1, 2, 3 white primer.  

The hardest and most time consuming part with painting a staircase is timing it and planning around foot traffic.  I started at the top and worked my way down one night after we were sure the kids were asleep.  Thankfully, the primer dried super fast. 
Next, came the white border.  Since the middle of the stairs would be blue, I just painted the wall sections and outside sections of staircase in true white paint/primer in semi-gloss.  Again, I worked top down and did one coat during nap time since we would still carefully walk up the middle and a second coat that night.  

On to the mathematical portion of the project.  To make things simple, I went to the store and choose a painting tape in the same width that I wanted my skinny stripes.  I taped out a few options- mostly looking at how wide I wanted the middle section in blue.  I ultimately decided I wanted that to be pretty wide to look like a traditional rug runner.  The stair width is 30" so I decided to have 18" of blue down the middle followed with 1" of white on both sides, followed by 1" of blue on both sides and finished with 4" of white.
Not at all to scale but the general idea
Using a ruler and pencil, I marked a line at each break of color at the top and bottom of every tread/riser.  
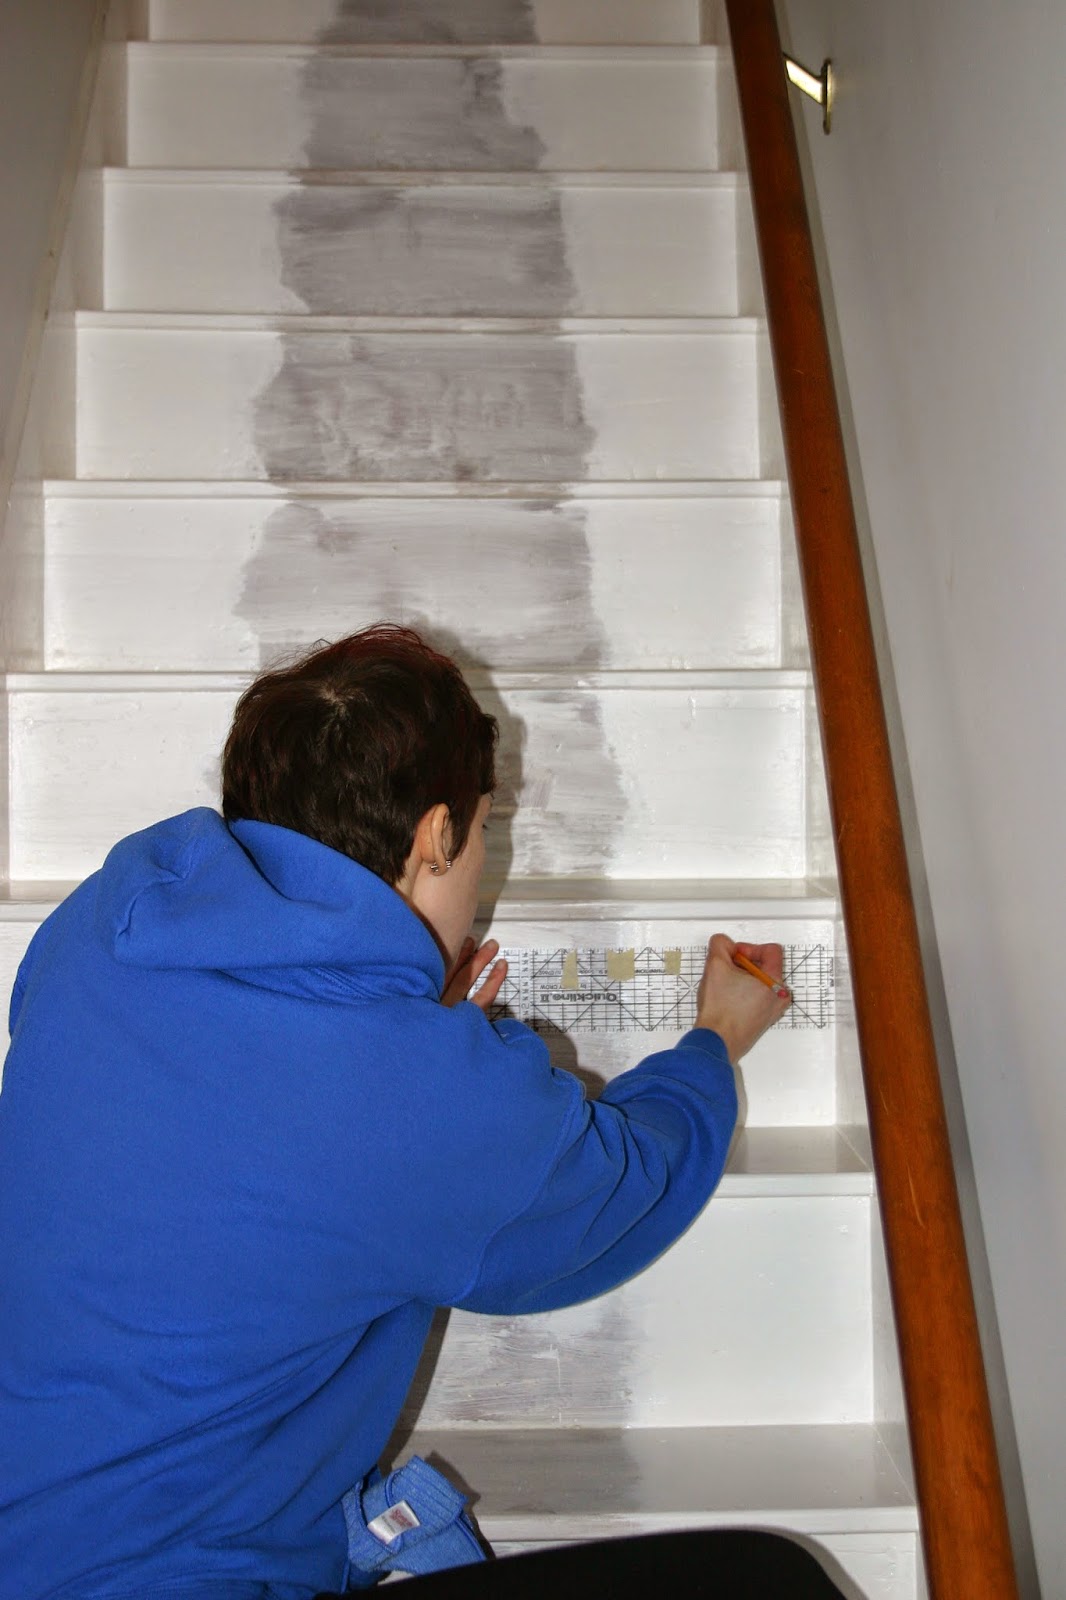
I then used 1" blue painters tape to mark the areas I would be painting blue.  

This was where buying the correct width of tape came in handy because I was able to use one width of tape between the skinny blue stripe and the large blue runner.  Right now, I will say that I used the wrong tape.  Though I bought the nice and expensive blue painters tape, it wasn't very sturdy and kept ripping.  It was much easier to keep a straight line if I rolled out the tape in a continuous strip all the way down the stairs.  Also, a little preview as to what's to come, the blue tape did not do a very good job of keeping the paint from bleeding under the tape.  After further research, I think frog tape might have done a better job in the end.

Once I had my lines taped out, I used Behr's Blue-Grey Slate paint/primer in eggshell (the same as on our bedroom walls).  Had I bought paint specifically for this project, I probably would have made the mistake of buying semi-gloss, which is a better finish for high traffic areas like floors.  This would have turned out to be a mistake, though because the gloss would have shown the imperfections of the stairs a lot more than a more matte paint.  I did two coats of blue paint, going from the top to the bottom of the stairs.  

After the stairs were dry, I slowly removed the tape for the big reveal and, damn.  Some bleeding on the tape lines.  

To fix this, I broke out one of Esther's paintbrushes and did touch up with the white paint.  Again, I think using frog tape would have helped with this issue.

To prevent the stairs from chipping due to frequent foot traffic, Andy used a wipe-on clear polyurethane.  This turned out to be a huge disaster.  First off, it wouldn't dry despite the can's stated dry time so the morning after application, the kids came down leaving sock prints all the way down the stairs.  Secondly, after a week or so the polyurethane began to yellow at the corners.  This has never happened to us and I still have no idea why this happened.  

After several months of thinking, "oh, we need to fix this...", Andy finally got around to sanding the stairs and applying a traditional brushed-on polyurethane in satin (again, we didn't want anything too glossy since that would show the imperfections of the wood even more).  It actually turned out pretty good that we waited so long because dragging construction materials up and down the stairs for our bathroom remodel created several chips in the paint that we were able to touch up once the polyurethane was sanded off.  

Andy reinstalled the trim work and I primed and painted it all white.  Finally, the rail was primed and then painted the same color as the stairs.

Since I used paint that was around the house, the only things we needed to buy for this project were the painters tape, polyurethane and the new grate so the total for this project was under $20!  Best 20 bucks I've spent in a while!  Just refer back to the picture of the original stairs covered in a carpet fungus if you don't believe me.

Monday, September 15, 2014

To Chicken or Not to Chicken, That is the Question

It has been four months since we picked up our box of tiny baby chicks at the post office.  We have tried a lot of new things since moving from the suburbs to a rural landscape.  Some of which were duds and some of which we would continue to do no matter where we lived.  Chickens fall into the latter category.  We love them.

We started with 26 chickens that were mail ordered from Dunlap Hatchery.  I found this company through a backyard chicken book and was really happy with their service and quality of chickens.  Every time we go to the post office, E asks if we are getting chickens.  We are definitely turning our kiddos into farm children.  15 of the chickens were straight run (mixed male/female) White Cornish Cross, used for broilers (chickens you eat, 5 of the chickens were pullet (females only) Barred Plymouth Rocks and 6 of the chickens were pullet Black Astralorps.  The Black Astralorps are especially beautiful with green feathers in their undercoats.  The pullets are all egg layers.

Barred Plymouth Rocks and Black Astralorps
9 weeks after we got the White Cornish Cross chickens, we took them to a nearby Amish farm to be butchered.  Andy was (of course) out of town on the day of the slaughter so I had to catch and cram 15 chickens into cages in the back of my mini van.  I don't think Honda had chicken transport in mind when it designed its' lay-flat seats.

For this unsavory task, I put on crappy clothes incase I got some... ahem, crap on my clothes as well as my Bog boots and work gloves.  I had originally planned to feed the chickens in the morning and quickly grab them as they unsuspectingly gobbled up their food.  Thankfully, my farming resource friend told me not to feed them 12 hours before butchering to help keep their insides cleaner.  So, though they were not distracted with food, the broilers are pretty dumb so I was able to grab up the first 5 very quickly.  The next 5 got a bit smarter and came after a bit of chase.  By now, the egg layers were smart enough to group up in a corner, prepared to attack as a group if necessary.  The last 5 broilers proved a bit tricky, especially because I was putting them in a cage with a tricky lid that I couldn't get closed (yes, at one point, I had a chicken escape and bounce around the car a bit).  The last chicken I had to grab was a larger rooster (the roosters were obvious compared to pullets as they were about a pound heavier) and proved to be my biggest fear when starting this task.  I finally got him in but for a bit wondered if I would have to break its' neck myself just to get the damn thing in the car.  Thankfully, on this occasion I was spared from committing murder.

The Amish family did a fantastic job and had my chickens slaughtered, cleaned and bagged by 4 pm that afternoon.  The total cost for 15 chickens was $29.10.  The very kind father of the family made me take my 90 cents change, though I proclaimed several times it was unnecessary.

We have eaten 2 of the chickens so far and they are delicious.  I am not super particular about buying "farm-raised", "free-range", etc because those terms can be very broad but let me say,  it is really nice eating food that you know how it lived and what it ate.

As far as cost breakdown of these chickens, here is a pretty good estimate of how much each cost by the end:

Price per chicken from Dunlap (plus vaccine)- $2.05
Price of shipping (divided by 26)-$0.61
Feed costs per chicken (this is the hardest thing to track so this is an estimate)-$2
Slaughter fee-$1.74

Total per chicken- $6.40

So, we really aren't saving any money raising them ourselves but it is also not really any more expensive then buying from the store- especially if you look at price of "free-range" chickens which is what they really are.  FYI-I did not put in the costs of equipment or bedding in the per chicken price since theses are start-up costs and will be minimal each year.  If you want to know what kind of equipment you need to start up, check back to our first chicken post.  Bottom Line:  We definitely plan to order more broilers in the spring.

Once the broilers cleared out of the chicken house, the egg layers were able to really stretch out.  They have such a personality compared to the broilers.  They are very active, jumping and "flying" around and are more skittish around people.  One of the biggest surprises after the broilers were slaughtered was how slowly we went through food all the sudden.  The 26 chickens would go though 2 troughs a day; 11 egg layers go through 1 every day or two.

Andy built a perch for sleeping and nesting boxes.  You don't need a nesting box for every bird or they will just sit in them all the time so 1 per every 3 or 4 is enough.  Andy cut the lids of 5 gallon buckets and attached them to a stand for quick, easy and free nesting boxes.

After building the perches, Andy picked up each bird and set them on the perch.

It took a few nights, but finally all of them found a perch.

Andy also built a platform for the waterer to keep the bedding out of the water.  It is scrap wood with chicken wire stretched over top and keeps the water a couple of inches off the ground.  Another option is hanging the waterer from the ceiling.

The chickens love getting out of their house to so some pecking around the property.  At first, only a few birds would come out at a time and we had some issues with Murphy, our dog trying to herd them.  Back to back nights ended up with one chicken short after a nightly head count.  After not finding the missing bird on night one, we called it our first loss, assuming it had wandered off or would be meet death by raccoon over night.  On the second day, head count was down to 9 and I was DETERMINED to find this chicken!  What do you yell when looking for chickens?  Ridiculous things like, "here chicken", "come here lady", "Come, blackie" (we have, at the point had yet to name them and the missing two were the Black Astralorps).  E came to the rescue, looking in some nearby day lilies finding BOTH missing chickens huddled in a corner on top of each other.

Now the chickens are much bolder, sometimes traveling all the way up to the house, other times venturing to the horse pasture or into the barn.

You know when an eagle is flying around because all the sudden you will notice the chickens run/fly back into their house very quickly.

E and F love the chickens and help with feeding them and filling their water tank and take turns terrorizing them trying to pick them up.


E has adopted the runt of the litter and named her "Jello".  One day, E brought Jello all the way to the garden beds where I was working to tell me Murphy was bothering her.  Poor Jello looked helpless, yet resigned in E's arms.

Now Andy and I frequently realize we are calling this silly chicken Jello.

No eggs as of yet but we expect them anytime.  One question I have been asked is why we have all females and if we need a rooster to get eggs.  The only purpose of a rooster is to fertilize eggs; female chickens will lay eggs no matter what (just like human females) but the eggs will only turn into chicks if they are fertilized by a male.  We don't want to deal with hatching our own chicks because we would need more equipment and then you have to worry about vaccinating them yourself (chicks are vaccinated for Marek's disease with is a highly contagious viral disease in chickens).

Even without getting the benefits of the eggs yet, we love having the chickens.  It is so satisfying to see them around the yard and they are very low maintenance.  As far as cost per bird, this is harder to figure out since they don't have a set "end of life" date.  Before calculating feed costs, they would be $3.30 each.  I would estimate another $3 per bird of feeding costs so far so about $6.30 each.  Seems like a lot since they haven't started producing yet, but if you think ahead, during summer months we should get 11 eggs a day and probably 4-5 a day during winter months.  So, similarly to the broilers were probably are just breaking even with our cost verses just buying from the store but I have been told that there is nothing better than fresh farm eggs so I think it will be worth it.

So, back to my original question.  TO CHICKEN!  One day, Andy and I will have moved to a city somewhere and have chickens roaming our rooftop- that's how much we enjoy this little hobby!


**You can get salmonella from handling live chickens so make sure you wash your hands after holding them!

Thursday, September 4, 2014

IKEA Curtain Tracks + Adorable Fabric= Love

Awhile back, I promised a few detailed posts on some things in our bathroom remodel.  Like most things around here, it took a little longer to get to it than we'd like so sorry about the delay!  Tis the reality of full time jobs, two kids and four acres to manage.

One of the things that we had to troubleshoot a lot in the bathroom was trying to get a shower/tub combo in a small space with one slanted wall.
Here is the bathroom when we moved it.  You can see about the tiling in the tub the flat wall begins to slant about 4' up.

I think this is a challenge for many upstairs bathrooms that were likely once attic renovations.  Our downstairs bathroom only has a shower so with two kids in the house, a tub is a must and we wanted a shower as well for guests to be able to use.  After several layout discussions, we decided that moving the tub/shower to a flat wall would be the best way to make it work.  If we had chosen a traditional skirted bathtub, we could have tiled the whole wall surround and used a shower curtain/rod combo.  We decided to make things as challenging as possible and went with a freestanding claw foot tub.  We chose this because of the "look" we were going for and it saved some considerable money- at least $100 for the tub and probably $300 for all the supplies for tiling (tiles, special tile board, grout, wet cutter rental, etc).  Installing a freestanding tub is obviously really simple- you just have to make sure all the flooring, trim work and painting is done before you get the tub in and you have set the hot/cold water holes and tubing in the correct spots.  Our challenge was figuring out a way to get a shower curtain around the entire tub with one slanted wall.

Several companies make an oval track specifically for claw foot tubs.  These can get pricy and with the slanted wall, we would have had to modify any of these tracks since they attach vertically to a flat surface.  I also looked at a few online hacks where some inventive people designed their own tracks.  This also seemed like a lot of work.

In a fit of genius, I remembered IKEA makes curtain tracks that come with curved sections.  Measuring the flat ceiling space above the tub, we ordered 3 straight KVARTAL tracks, 4 curved tracks and 8 ceiling fixtures.

Two straight tracks would make up the long sides and one straight track would be cut to make up the two short sides.

After getting all the tracks, we realized since we were cutting one track, we were missing a connection piece so we ended up having to pick up another straight track just for the connection.  The entire track system came out around $60- by far the cheapest option around and was easily adaptable to our odd space.

The biggest headache with this track system was figuring out how to attach a curtain to it.  I ordered two bags of the KVARTAL glider and hooks which slide right into the track.  A note- slide these onto the track before you have it completely mounted on the ceiling.  Obvious to most, but apparently not to all.  IKEA makes several options of curtain hooks to hook into the gliders.  I choose the RIKTIG hook so it couldn't be seen from the outside of the curtain.

Another note- if you choose this kind of hook, you will then only need the glider on the track, not the glider and hook or the curtain will not be facing the right way... Once we realized this mistake, Andy, perched on top of the claw foot tub, holding up the curtain track with one hand was bombarding me with little plastic hooks from the other hand.
Hard to see in this picture, but the wall to the left of the picture is the slanted one.

Ok, so track system up, now onto the curtain.  A typical shower curtain would not have worked for this project for two reasons- it would be too short since I was hanging it from the ceiling and I would have needed to buy several to get the curtain all the way around the tub.  If you are not a sewer, they do make extra long shower curtains that might work but would likely be pretty pricey.

A note before I get into the specifics of how I cut and sewed the curtains- I am by no means a sewing expert.  I learned to sew from my mom and pretty much exclusively make quilts.  I have dabbled a bit in Halloween costumes and pillows but other than that, I am a novice at home decor.  So, this all worked for me but there are likely other, easier ways to go about it.  I definitely attacked it with a quilter frame of mind.

I measured the circumference of entire tub as well as the height from ceiling to the base of the tub (leaving the claw feet exposed) to get my basic dimensions.  Using a yardage calculator online, I determined that I would need 9-11 yards of fabric for the entire curtain.  It took several fabric stores but I finally found the perfect cotton fabric from Jo Ann Fabrics- it was the coral color that I was using as an accent, had some turquoise which matched the garbage basket I'd just purchased and was whimsical and fun for a kids bath.

Kismet.  To my dismay, though, there was no way there was 9 yards of fabric on the roll... probably 3-4 in my estimation.  Luckily, I found a great complementary fabric with the same background color in a cute dot pattern.

Again, no way this had 9 yards on it but I was hoping between the two fabrics, I would squeak out at least 9 yards and figure out later how I would mold them into one curtain.  After some crossed fingers and breath holding, the store clerk rolled out the two fabrics and between them, I had just over 9 yards.  I went ahead and took both and figured if I was still short, I could add some trim or something to make up the difference.  With a 40% off one item store coupon, the fabric came out to $65.

After washing and ironing all the fabric, I laid it out in a few different patterns to decide how I would sew the two fabrics together.  I decided the most balanced look with the yardage I had was using the cute print on the top and bottom and having a thick band of the polka dot in the middle.

I double checked my tub circumference and height measurements again as well as my fabric yardages to determine my cuts.  Here is my super, scientific measurement sheet:

Andy is horrified/embarrassed my my building/measuring sketches but it works for me.  The diagram shows the two fabrics- leaves on top and bottom and dots in the middle.  Using my room height, I knew I needed 80" finished height so determined by my fabric yardage, I would need 13" on top and bottom and 54" finished fabric in the middle.  Adding 1/2" on all sides of the fabric which I would serge off and 1/2" seam/hem allowance, I got my cut measurements which are listed on the left side of the picture.  Using the circumference of the tub and the width of the fabric (40"), I calculated that I would need 4 panels.  The numbers on the bottom left of the sheet are the total inches of each fabric I had: 238" in the plain (dots) and 126" in the patterned (leafs).  I divided these number by 4 for the 4 panels I needed to to get 59.5" and 31.5" respectively.  If you can calculate my measurements above, you will see that I barely squeaked out enough fabric!

So, tricky measurements done, I cut my fabric using my quilters cutting tools of a rotary cutter, plastic rulers and cutting mat. To make sure I cut my fabric square, I folded the fabric length wise and squared off the end using the fold as my straight line.  Once my fabric was square, I measured my cut measurements from above for each fabric:  in the leaf pattern I cut 15" 8 times (2 needed for each panel); in the dot pattern I cut 56" 4 times.

In any sewing project- or building project for that matter- cutting is the most important step.  It is important to make sure the fabric is straight and even and you are measuring correctly and cutting straight.  For these reasons, I think the rotary cutter and quilting rulers are a necessity.

For Christmas this year, I got a Huskylock Serger which made this project much easier.  If you look at the inside of your shirt, you will see at the seam a bunch of interlocked stitches.  This is what a serger does (among other things that I am still learning about).  It cuts the fabric and sews an edge that will not fray.  This is a great time saver for this kind of project because I can serge all the edges and not have to create a double folded hem.  Before sewing anything together, I serged all the edges that would be connected to fabric as well as my upper and lower hems.  This cut off 1/2" fabric.


I did not serge the edges that would form the long, vertical sides.  After serging, I sewed the two fabrics of each panel together with a 1/2" seam allowance.  Once I had my four panels sewn, I used my serger on the long vertical sides.  I sewed two panels together, making 4 panels into 2 so it would be easier to use in the shower.  You know you've done a great job cutting when 2 80" panels meet up perfectly!

Using a 1/2" seam, I hemmed all the edges.

You can see the serged edge in white thread and the hemmed thread in pink.

My biggest head scratcher in the curtains was connecting the hooks I purchased at IKEA to the tops.  There were no clear instructions or obvious ways to do it- no matter how much Andy proclaimed "just make a pocket!".  Yes Andy, sewing 28 individual pockets for each hook sounds super easy.  In the end, I used fusible tape and folded a new upper hem to tuck the hooks into.  Using the holes in the plastic curtain liner that would go inside the fabric curtain as my measuring guide, I folded in a hook every 4 1/2" and then ironed the gap in between with the fusible tape.


Honestly, this is a temporary solution which I will be fixing soon because the hooks at the edge of every curtain are coming up since the tape is not strong enough to hold them (the rest of the hooks are holding fine).  Hopefully, I will think of a solution soon and get back to you but I think the tape is a good way to start and was very easy to do- likely you will just need to sew the hooks in after getting them initially placed with the tape.

These hooks easily slide into KVARTAL track gliders and look great on either side of the curtain.  The finished curtain functions beautifully, covering the entire tub when it is shower time and adds a lot of fun to the bathroom.