Sunday, June 14, 2015

Bookcase Magic

BAM.

My newest furniture update- a built-on bookcase for a vintage dresser.  I seriously can't get over how awesome this turned out.  I will take a bit of a break patting myself on my back to get my hands back on the keyboard to share some details on this design.

One of the challenges of our attic remodel is organization.  There isn't a closet in the space and we didn't really have enough of a need for one to get into the logistics of building one in.  But, we did need space for two kids worth of clothing, books and miscellaneous bedroom stuff.  I really wanted a single bookcase and dresser unit for the room since we were adding a bed and I didn't want to clutter up the room with too much furniture.  Also, I thought getting the books a bit more out of toddler arm reach would help with book longevity.  (A moment of silence for the countless books I have had to throw away due to excessive tearing or traces of human excrement).

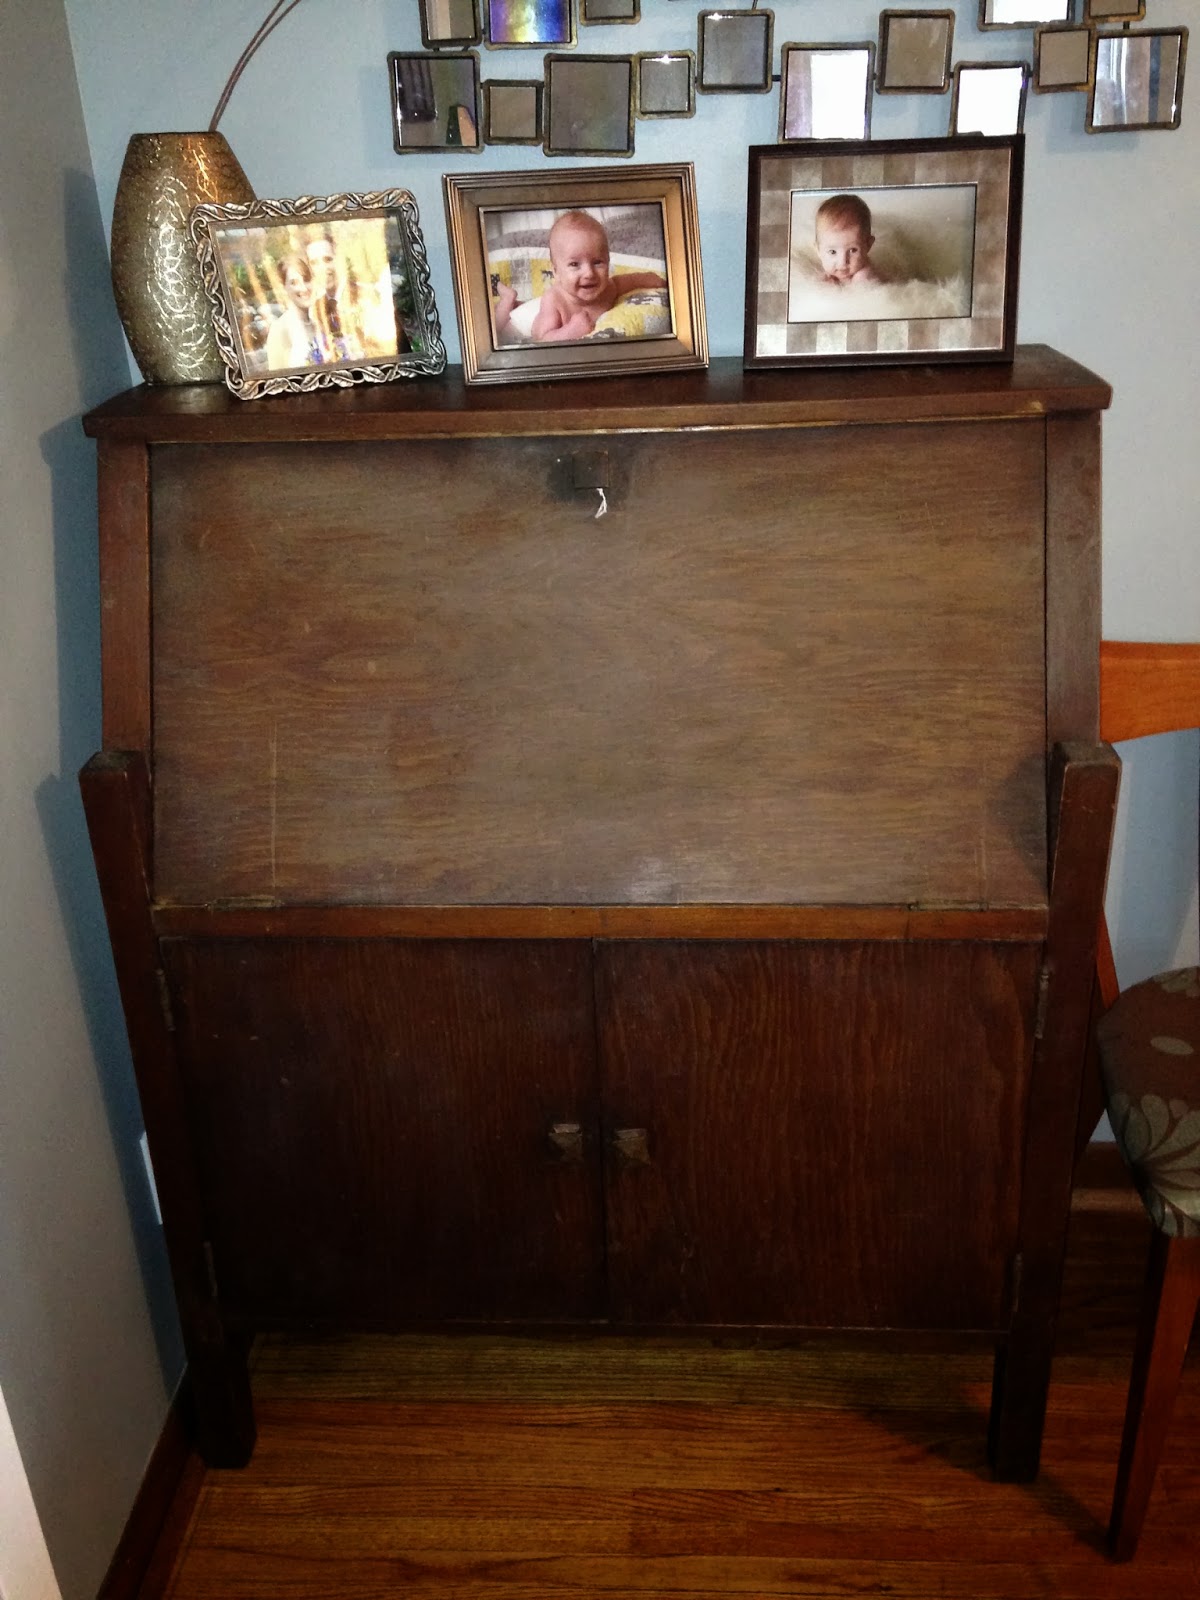
Starting with the base, I spruced up an existing vintage dresser we had.

For the bookcase, I was inspired by this picture.
http://thecartens.com
I am a super visual person, so I used painters tape to mask out the dimensions of the bookcase, starting with the width of the dresser and using the slant of the wall to determine my height.


I decided I didn't need even shelf heights since many kids books are short (thinking of board books), so I went with 13" on the bottom for my tallest height and 11" in the middle and 10" on top.


Design completed, Andy was in charge of the actual build. ----------

Ap: As per usual I used 1/2" birch plywood for the case and 3/4" pine ripped to size for the face frame. This bookshelf is 38" wide and books/ children climbing can be heavy so I wanted to make sure each shelf was as rigid as I could make it. I rough cut all the pieces with my straightedge and circular saw and then final cut all the pieces using the table saw. Next, I set up the dado blade on my table saw and cut 1/4" deep dados into the sides to accept the shelves and back. Because Megs wanted to paint all the pieces ahead of time I had to be extra careful with the final assembly. I asked that she not paint the edges of the pieces so I would have a clean glue surface for the mating parts to stick. Overall this was a very easy project and went together quickly. I am not a huge fan of pre-painted parts but it worked out ok. Back to Megs...

Mp:  I really liked the different pattern on the back of the bookcase in my inspiration picture but couldn't find a wrapping paper with the right colors that was also gender neutral, so I decided to stencil a design myself.  Using leftover paint from a desk I refinished a couple of years ago, I put two coats of Simply Silhouette by Behr on the backing piece of wood.


While I had my painting station all set up, I went ahead and painted all the other bookcase components with two coats of Ryegrass which was the green I used on the dresser.


I have become so accustomed to county living that it didn't even phase me to knock chickens away from my drying station.  Life is weird.

While my pieces were drying, I created my stencil.  I had left over stencil sheets from a stencil I created for F's old closet so I used this to trace my design on.  For this particular project, a piece of cardboard would also work fine.  I found the stencil design on this site where the author uses it for an accent wall.

Utilizing all of my quilting rulers, I traced the stencil design onto the backing board with a pencil.  Once my entire design was traced, I used one of the kid's craft paintbrushes and hand painted over the pencil marks with gold craft paint.


Andy then took over again putting all of the pieces together and nailing a face frame over the front.


I filled the nail holes and painted the face frame with 2 coats of the green paint.  Andy cut two blocks of wood that he screwed into the top of the dresser and then screwed into the inside of the bookcase.

This is nice because if we ever have to move the dresser, we can easily remove the bookcase and move them in two separate pieces.

Viola.  Pure perfection.

Tuesday, January 7, 2014

The Mess of Progress

Ever since I took a furniture refinishing class at Adourn in the fall, I have been dying to dive into the world of painting techniques and distressing- a nice change of pace from my constant task of trim painting.  BORING.  (And now I am horrified to realize I first posted about painting the trim in September and I am no where near being done!!!).  I got my feet wet a bit with a new bookcase Andy built for our bedroom.  Since the bookcase was built with unfinished wood, I was able to use a color wash technique.  Still, I have been impatient to get my hands on a vintage piece of furniture to try to update the look with paint.  My chance came early winter with a new job which meant more hours working from home.  After a week of working from my favorite arm chair in the living room with piles of paper and books piles up around me, I said ENOUGH !   I need a workstation downstairs.  After looking around the rooms on our first floor (our “office” is upstairs but I can’t work up there when the kids are up and they don’t sleep soundly enough to work up there during nap time) and contemplating several options (even moving around the dining room and kitchen tables several times), I determined the best option would be to put a secretary desk in the living room.  This would mean moving around some furniture in the living room, possibly getting rid of a few pieces but it was really the only feasible option.  I felt like a secretary desk was better than a small table and chair since the kiddos love to destroy any piece of paper they can get their hands on and the secretary desk would close up when not in use.

Decision made, Andy and I went on our hunt.  We checked out several antique stores in Minnesota with no luck- I always have found when you are looking for something specific while antiquing, you can never find it but you suddenly see tons of the item you were out looking for last time!  After a delicious lunch at a Mexican restaurant- randomly located on the main highway between two towns, we called it quits and took the kiddos back home for nap time.  In a last ditch effort, I decided to run to an “antique store” right down the road from us.  Really, it is set up in someone’s barn and mostly looks like random finds similar to what we have found in our outbuildings.  Shockingly enough though, I found 2 secretary desks right away that looked great.  After messaging Andy pictures and descriptions, I made my choice and talked the owner down a bit for a final price.
Desk Before

Desk Before
Once I got the desk home, Andy immediately took it to the shop for some repair.  He tightened up all joints, sanded down everything and more importantly rebuilt the drop-down desk component with a long piano hinge and chain supports.  Since Andy had already sanded down the piece, I gave it a really good dusting to prep it for painting.  The paint color I chose for the outside was Simply Silhouet by Behr which is one shade darker from the paint color Puddle which is the adjoining room to the living room.  I did a paint match with Glidden paint since I can't get Behr within an hour drive of our house.  I have had great success with paint matching but this time the color was not what I expected, though I luckily liked it anyway.  I coated the entire outside (with the exception of the very top) with two coats of paint, using a 2 1/2” angle brush.  I painted with the grain of the wood, working hard to using long strokes to not see the brush strokes.  

After the outside was dry, I painted the inside working surfaces with two coats of Redstone Dakota Sandstone by Valspar (I picked up a sample size jar when visiting my sister in Kansas City).  I did not paint the vertical surfaces in the inside, choosing to leave them natural. 

Finally, I wanted to add some character to the inside so I chose a fantastic wrapping paper print from The Container Store.  (No- we don't have a Container Store anywhere close- my mom picked the rolls up for me in Illinois!)

The wrapping paper at The Container Store is very heavy-duty with a matte finish.  I measured all the surfaces I wanted the paper on (the insides of the doors and the shelf area in the desk part) and marked the backside of the paper.  Using a rotary cutter from my quilting supplies, I cut the paper.  Using an all-purpose adhesive spray, I attached the paper to each surface.  

The adhesive oversprays quite a bit, so I used cardboard and painters tape to not get spray where I didn't want it.  

The hardest part was making sure the paper was straight and arranged right before I applied it to the service.  
(Andy was amused how stressed out I got during this part).  Thankfully, I didn't make any mistakes and it turned out perfectly.  On the inside of the doors, which were not dimensionally square, any places the paper went off the door I used an Exact-o knife to cut the excess.

Unfortunately, after all this work the next day I noticed the paper was not sticking in some places.  I’m not sure if I used the wrong adhesive or didn't apply it correctly but it definitely needed to be fixed.  Instead of messing with the spray adhesive again, I got heavy-duty double stick tape (the kind you use for framing which is acid-free) and used it in places the paper was coming up.  

This worked fine and I think in the future, I will just use this method first.

I decided to leave the top of the desk natural wood since I liked the contrast of the wood with the paint.  I sealed the wood with wax to give it a nice finish.  I also distressed the outside edges of the desk slightly with 100 grit sandpaper to give it more of a “lived in look”.

Finally, I replaced the handles with a set I found at Hobby Lobby.  I’m not totally satisfied with how they look but am going to leave it for now.  I’m still considering doing a stencil on the outside somewhere but haven’t found one I am in love with.  So for now, it is finished!  It has been working great as my workstation and I love that I can just close it up with I am done- hiding the “mess” of progress.
Are you ready to take some furniture rehab?  I highly recommend it!

Friday, August 23, 2013

Slappin' on a Little Color

One of our standing home improvement deals is Andy builds, I paint.  I actually don't mind this deal so much... I enjoy the instant gratification of painting and seeing an immediate change.  I also love setting up a movie while I paint (and now as a result of having painted 30+ rooms, can spout off scenes from the BBC "Pride and Prejudice" verbatim... though I do have to take a painting break every time Mr. Darcy jumps into the pond.  He clearly needs my full attention).  Before kids, once I started painting, I wouldn't stop until the whole room/piece was finished.  Now, I work around nap times and bed times and eventually get it done.  This project took me 3 nap times and 2 bed times to finish.

Always, the hardest task when painting is color choice.  I made one wrong choice when we moved into our DeKalb house and that has made me a bit trigger-shy since (which will happen when you paint an entire kitchen then repaint it the next day).  Since I already painted the porch white (SO unusual for me!), I decided I wanted to use some subtle color on the benches.  Enter grey.  Grey is a tricky color.  It looks grey on the little color chip in the store, then once it comes home with you, suddenly morphs into beige, or blue, or lavender (check out the light walls in our bedroom, urf!).  So, I was a little nervous but after going through EVERY light grey color chip in the store, I was pretty confident in my choice:  "Time Worn Stone" by Better Homes and Gardens.  I am a self-admitted paint snob so I did a color match in Glidden brand- 1 quart of semi gloss (I always do semi gloss for furniture and eggshell for walls).  Had I been at Home Depot, I would have gotten Behr paint, which is my favorite, but alas... Decorah only has a Walmart, sigh.

My tools of choice:
I used a pretty small, angled brush for all the cutting in and corners.  I used the little roller for everything else.  The roller had a flat nap pad on it which is what is recommended for furniture.  The little baggies are sitting next to everything so when I have to stop (when nap time is over!) I put the roller in a bag and brush in a bag, close it as much as I can, and throw it in the fridge.  Brushes keep for days like this so you only have to clean-up once!  Everything got one coat of primer first (Zinsser 1, 2, 3).
Yeah, my sweet painting clothes- Old Navy pj pants and my high school "Pajama Game" t-shirt.  Of course, I have the iPad set up and and am catching up on episodes of "Burn Notice".  After the coat of primer, the benches needed two coats of paint.  I just squeaked by with one quart of paint.  We are thrilled with the results.
The light grey really looks sharp on the white walls but is neutral enough to go with the outside color of the house and kitchen cabinet color (which you can see through the window joining the porch to the house).  I considered making bench cushions but decided the cost wasn't worth the product.  I may add covers to the bottom cubbies so you don't see all our "junk" and I am keeping my eyes out for some jazzy pillows and rug (the one in the pic was returned.  We decided it was too small for the area and just looked weird) to add some fun color and pattern to the space.  More on that to come.  For now, the kids love playing out here on rainy days and we love having an organized area to take off boots and relax for a bit.