Tuesday, January 7, 2014

The Mess of Progress

Ever since I took a furniture refinishing class at Adourn in the fall, I have been dying to dive into the world of painting techniques and distressing- a nice change of pace from my constant task of trim painting.  BORING.  (And now I am horrified to realize I first posted about painting the trim in September and I am no where near being done!!!).  I got my feet wet a bit with a new bookcase Andy built for our bedroom.  Since the bookcase was built with unfinished wood, I was able to use a color wash technique.  Still, I have been impatient to get my hands on a vintage piece of furniture to try to update the look with paint.  My chance came early winter with a new job which meant more hours working from home.  After a week of working from my favorite arm chair in the living room with piles of paper and books piles up around me, I said ENOUGH !   I need a workstation downstairs.  After looking around the rooms on our first floor (our “office” is upstairs but I can’t work up there when the kids are up and they don’t sleep soundly enough to work up there during nap time) and contemplating several options (even moving around the dining room and kitchen tables several times), I determined the best option would be to put a secretary desk in the living room.  This would mean moving around some furniture in the living room, possibly getting rid of a few pieces but it was really the only feasible option.  I felt like a secretary desk was better than a small table and chair since the kiddos love to destroy any piece of paper they can get their hands on and the secretary desk would close up when not in use.

Decision made, Andy and I went on our hunt.  We checked out several antique stores in Minnesota with no luck- I always have found when you are looking for something specific while antiquing, you can never find it but you suddenly see tons of the item you were out looking for last time!  After a delicious lunch at a Mexican restaurant- randomly located on the main highway between two towns, we called it quits and took the kiddos back home for nap time.  In a last ditch effort, I decided to run to an “antique store” right down the road from us.  Really, it is set up in someone’s barn and mostly looks like random finds similar to what we have found in our outbuildings.  Shockingly enough though, I found 2 secretary desks right away that looked great.  After messaging Andy pictures and descriptions, I made my choice and talked the owner down a bit for a final price.
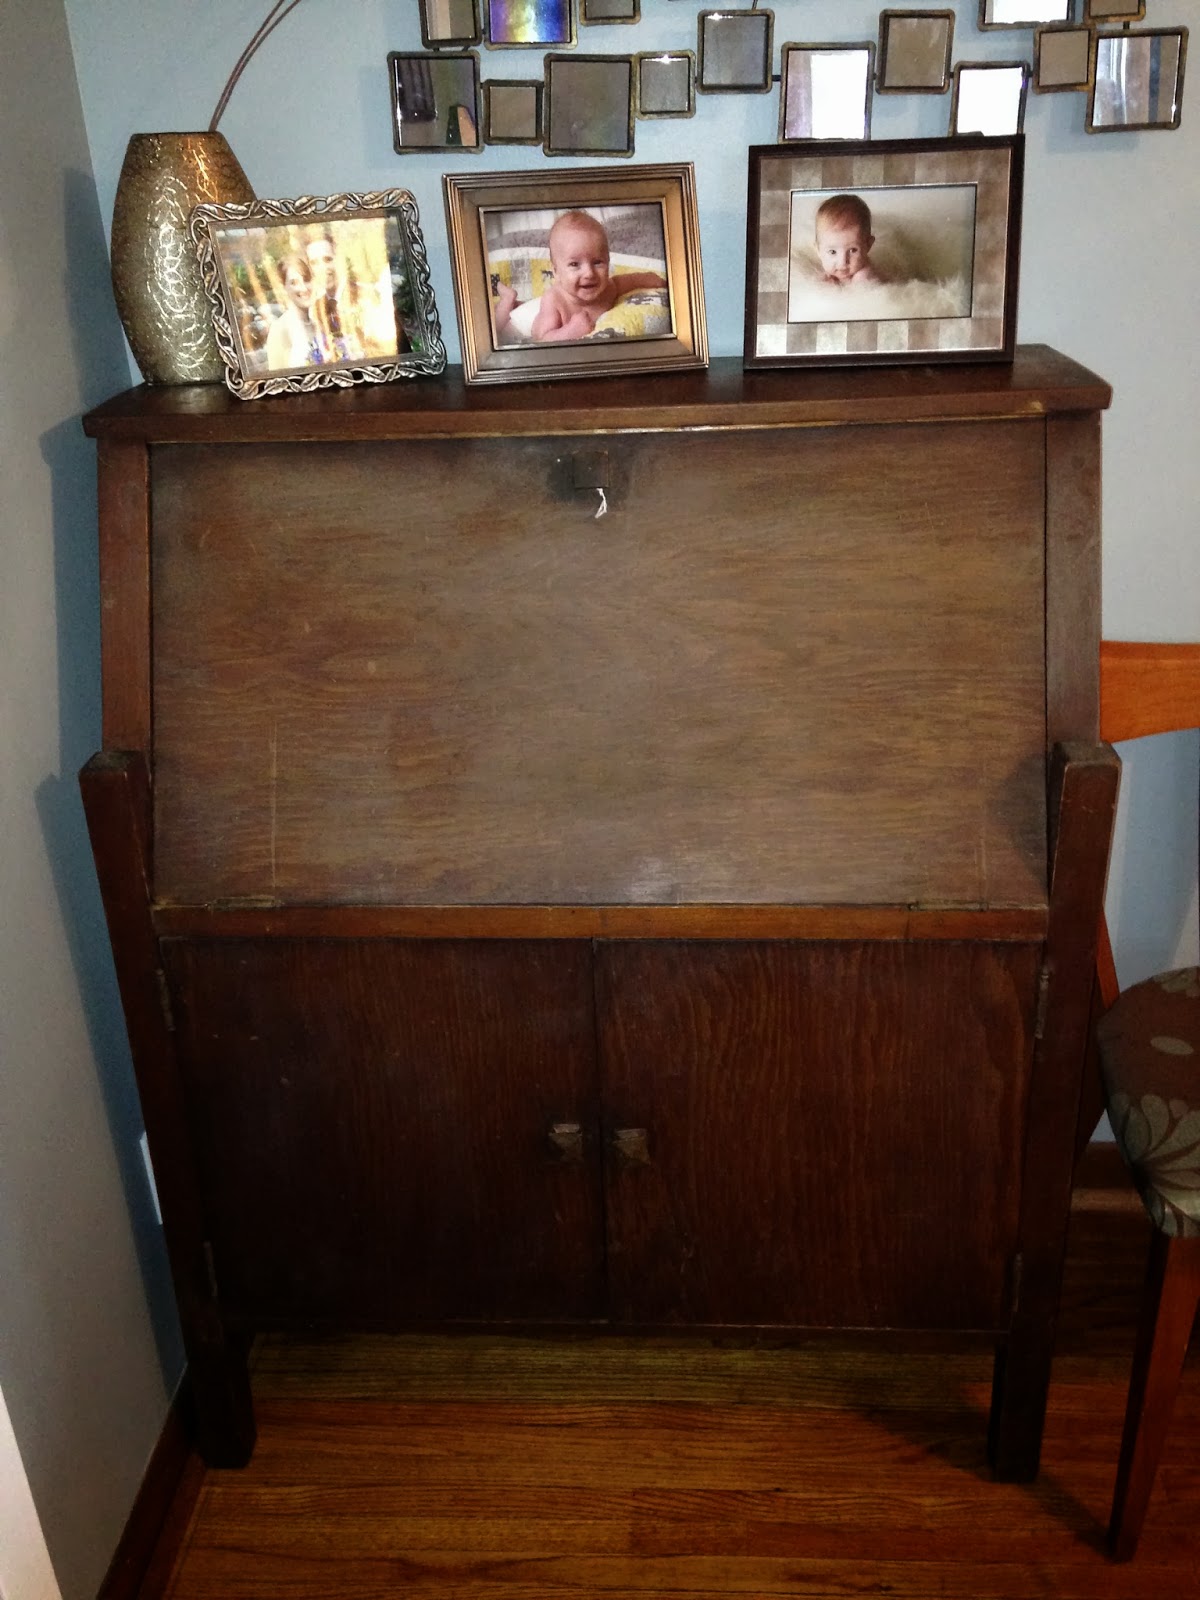
Desk Before

Desk Before
Once I got the desk home, Andy immediately took it to the shop for some repair.  He tightened up all joints, sanded down everything and more importantly rebuilt the drop-down desk component with a long piano hinge and chain supports.  Since Andy had already sanded down the piece, I gave it a really good dusting to prep it for painting.  The paint color I chose for the outside was Simply Silhouet by Behr which is one shade darker from the paint color Puddle which is the adjoining room to the living room.  I did a paint match with Glidden paint since I can't get Behr within an hour drive of our house.  I have had great success with paint matching but this time the color was not what I expected, though I luckily liked it anyway.  I coated the entire outside (with the exception of the very top) with two coats of paint, using a 2 1/2” angle brush.  I painted with the grain of the wood, working hard to using long strokes to not see the brush strokes.  

After the outside was dry, I painted the inside working surfaces with two coats of Redstone Dakota Sandstone by Valspar (I picked up a sample size jar when visiting my sister in Kansas City).  I did not paint the vertical surfaces in the inside, choosing to leave them natural. 

Finally, I wanted to add some character to the inside so I chose a fantastic wrapping paper print from The Container Store.  (No- we don't have a Container Store anywhere close- my mom picked the rolls up for me in Illinois!)

The wrapping paper at The Container Store is very heavy-duty with a matte finish.  I measured all the surfaces I wanted the paper on (the insides of the doors and the shelf area in the desk part) and marked the backside of the paper.  Using a rotary cutter from my quilting supplies, I cut the paper.  Using an all-purpose adhesive spray, I attached the paper to each surface.  

The adhesive oversprays quite a bit, so I used cardboard and painters tape to not get spray where I didn't want it.  

The hardest part was making sure the paper was straight and arranged right before I applied it to the service.  
(Andy was amused how stressed out I got during this part).  Thankfully, I didn't make any mistakes and it turned out perfectly.  On the inside of the doors, which were not dimensionally square, any places the paper went off the door I used an Exact-o knife to cut the excess.

Unfortunately, after all this work the next day I noticed the paper was not sticking in some places.  I’m not sure if I used the wrong adhesive or didn't apply it correctly but it definitely needed to be fixed.  Instead of messing with the spray adhesive again, I got heavy-duty double stick tape (the kind you use for framing which is acid-free) and used it in places the paper was coming up.  

This worked fine and I think in the future, I will just use this method first.

I decided to leave the top of the desk natural wood since I liked the contrast of the wood with the paint.  I sealed the wood with wax to give it a nice finish.  I also distressed the outside edges of the desk slightly with 100 grit sandpaper to give it more of a “lived in look”.

Finally, I replaced the handles with a set I found at Hobby Lobby.  I’m not totally satisfied with how they look but am going to leave it for now.  I’m still considering doing a stencil on the outside somewhere but haven’t found one I am in love with.  So for now, it is finished!  It has been working great as my workstation and I love that I can just close it up with I am done- hiding the “mess” of progress.
Are you ready to take some furniture rehab?  I highly recommend it!

Sunday, December 22, 2013

Cottontail Dinner

Megs is always hounding me to “take pictures for the blog, take pictures for the blog”. This event was no different but she did add the caveat… don’t make it gruesome. Although I think hunting helps to sustain a healthy habitat, the act is not for the light of heart. So when I showed Megs the action shots of cleaning said animal she was concerned for our viewers. Please note that this blog post contains pictures and descriptions of responsible hunting and if you are not interested please join us again on our next posting!

A few months ago Megs and I started to notice a trend. When I was able to get out early on Saturday morning for some “woods” time, I was a lot more enjoyable to be around during the rest of the weekend. I love my job but it comes with a lot of desk time and I really need to get out into the fresh air as much as possible to balance my sanity.

One of my absolute favorite spots to spend time outdoors recently is my buddy’s mom’s place. It is 120 acres of rolling woods and fields, northeastern Iowa cliffs and river valleys. It is a great spot all year round. My buddy AA introduced me to squirrel hunting last year and I have grown to love the activity. Most people, including myself would never dream of eating the garbage-fed tree rats in the city suburbs, however around here country squirrels are considered free range in most people’s minds.

Not an attractive woods selfie, it doesn't get much better
The idea is to get out to the woods in the dawn hours and find a grove of oaks to sit quietly and wait. Getting out early is important because you want to be in place before the squirrels wake up and come down from their nests because once they are on the forest floor they are impossible to see or shoot.

I have been out to hunt squirrels 8-9 times but only have come back with a squirrel in hand once or twice. There are always squirrels out there but grey squirrels are small and not worth the effort for the most part. Red squirrels are where it is at, but more accurately, the hunting part of the event is overshadowed by sitting quietly out in the woods and watch the world transition from night to day. Birds start to chirp, turkeys cackle, deer grunt and spit (not a majestic creature the deer), and all the nocturnal animals head to their dens.

On this outing the weather had turned cold and not much was moving around, including the squirrels. I was the only idiot not tucked up in their respective beds staying warm and dry that morning. After about an hour of meditation I stood up, stretched and decided to take a meandering valley out of the woods and back to the car. Bushwhacking through scratchy terrain is most people’s idea of torture, especially my sister, but I was having fun. Suddenly there was a flash of fun nearly under my feet. During my heart attack I realized it was a decent sized rabbit… good enough for dinner. Pop!

Once ol’ fluffy was bagged up I headed home. Megs always told me she was fine with my hunting as long as I didn’t bring anything home. Rabbit, however, is one of those animals that show up on high class menus so I thought I could swing it, and to my excitement Megs was on board. She even picked the recipe, beer braised rabbit with rosemary gravy. I set out to prep the beast for cooking. Some water, gloves, my knife and a plastic bag for the offal. I decided to lay down a spare scrap of house wrap to catch all of the what-have-you’s and keep my shop floor clean. I won’t go into detail how to clean a rabbit, you can look online…I did.
Furred

Un-wrapped

Once prepped and washed thoroughly in the sink, I cut it in 6 major components then drenched it in egg and rolled it in flour.  I heated some olive oil in our favorite La Cruset dutch oven and browned the rabbit chunks, in batches on both sides. Once that was complete I added all the chucks back into the pot and covered it with salt, pepper, rosemary, a bottle of dark beer, and a container of chicken stock. An hour later yielded a cooked rabbit, and it was now time to use the cooking stock to make gravy… I love you gravy.  Make a rue, add it to the stock, ka-pow, gravy!

Looks a little more store bought now

I liked the rabbit flavor and the gravy this recipe made was outstanding but I think the cooking instructions for the rabbit made it tougher than it could have been. We all ate it but I was the only one who ate the leftovers. One of the ladies at work makes a rabbit “McNugget” that are fabulous and I will plan that for my next foray into loveable edibles. My next foray could fairly come soon as I just found a rabbit superhighway in the back part of our property.


Stay tuned to hear all the antics of my first deer season and the 3 projects I am behind on writing about!

Ap

Wednesday, December 18, 2013

Decorate Hard: With a Vengence

Christmas is in full swing here on the acreage.  We are shopping, baking and wrapping, all while watching our favorite holiday movies including "The Ref", "Meet Me in St. Louis" and "Die Hard".  Our definition of what qualifies as a Christmas movie is a bit broad, meaning it must have a Christmas scene in it at some point.  We have visited Santa (E asked for a water tower... we have no idea where that came from) and had a family outing to see "Frozen" in the theater.  All while this is going on, I have been decorating our home.  Last year, we didn't delve too deeply into decorating with a 2 1/2 year old and 4 month old so this year I was excited to make our little farmhouse feel festive.

Our first task was to get our Christmas tree.  One of the traditions Andy and I started when we had our first house in Dekalb, Illinois was going to a tree farm to cut down our own tree.  Growing up, my family usually had an artificial tree and on the rare occasions we had a real tree, it would come from a grocery store parking lot where the YMCA was holding their annual tree fundraiser.  Once we moved to Dekalb, we had the opportunity to go to a tree farm and we were hooked!  Now that we are in an even more rural area, there are several tree farms to choose from.  We usually go to pick out our tree on the weekend right after Thanksgiving and this year was no different.  In the years we have gone to cut down our own tree, weather has ranged from sub-zero temps to snowy to raining.  This year we lucked out, picking a beautiful, sunny, 40 degree day.  Our destination was Holiday Pines- a family-run tree farm right outside of town with an abundance of trees to choose from.  We picked up our saw, we headed up the hill to find "our" tree.

As we came to the first patch of trees, we saw it.  Perfectly shaped, sturdy and the right height.  Similar to wedding dress shopping though, I felt like we couldn't just cut down the first one we saw. Not that I didn't think we would end up with it, I just thought we needed to do the "experience" a bit more, walking through the trees as a family, really the start of Christmas in my opinion.  So, much to Andy's frustration and confusion, we continued to search for a few minutes more. E was pointing at EVERY tree saying, "This is the one!"  We turned back to our first tree only to find a couple sniffing over it.  Keeping Andy posted close to the tree, waiting for their final decision, I walked around with the kids a bit more, getting nervous that "our" tree would be taken and I wasn't finding anything I liked as well.  Over the trees, I heard a familiar "Caw, Caw!" (the Peterson signal for finding another family member in crowded areas) and I went racing back to the original tree.  Thankfully, the couple had moved on so it was ours!

A few back and forths with the saw and we were on our way home with the tree.

E helping to carry the tree down the hill
Unfortunately, this house doesn't have a great spot to put a tree so we move our dining room table out of the dining alcove and put it there.  I spent the afternoon stringing lights and putting up ornaments we have collected over the years with help from E.
E putting the angel on supervised by F.


I love putting up ornaments because I can remember where each one came from. We always buy ornaments when we travel- the lederhosen man from Austria and the cotton angel from South Carolina- and I always get ornaments for Christmas from my sisters- the set of 12 spoons each with a verse of the Twelve Days of Christmas stamped on.  I even have a collection of red birds which were gifts from students during my years of teaching at Wredling Middle School (school mascot- red hawk).  I have never done a "theme" tree (colors, etc) and never plan to- I love my ornaments.
Sneak peak of our newly painted white window trim and door!  More to come later!


Throughout the house, I have several pockets of decorations.  A garland over the living room windows which is a piece of trim strung with hooks across the windows with paper trees, decorated with stickers by E several years ago, held on with clothespins.

On the desk in the living room (which I will be posting about soon!), I have a few of my favorite nativities and some various decorations picked up at Michaels or Hobby Lobby over the years.

Above the desk is a mirror that is there year round, but during the holidays houses all the Christmas cards we receive.

Attached to the light and fan in the living room are several vintage glass ornaments.

Outside, next to the front door, I placed a potted evergreen on top of a stool we found in a shed.

I also decorated a faux-evergreen wreath I have had for years with some flowers I picked up at Walmart.  I redecorate the wreath every year depending on the style I want by picking up flowers/ribbons at a local craft store and cutting apart, placing, etc.  I use picture wire to hold everything in place which is also easy to take apart the next year.

I used ribbon to hang the wreath to the door- tacking the top of the ribbon down over the door with a small nail.

I think the wreath looks fantastic on our newly-painted front door!  I would have really liked to add more greenery outside the house but I guess that will go on the list for next year!

Finally, our biggest DIY project was creating a faux fireplace to hang the kids' stockings on.  Unfortunately, this house doesn't have a fireplace, so no obvious place to put stockings.  Last year, I just put the stockings randomly on a wall, held in place by 3M hooks.  This year, I was determined to do something more special since E is really starting to get into Christmas.  Going along with our standard operating procedure, I told Andy to build a little mantle on a wood board that I could paint up.  Continuing with the SOP, Andy took these vague directions and planned out a fantastic design.  Oddly enough, that day when reading my favorite blog, Young House Love, they had created a faux fireplace in a similar design!  Taking our two designs, this is what we ended up with.

The terrible artist that I am, I pretty much copied the flames from the Young House Love design- which was much more artistic than my plan- using basic craft paints in grey and orange-red.  While Andy was out hunting, I sent him on a mission to bring home some good sticks and as usual, he didn't disappoint.  He cut the sticks in half so I was able to hot glue them to the board (update: they are not sticking very well so we are going back with wood glue so they don't fall off).  I painted the outside trim and mantle in beige and used small tacks to attach the kiddos' stockings to the mantle.

When E came down the next morning, she immediately saw the new feature and asked, "Will Santa come down there?"  "Yes baby, of course he will." ;)