In all the houses Megs and I have stayed in or bought beige
has been the color pallet of choice. That was the same with our new house.
However this color scheme expanded in the master bath with an old dingy looking
beige vanity top mounted on an fake oak 2-drawer vanity. As with most projects
in our lives, if it functions well enough we leave it alone until it drives us
nuts.
As per Megs usual MO, she shows up with a crusty old bathroom sink wedged in the back of the car. Piled on top are various bits of
family life, a stroller, box of diapers I can barely lift, and food scraps
strewn about like a pack of raccoons got into the car. After busting a nut and
getting this thing out I set up the saw horses, busted out the Barkeepers
Friend and start scrubbing. After 10 minutes this thing is looking pretty good!
With E’s help we pulled out all the stuff from the old vanity
so we, yes we (meaning E and me), would have room to work.
Let’s begin; Place a
towel down for leaks, shut off the water, unbolt the water lines, unscrew the
trap and pull out all the drain plumbing. A good pro’s trick to avoid the sewer
smell when plumbing is to shove an old rag or paper town down into the waste
stack. It will stop the gasses from escaping but it will also stop the water
from traveling down so leave a bit sticking out to remind you to remove it
before re-installing the new plumbing!
Out with the old is the old
saying, unfortunately the disco sink was glued down with construction adhesive and
didn’t want to budge. (Anger!) I grabbed my trusty Ridgid Jobmax with an old gummed up
blade and made short work of cutting through the junk.
Once the old sink was
free and clear out in the yard, we look like hillbillies sometimes, I used a
chisel to clean up some of the remaining dried globs of adhesive from the
vanity. The vanity was as level as it was going to get so I dry fit the sink on
top. With that good to go I could start to put the whole thing back together.
Hoping the next guy would curse me like I did him I caulked
on a liberal amount of heavy duty construction adhesive and set the sink in
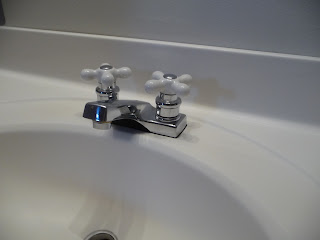
place. Next, I inserted, centered and tightened the "new" faucet (another ReStore find) onto the sink
and set about plumbing the fresh water lines.
Once all connections were water tight I installed the old drain in
the new sink. Using the adult version of silly putty, plumber’s putty, I rolled
a thin snake with my hands and
applied the putty to the underside edge of the drain. This is the location that
comes in contact with the sink and ensures a water tight seal between the two
components.
The last step in the process was to reconnect the P trap and
waste stack. Now is the moment of truth… turn on the water valves, crack the
faucet and let the good times roll. A little dripping from the connections at first is pretty
normal, at least in my opinion. I always go back through and check to make sure
all connections are tight and there are no spiting water leaks. Viola: new
vanity.
As you can see by the picture above there used to be a mirror on the wall that had to come out when the sink was replaced. Stay tuned for more of my (Megan's) design genius on bringing that into the modern era.
Ap


No comments:
Post a Comment